Manage an Investigation in DFIR-IRIS
Create a customer and case, record affected assets and evidence, build a timeline, collaborate with other analysts, generate a report, close the case, and preserve the database. The screenshots are presented alongside the steps where they are needed.
Use the phase headings to track your position. At the end of each phase, confirm that the newly created record is visible and correctly linked before moving on; screenshots show where to work, while your saved case record is the evidence that the step succeeded.
Use the screenshots as interface guidance
The values and final disposition shown below belong to the preserved demonstration. For a new investigation, choose classifications and outcomes only when your evidence supports them. The Full Lab uses a separate synthetic scenario with an explicitly bounded conclusion.
Work through an investigation in DFIR-IRIS
Adding a Customer
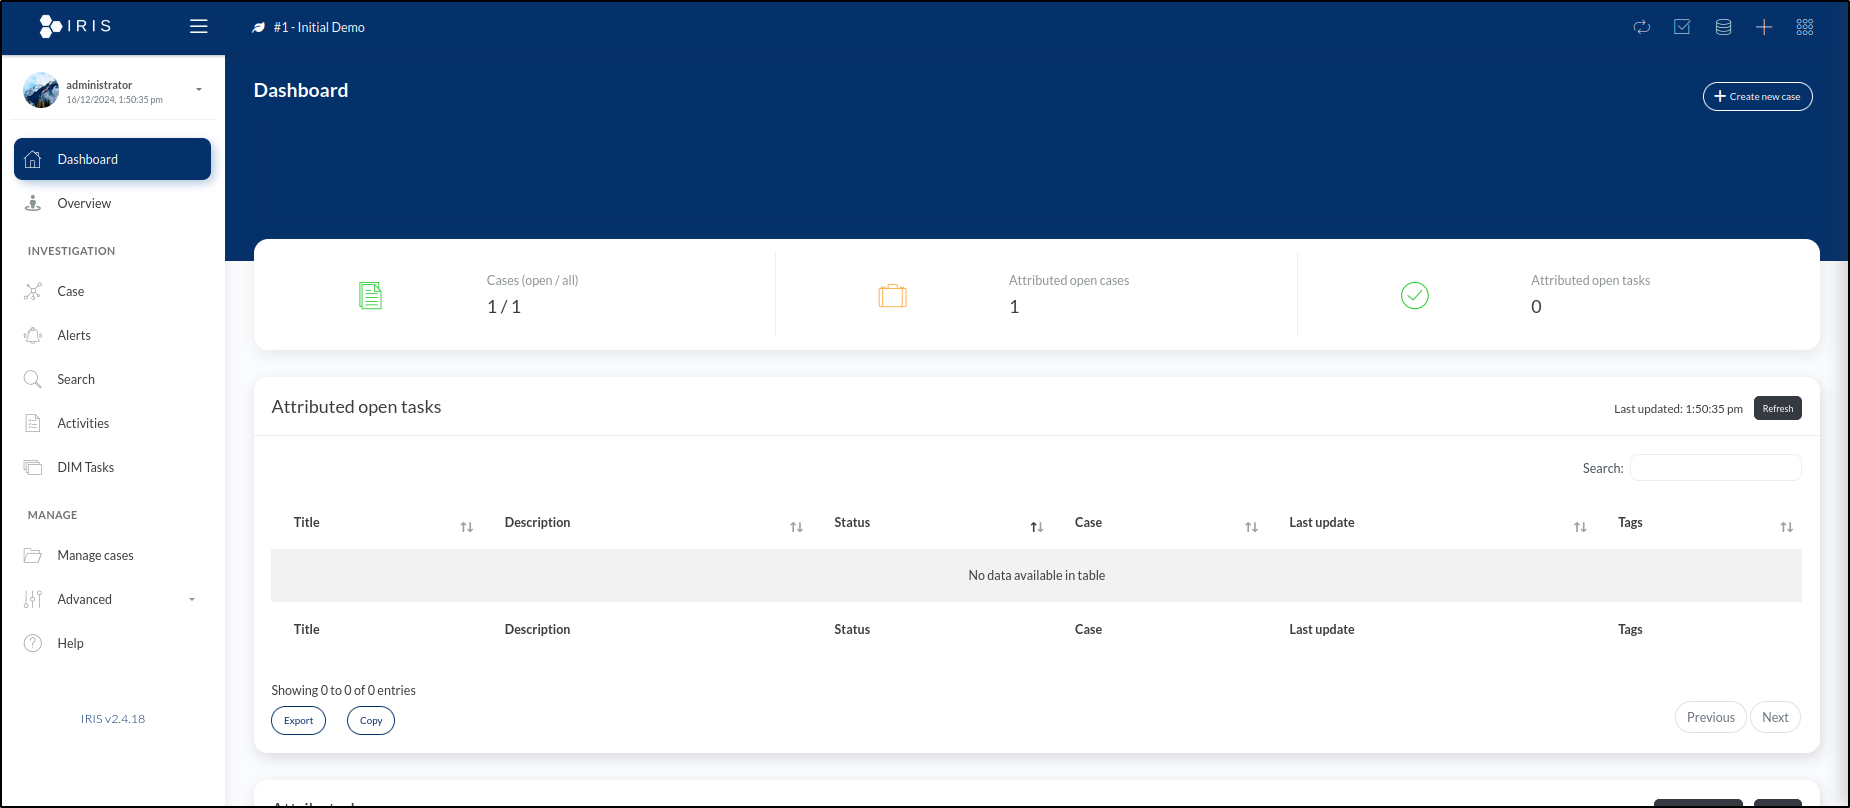
Upon entering the administrator credentials, the Dashboard highlights pending tasks and ongoing cases.
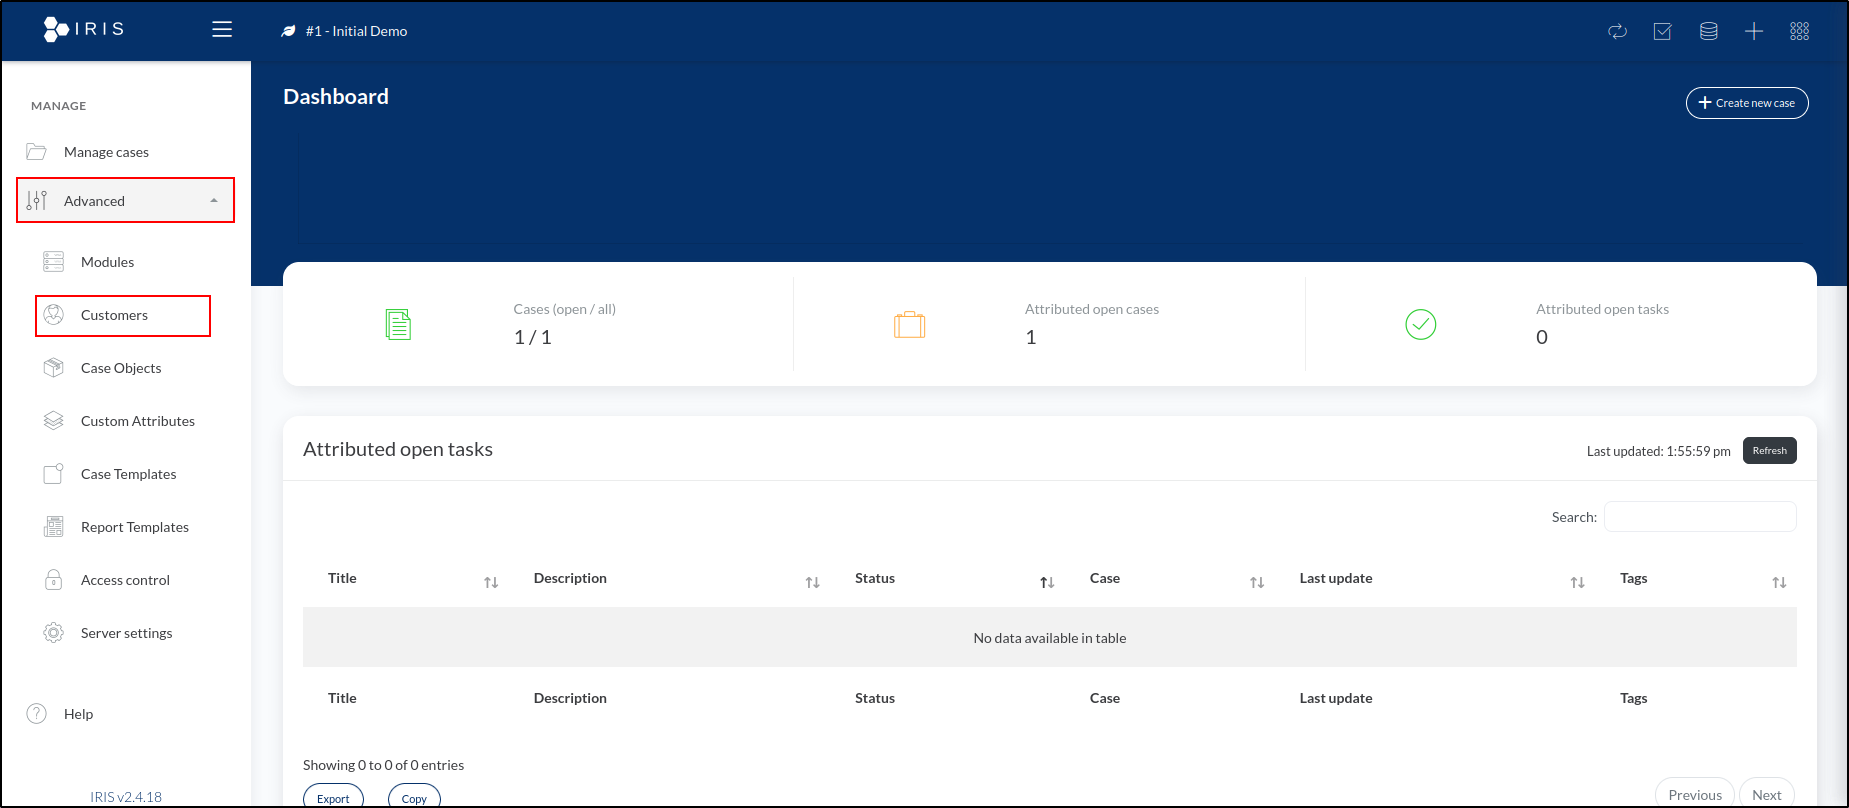
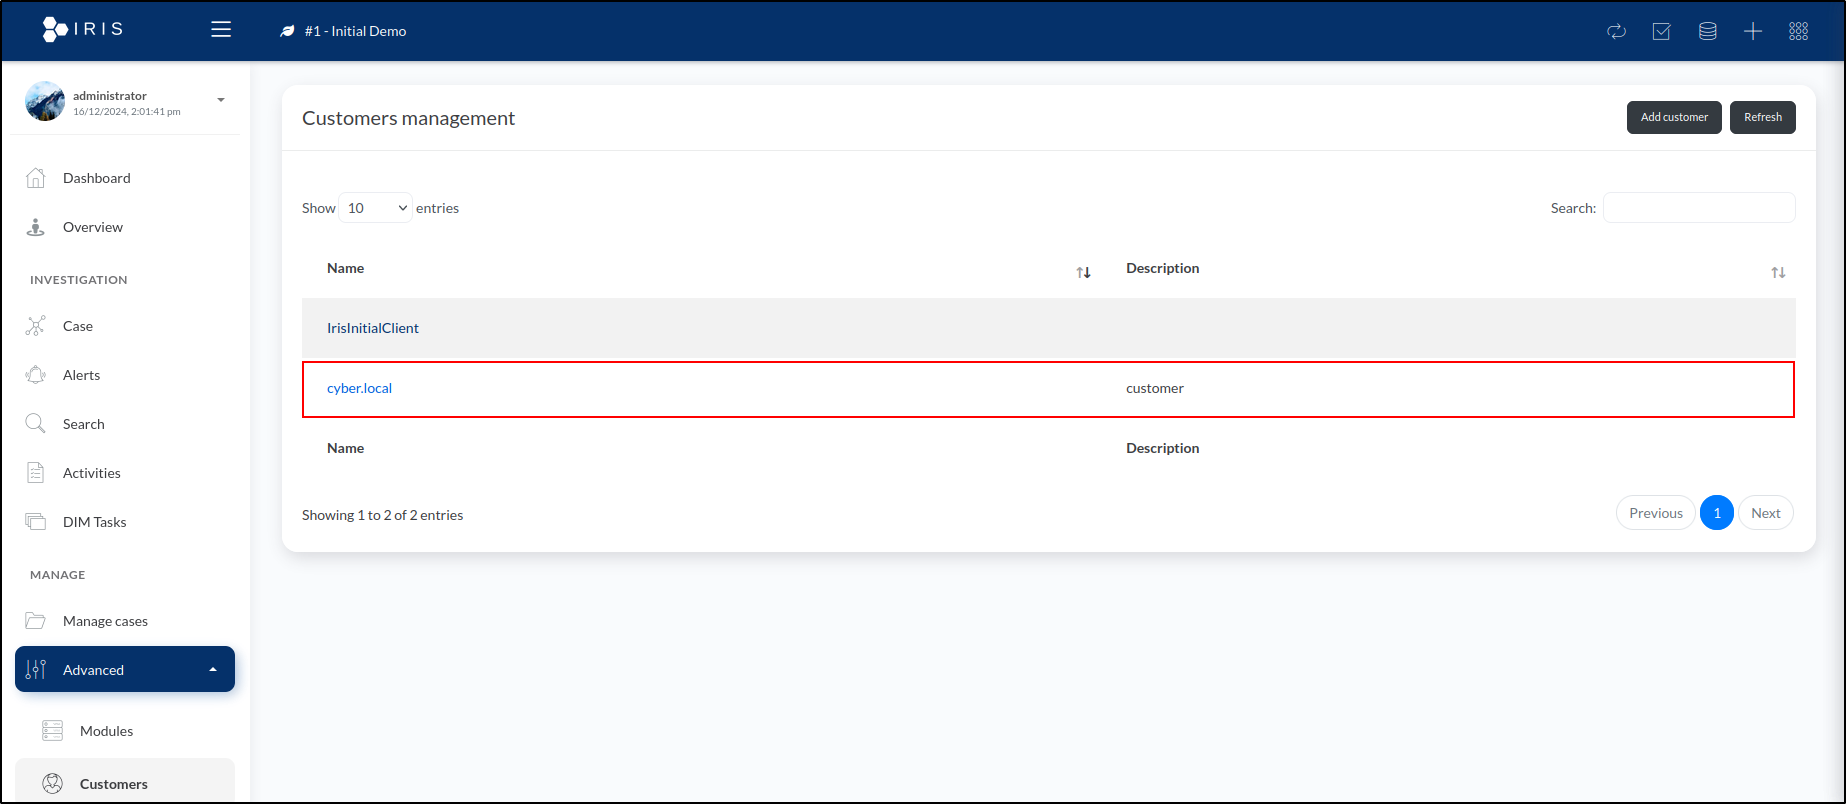
To access the customer management page, open the sidebar menu, expand the Advanced section, and click on Customers.
This displays a list of customers. To add a new customer, click Add Customer in the top-right corner of the window. In this window, we can input the customer's details. We'll name the customer cyber.local and add customer as a brief description. There's also an option to specify the Service-Level Agreement (SLA) with the customer, but since we don't have one in this instance, we'll leave it blank.
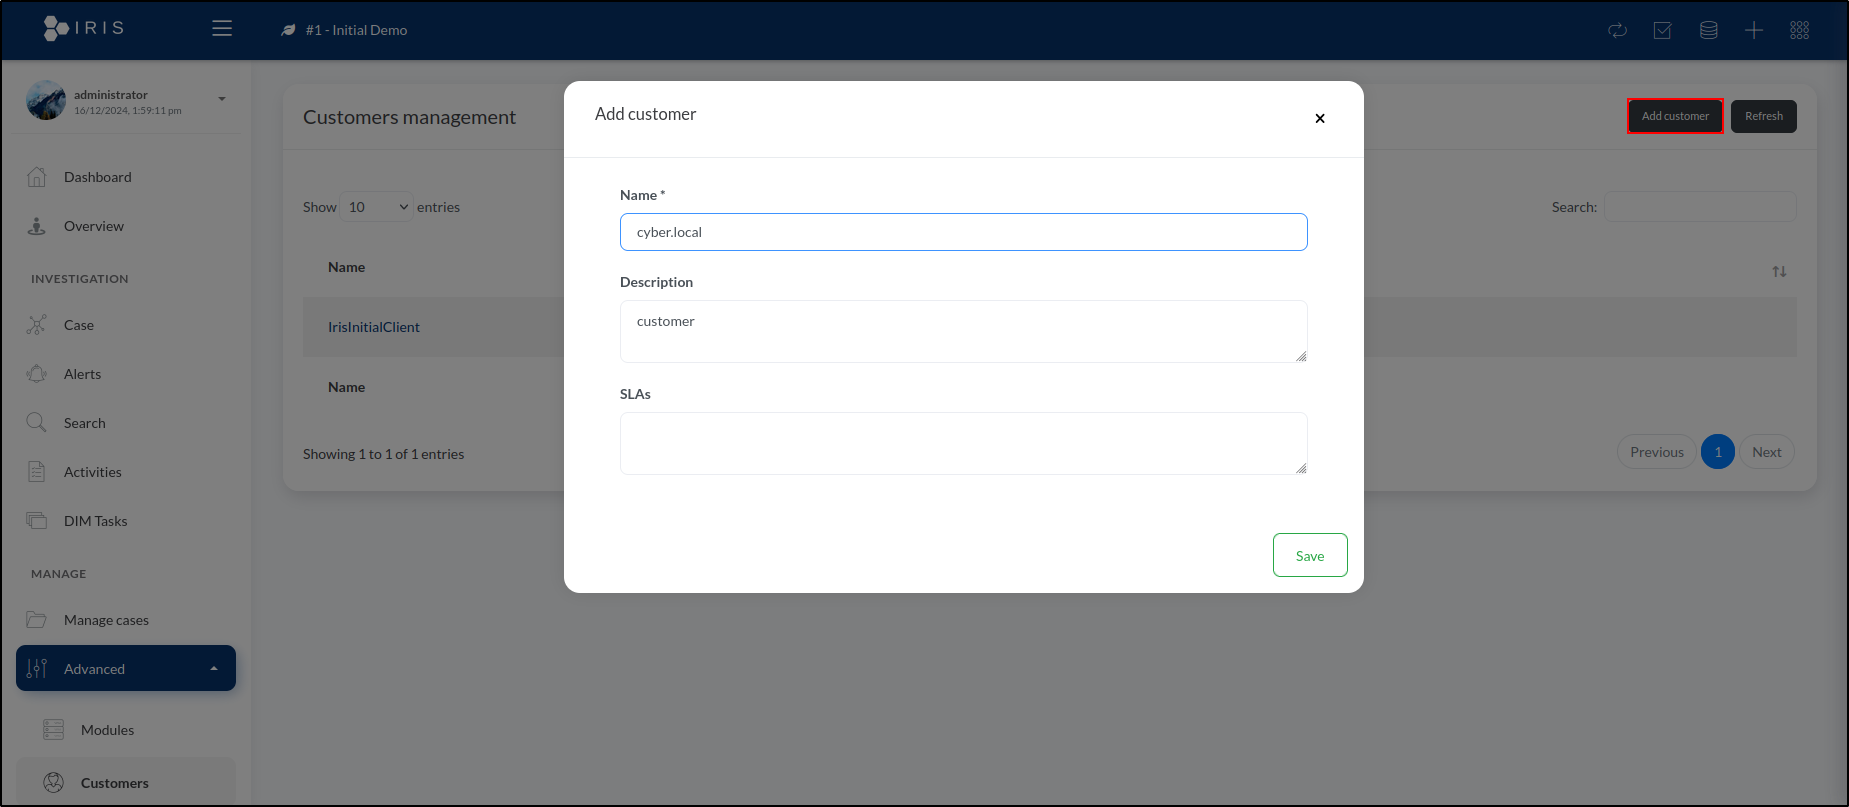
Click Save to create the customer. Once saved, the new customer will appear in the list on the Customer Management page.
Creating a Case
Having logged into IRIS and created our customer, we can now begin the case management process. A case is the fundamental unit of an incident. It serves as a container for various elements used to organise information related to the incident.
To create a new case, navigate to the dashboard and click Create new case in the top-right corner of the window. This opens a new page with several fields for entering details about the new case.
For Customer, select cyber.local. For Case Name, enter [2024-12-16] Data Breach. The Select Case Template option allows us to choose a predefined template for the case. Templates can automatically populate various elements, such as tasks, tags, a case title prefix, and more. Since this step is optional, we’ll leave it blank.
For Classification, select Information-Content-Security: Unauthorised Access to Information. For Short Description, enter Data breach from unauthorised SMB share access.
The last field is the SOC Ticket ID. In many cases, incidents are monitored through a ticketing platform like Jira or ServiceNow. While we're not using a ticketing system for this example, this is where you would input the ticket ID if one were being used.
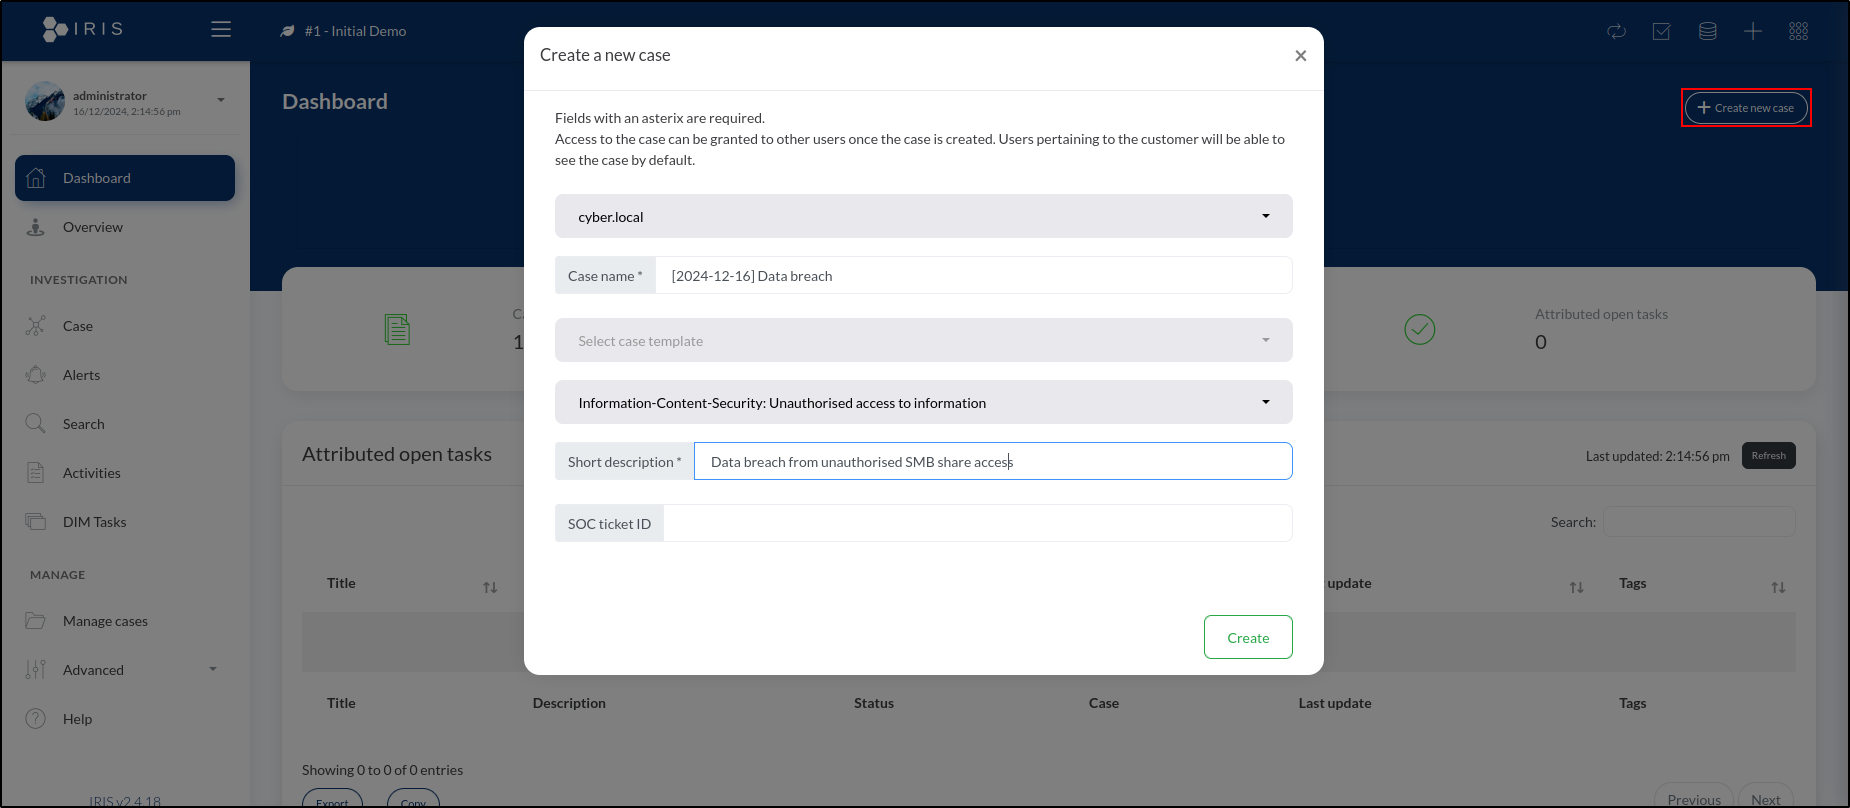
After completing all the required fields, click Create to add the case. A pop-up will appear confirming that the case has been successfully created.
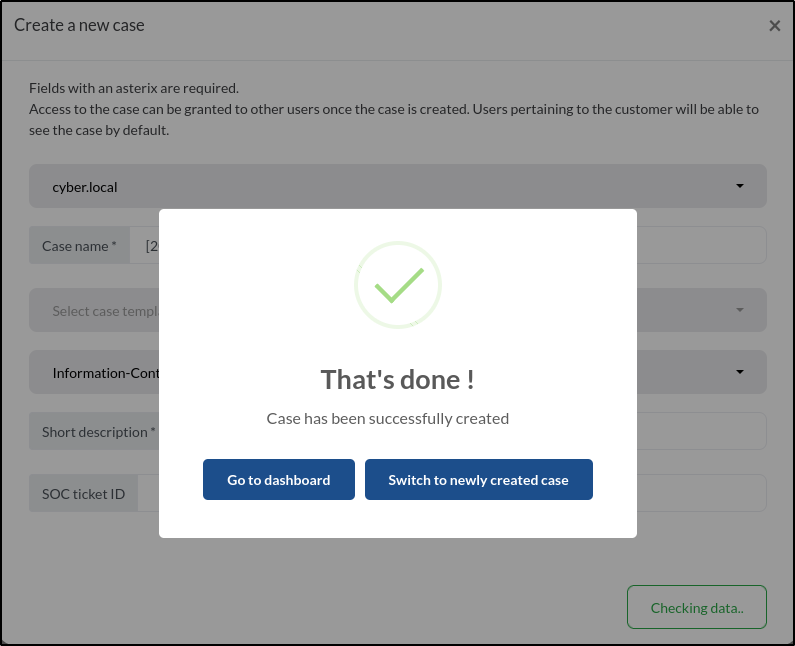
With our new case created, we can return to the dashboard by clicking Go to Dashboard in the pop-up or selecting Dashboard from the sidebar menu.
Our newly created case, titled #2 - [2024-12-16] Data Breach, appears under Attributed Open Cases. The prefix #2 is automatically added to the case title, reflecting its sequence in the total number of cases created in the system.
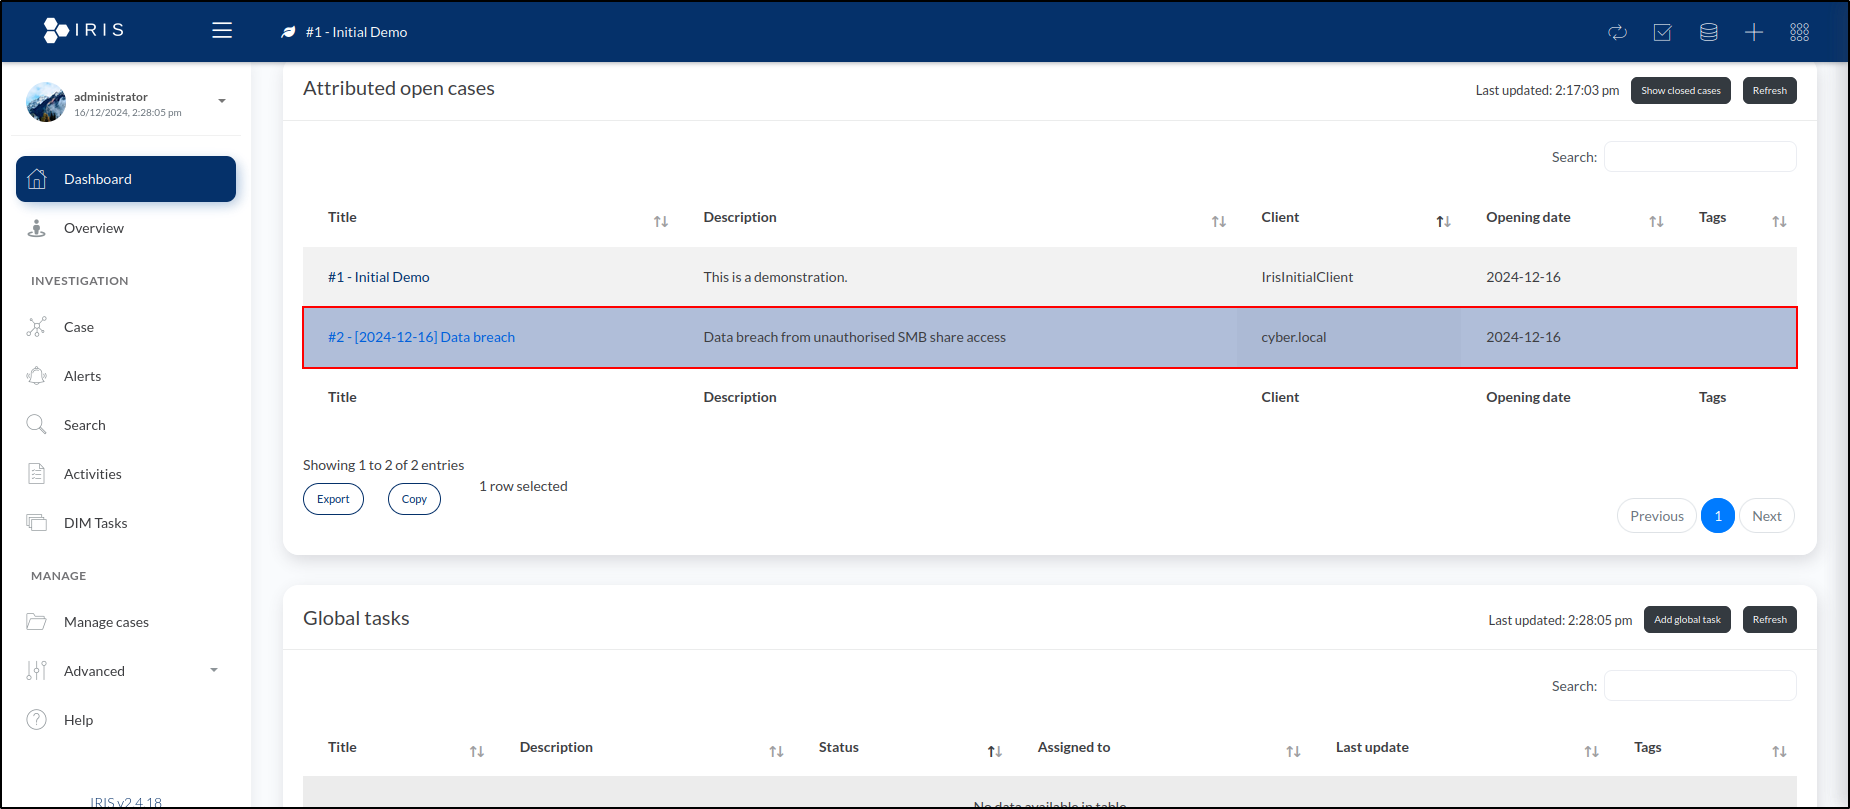
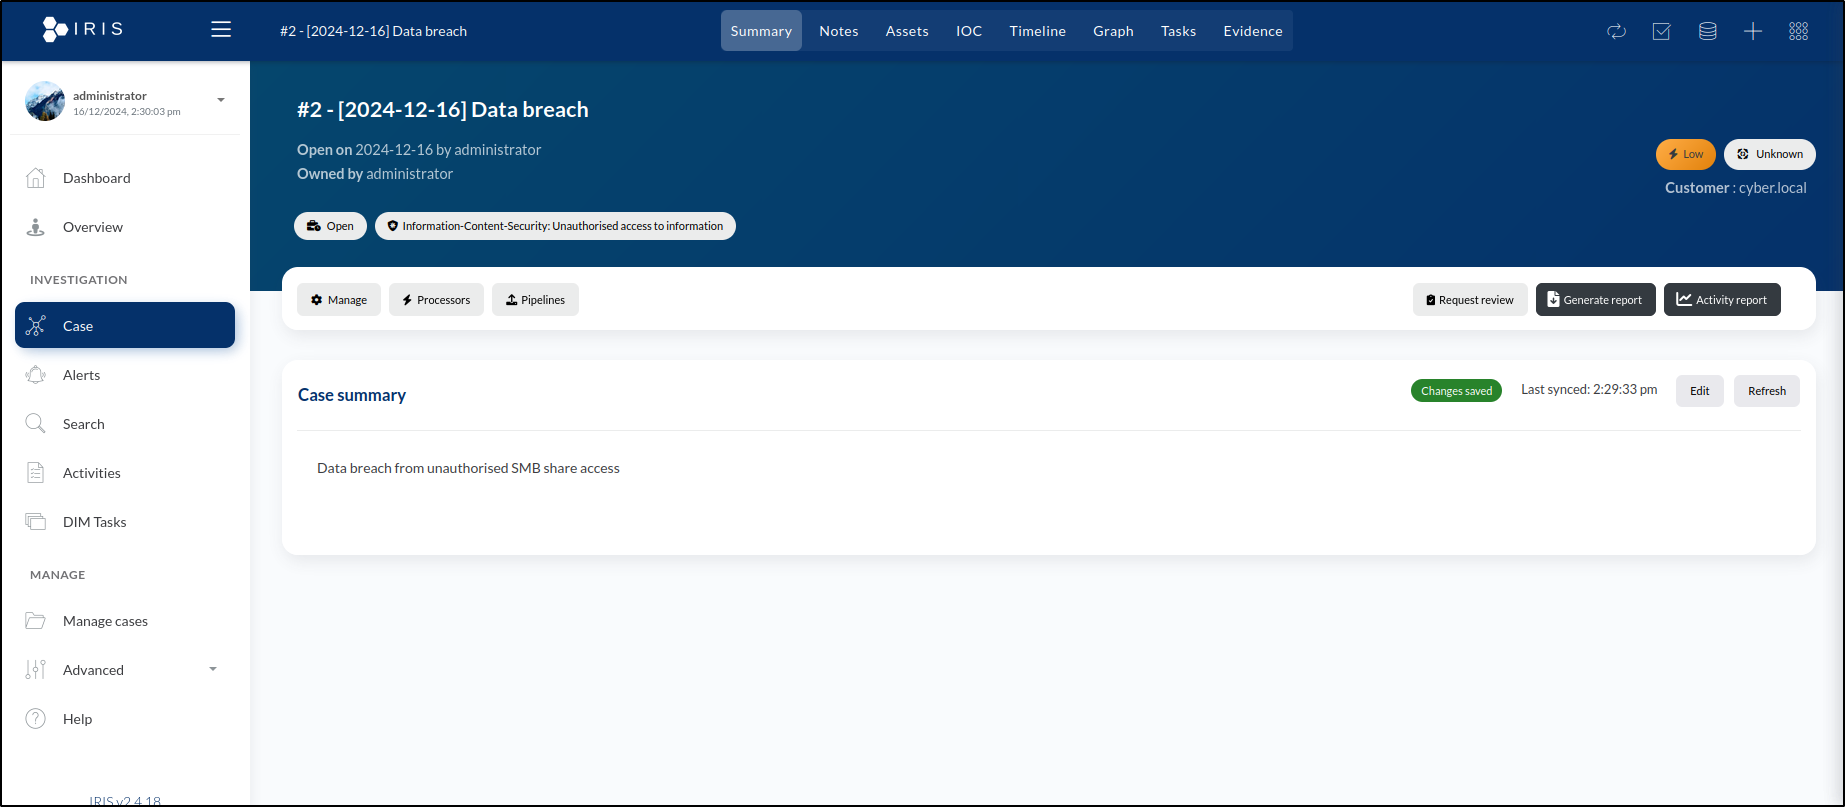
By clicking on the case name, we are taken to the Summary tab for the case. This page offers a range of options for managing the case.
Adding Assets
During incident response, maintaining a list of assets that are known or suspected to be compromised is essential. To add an asset, go to the Assets tab on the case page. This will display the asset list, which is currently empty. To include a new asset, click the Add Assets button located in the top-right corner of the window.
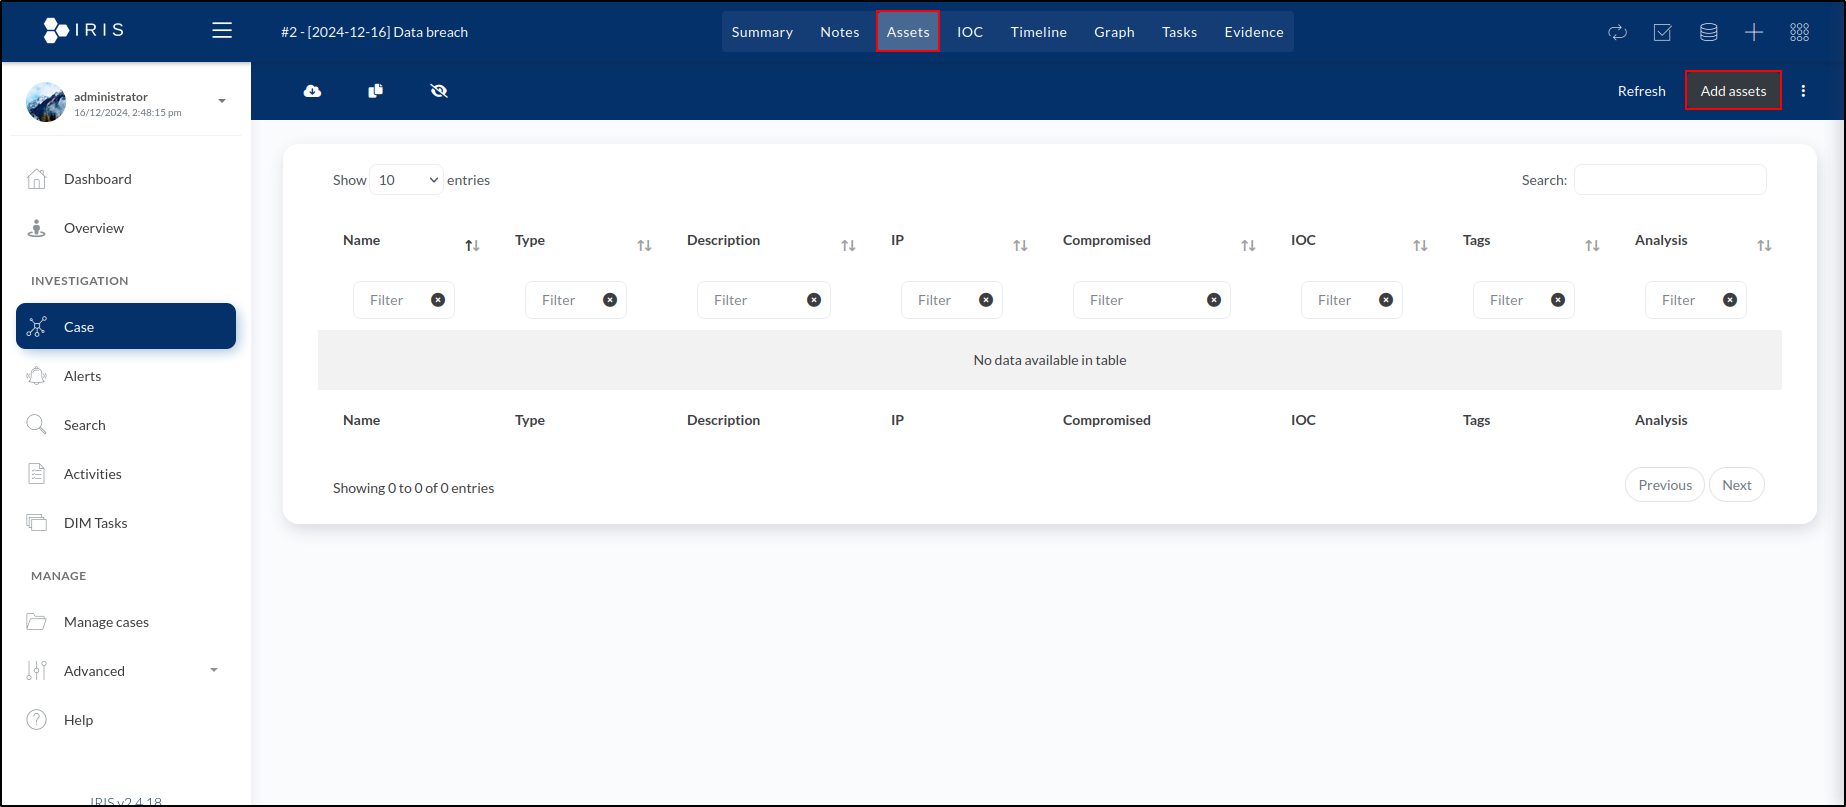
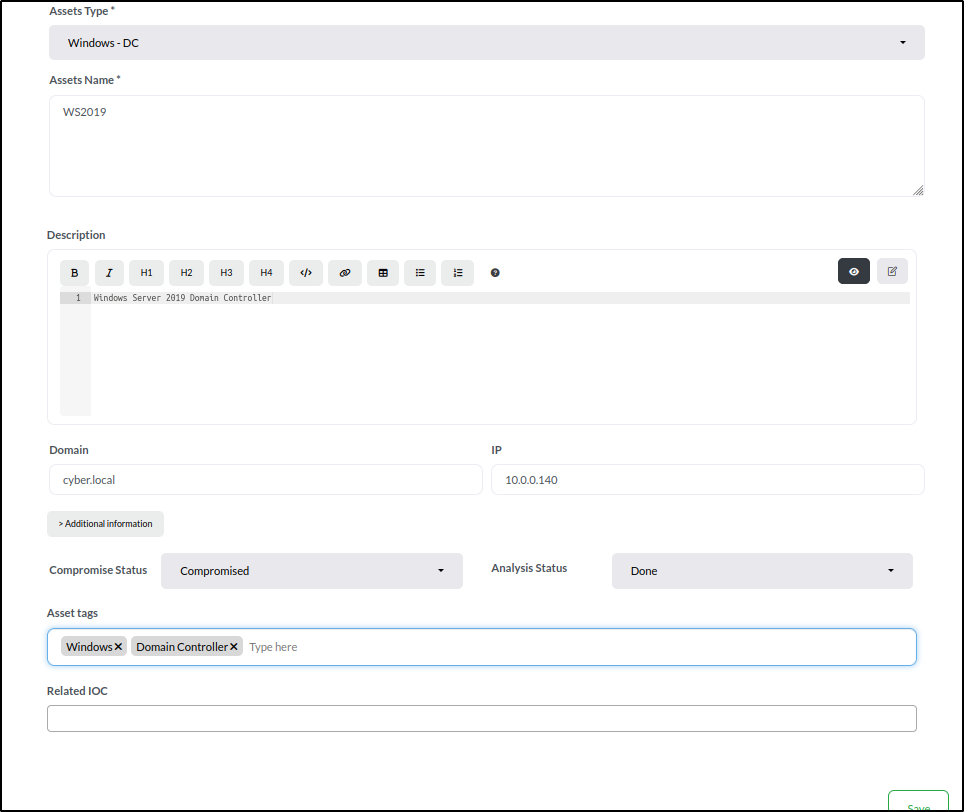
For the first asset, enter the following details:
- Asset Type: Select Windows - DC.
- Asset Name: Enter WS2019.
- Description: Add Windows Server 2019 Domain Controller.
- Domain: Specify cyber.local.
- IP: 10.0.0.140
- Compromise Status: Choose Compromised.
- Analysis Status: Set to Done, as the machine has been confirmed compromised and analysis is complete.
- Tags: Add Windows and Domain Controller.
Click Save in the lower right-hand corner of the window.
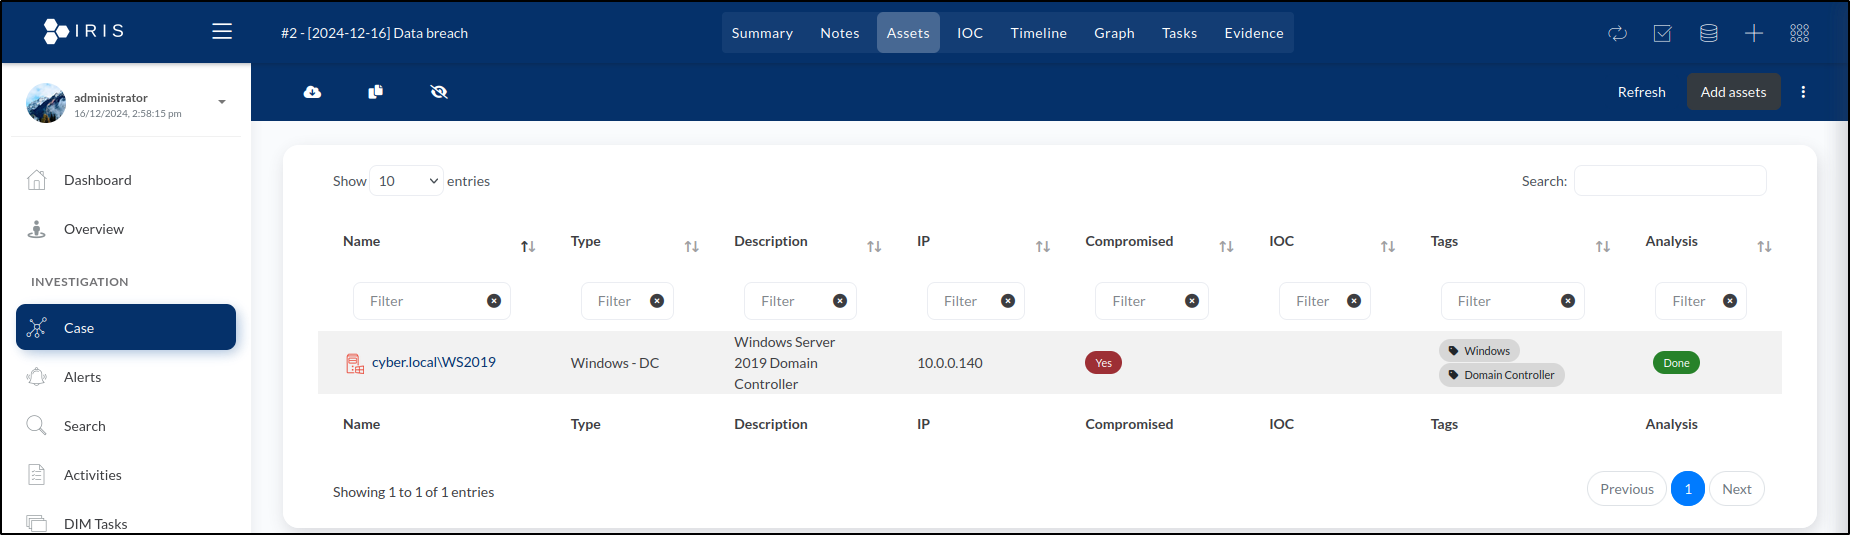
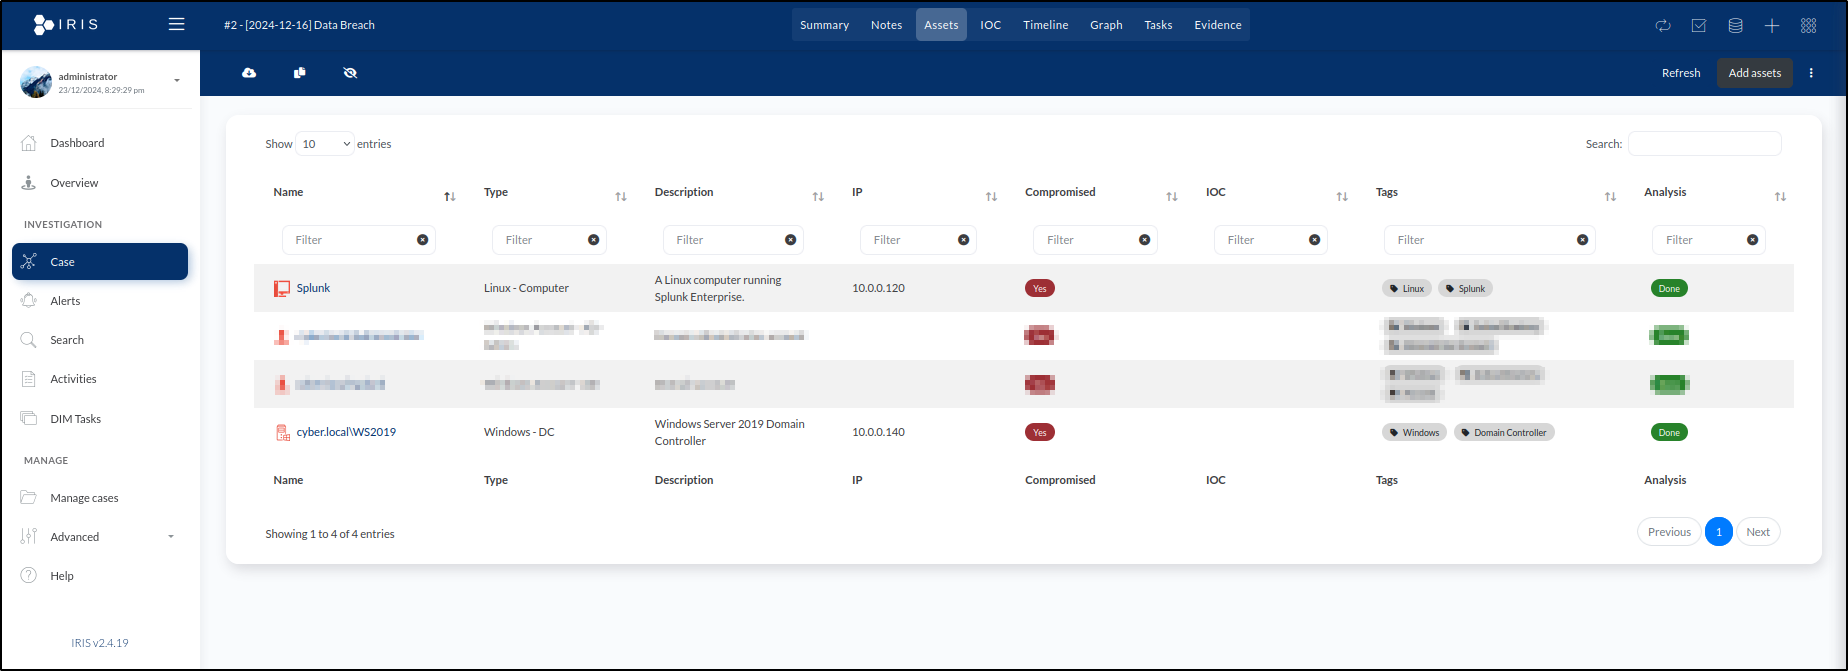
This creates the following entry in the list of assets:
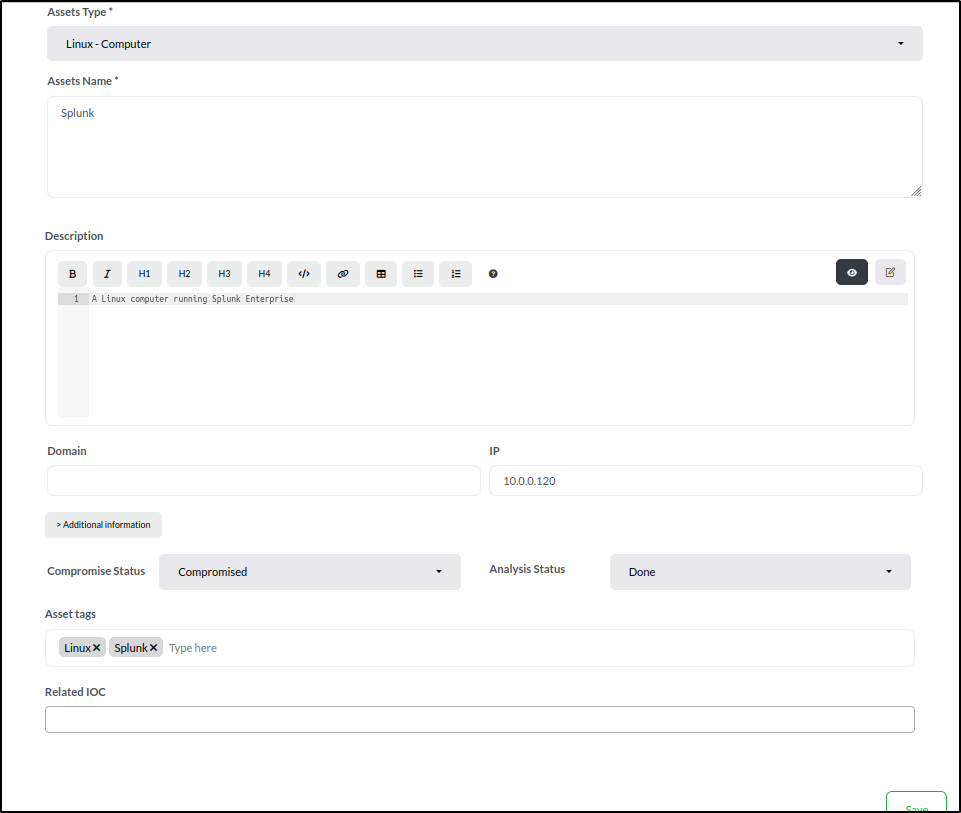
For the second asset, enter the following details:
- Asset Type: Select Linux - Computer.
- Asset Name: Enter Splunk.
- Description: Add A Linux computer running Splunk Enterprise.
- Domain: (Leave it blank)
- IP: 10.0.0.120
- Compromise Status: Choose Compromised.
- Analysis Status: Set to Done, as the machine has been confirmed compromised and analysis is complete.
- Tags: Add Linux and Splunk.
Click Save in the lower right-hand corner of the window.
The new asset will now appear in the Assets tab list:
Next, set asset details for the Domain account splunk:
- Asset Type: Select Windows Account - AD.
- Asset Name: Enter splunk (the username).
- Description: Add Domain account.
- Domain: Set to cyber.local.
- Compromise Status: Choose Compromised.
- Analysis Status: Select Done.
- Tags: Add Windows, Active Directory, and Account.
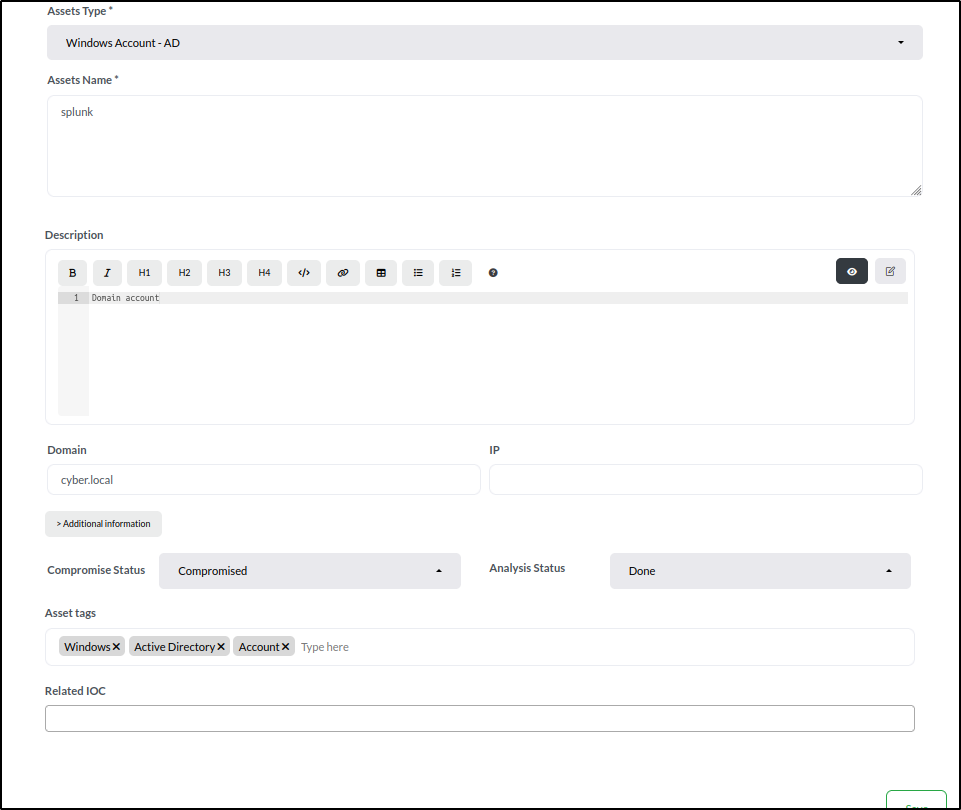
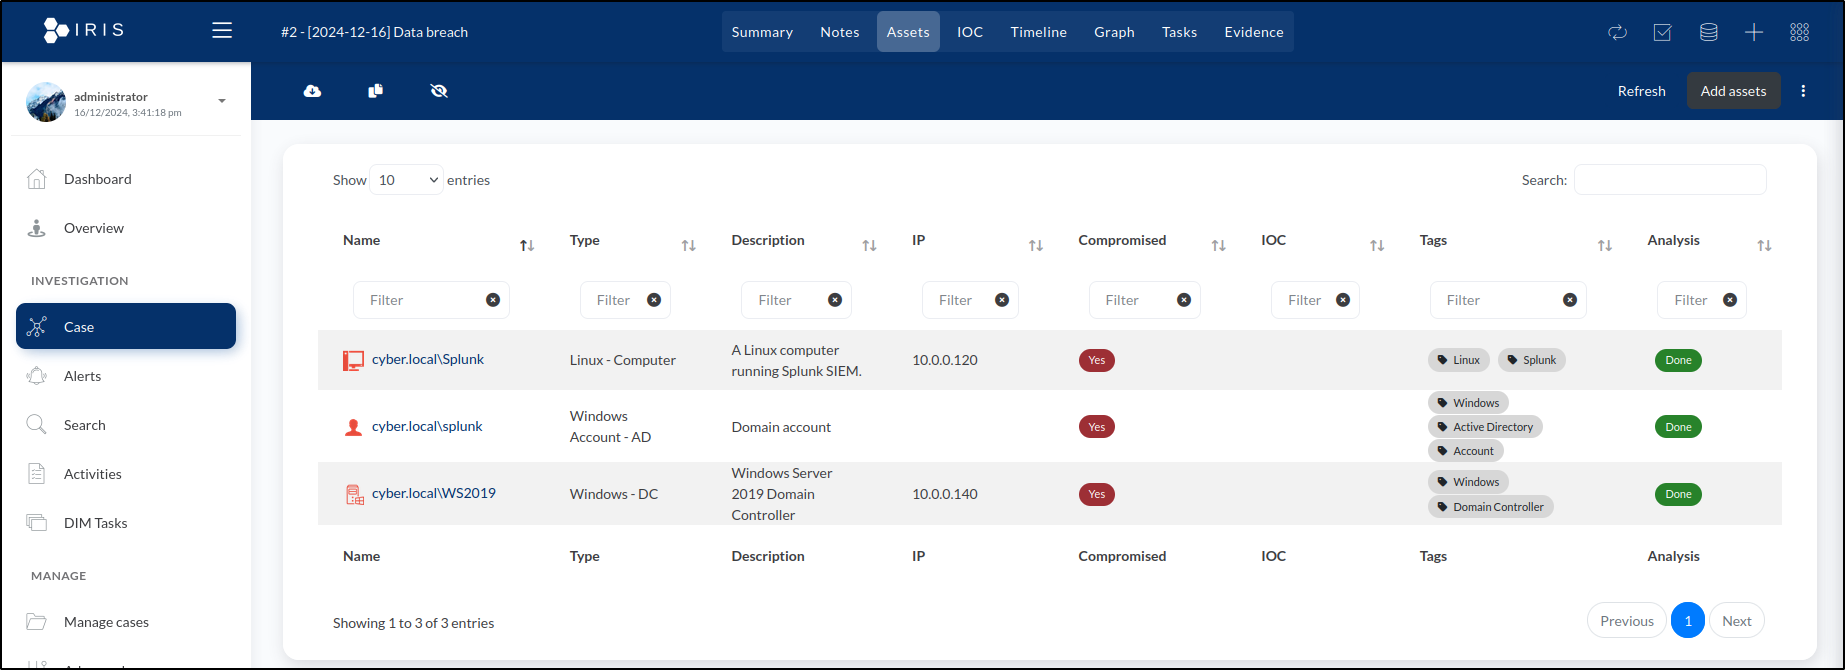
Click Save to finalise the entry. The new asset will now appear in the Assets tab list.
Next, set asset details for the Domain Administrator account:
- Asset Type: Select Windows Account - AD - Admin.
- Asset Name: Enter Administrator (the username).
- Description: Add Domain Administrator account.
- Domain: Set to cyber.local.
- Compromise Status: Choose Compromised.
- Analysis Status: Select Done.
- Tags: Add Windows, Active Directory, and Administrator Account.
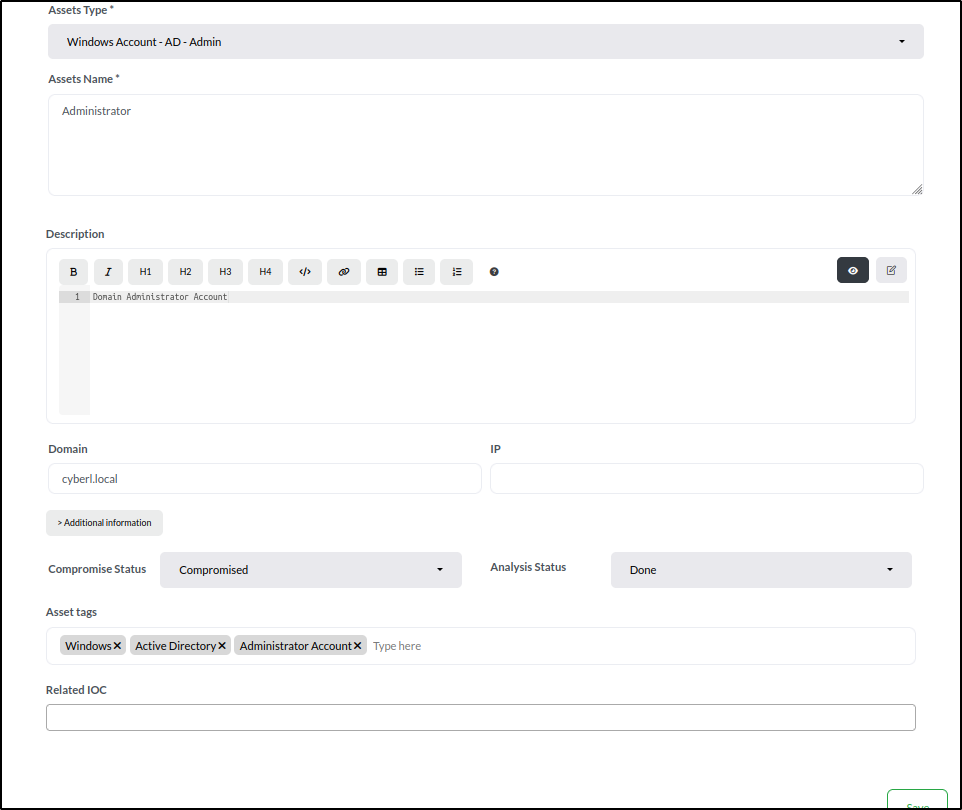
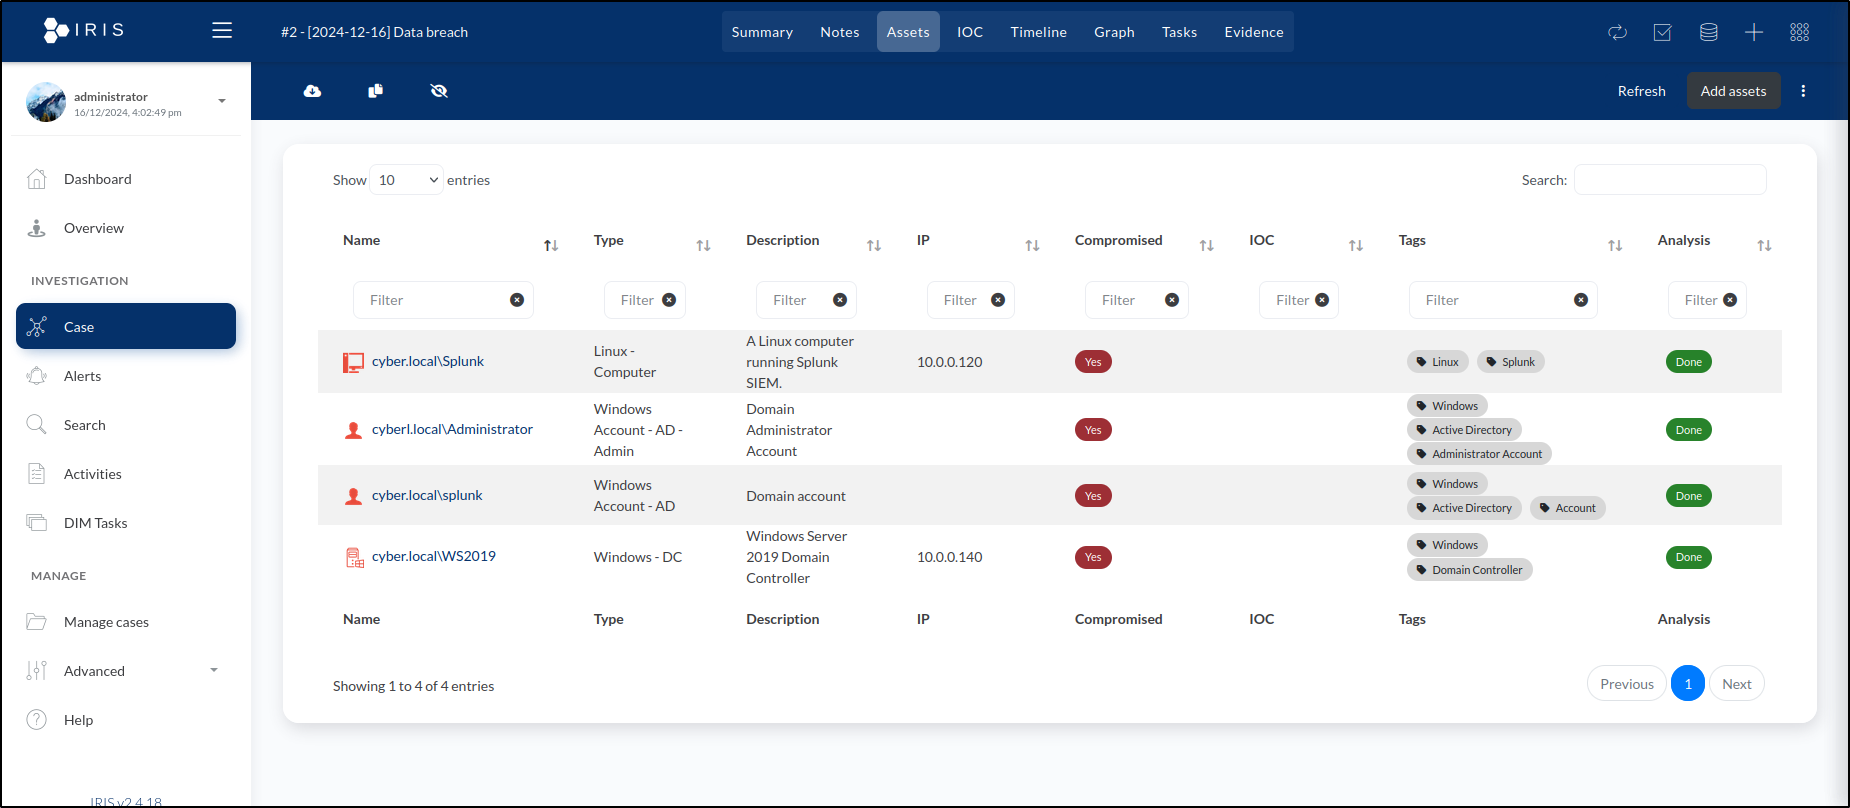
Click Save. Our list of assets in the case's Assets tab now contains a total of four entries.
Creating a Timeline
In IRIS, we can create a timeline by adding individual events to document the sequence of actions and incidents.
The first event is File Creation Event Detected for setup.exe on WS2019. To locate the log for this event, search the Splunk server using the following query:
Set the timeframe to All time to ensure the event is captured.

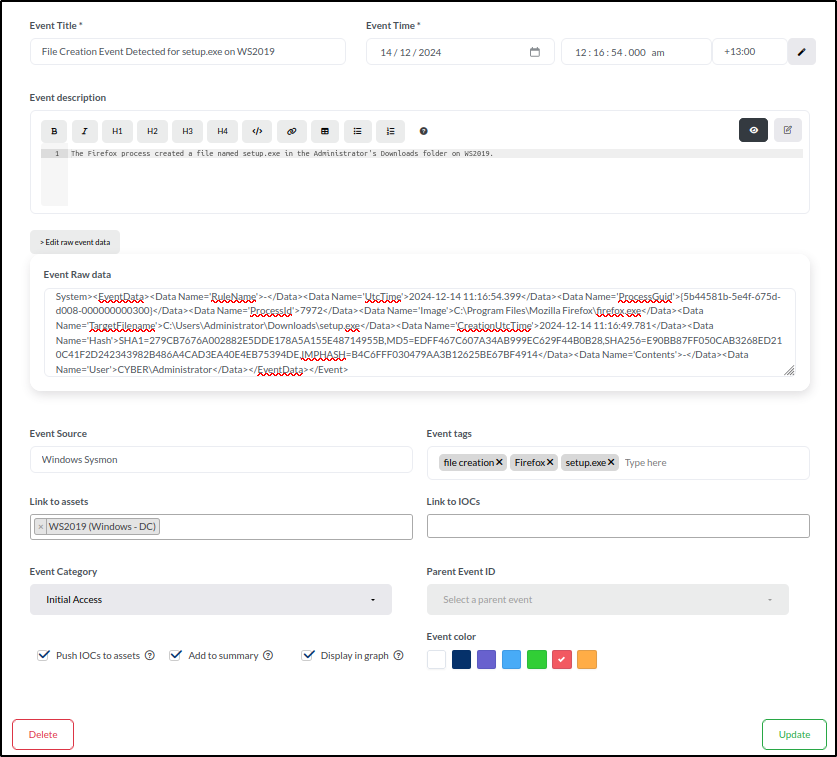
To create an event for this in the timeline, navigate to the Timeline tab. Click Add event and enter the following details:
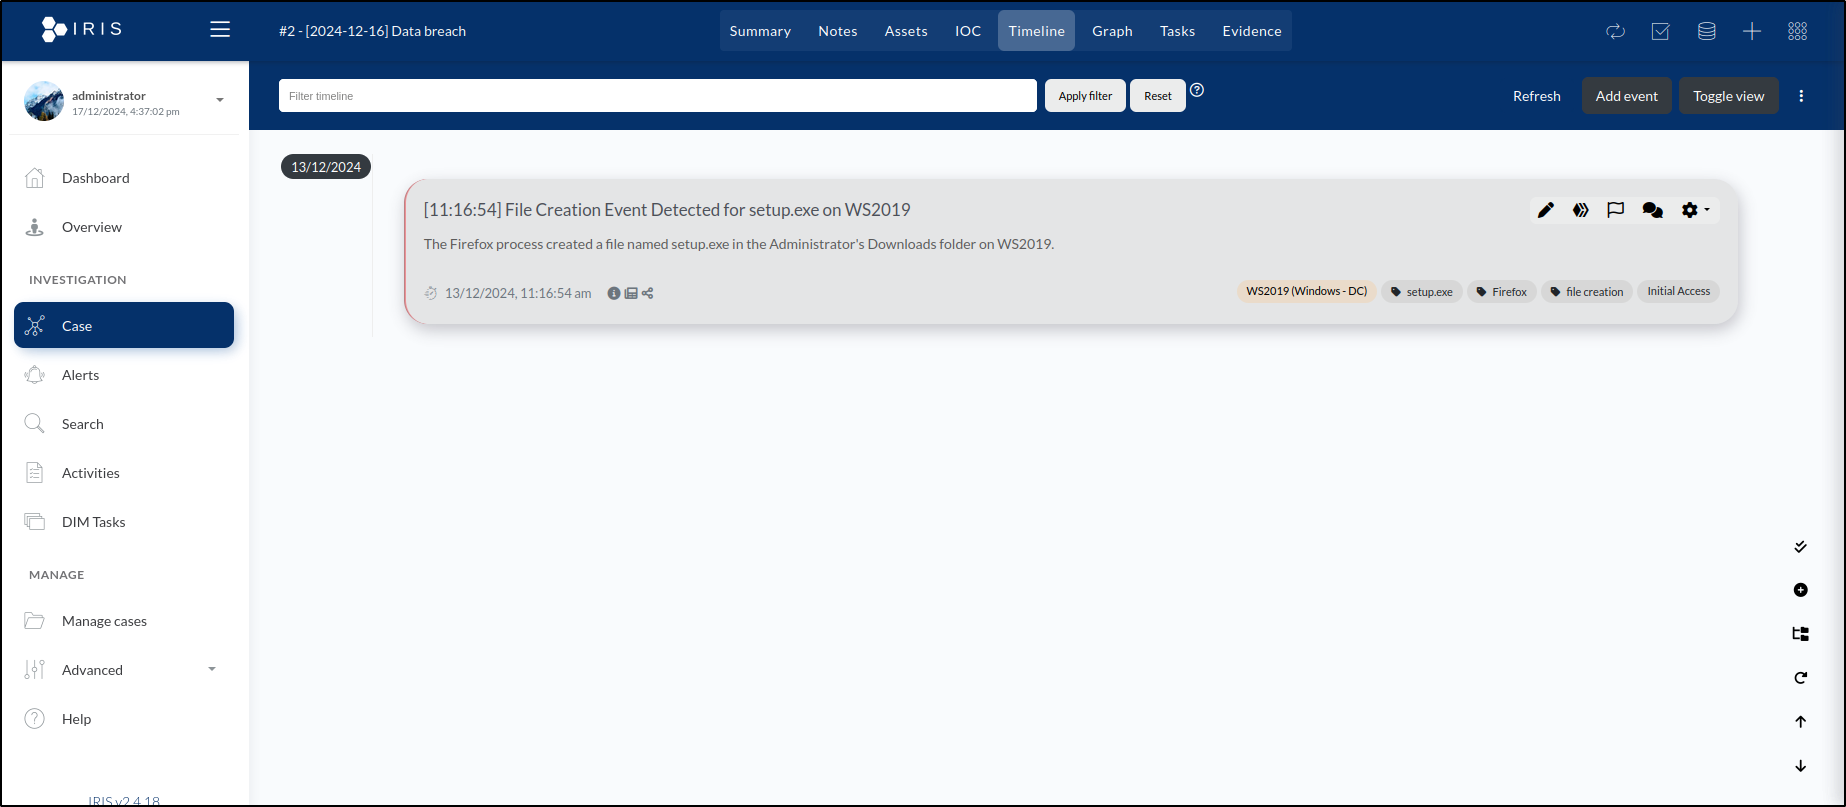
- Title: File Creation Event Detected for setup.exe on WS2019
- Time: 14/12/2024 12:16:54.000 AM with the UTC offset of +13:00.
- The most widely used standard for recording time data is Coordinated Universal Time (UTC). In this case, we've included +13:00 as the UTC offset. This is because the Splunk server is configured to New Zealand time, which generally has a UTC offset of +13 hours during Daylight Saving Time.
- Description: The Firefox process created a file named setup.exe in the Administrator's Downloads folder on WS2019.
- Event Raw data:
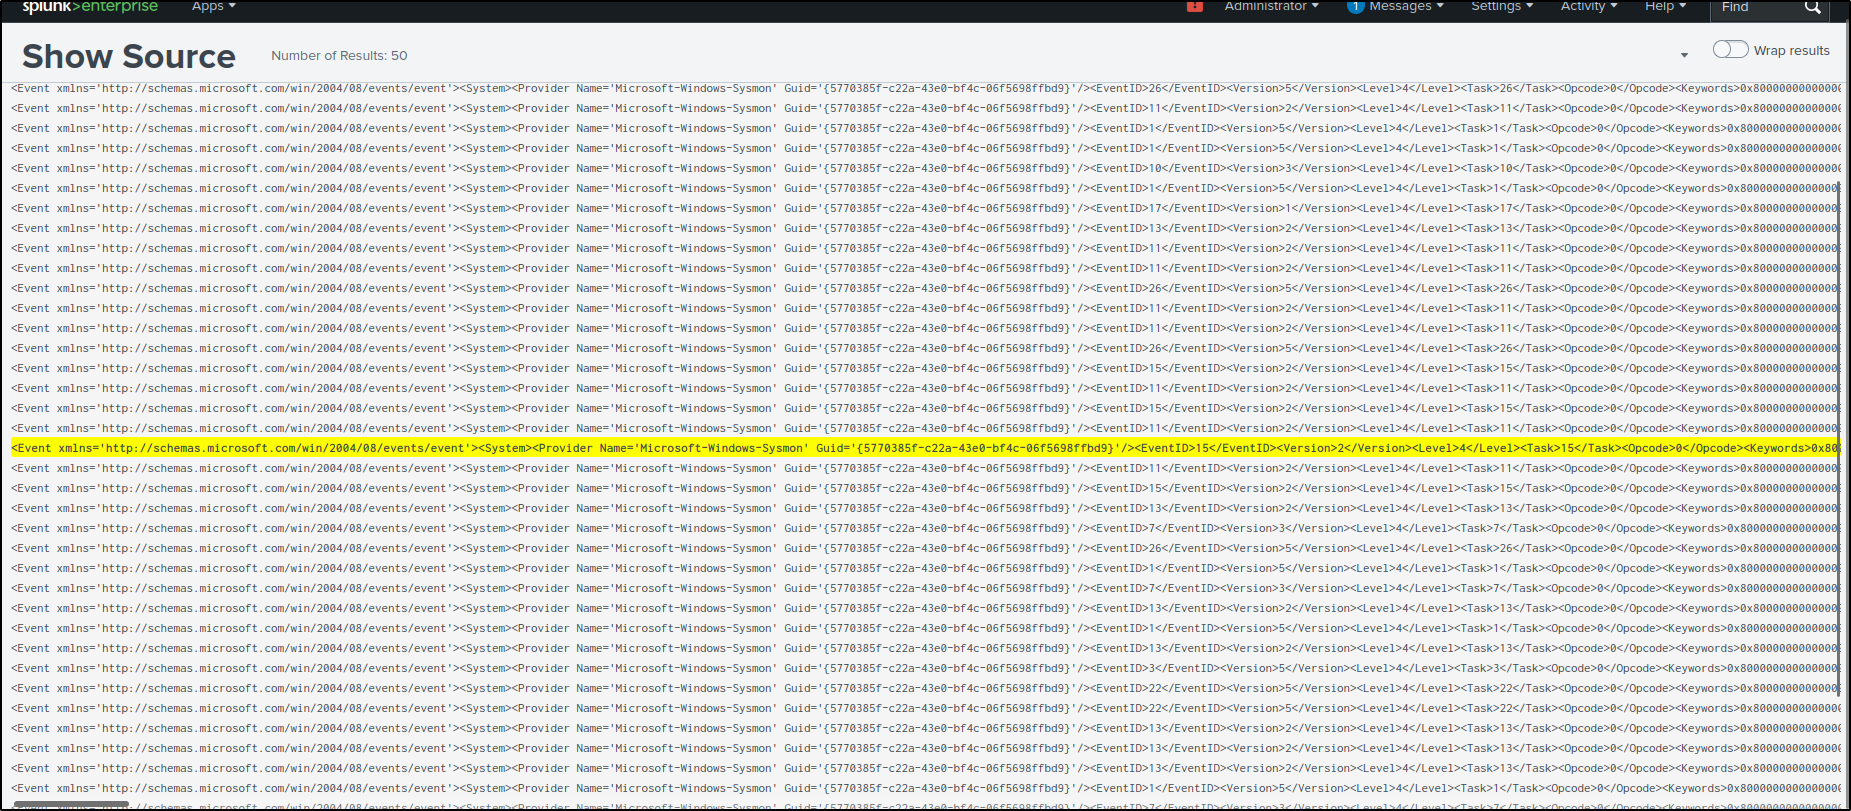
C:\Program Files\Mozilla Firefox\firefox.exeC:\Users\Administrator\Downloads\setup.exe - To obtain raw event data, clicking the > icon reveals the Event Actions dropdown. From the dropdown options, select Show Source to display the raw log.
- Selecting Show Source opens a new browser tab, highlighting the raw log entry. From there, we can copy the log and paste it into the raw event data field.
- Event Source: Sysmon
- Event Tags: file creation, Firefox, setup.exe
- Link to Assets: WS2019
- Event Category: Initial Access
- Select Add to Summary to include the event in the timeline visualisation.
- Choose Display in Graph to add the event to the graph view.
- Use the red box to assign a colour to the event for easy identification.
- Save
Upon saving, we are taken to the Timeline tab, where the event we just created is now visible.
The next event to document is Anonymous Login accessing C:\Shares on WS2019. To locate the log for this event, search the Splunk server using the following query:
Set the timeframe to All time to ensure the event is captured.
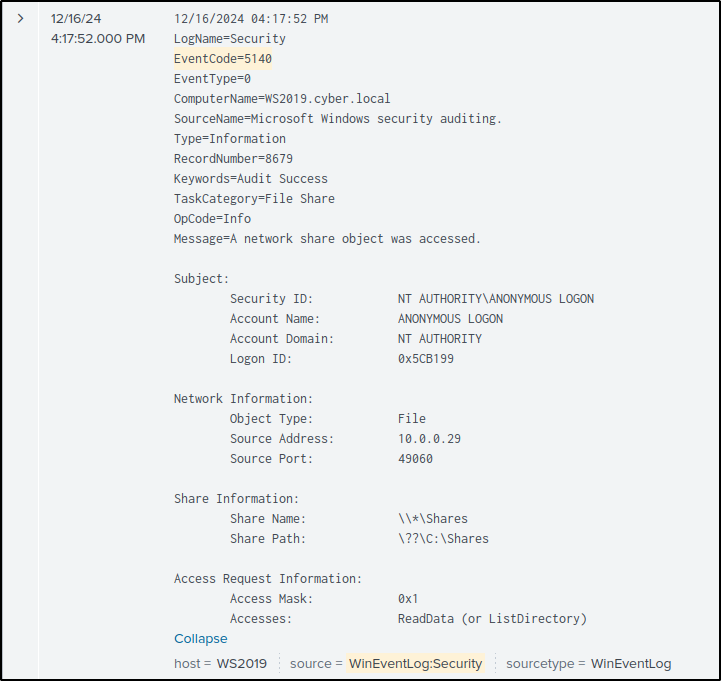
The log reveals that the event occurred at 04:17:52.000 PM. Expanding the log by selecting Show all 31 lines provides additional details about the event, including the Share Path, which is listed as ??\C:\Shares. Click Add event and enter the following details:
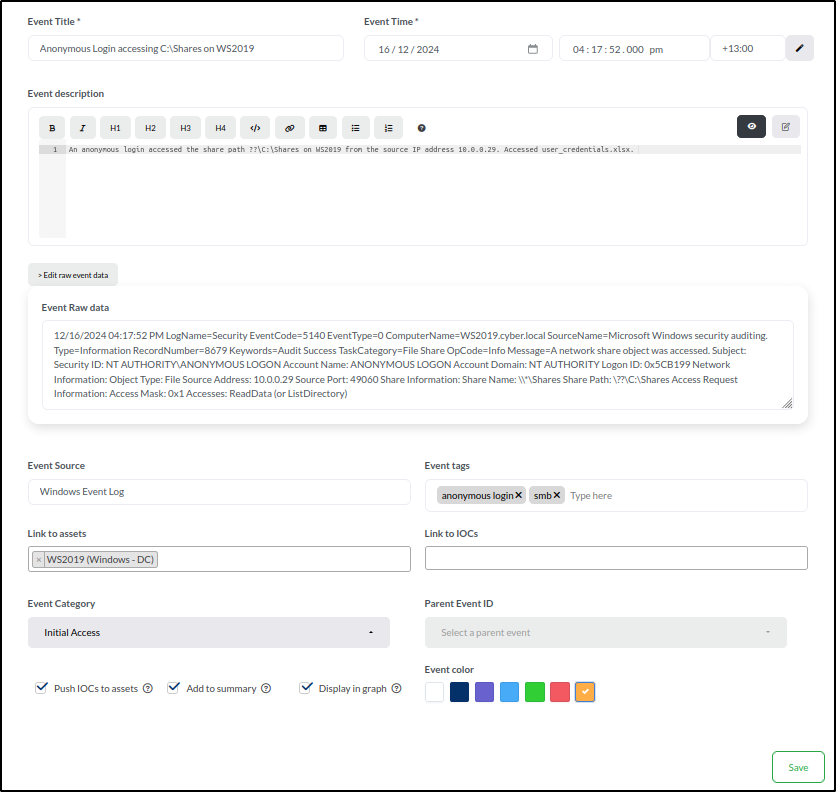
- Title: Anonymous Login Accessed C:\Shares on WS2019
- Time: 16/12/2024 04:17:52.000 PM with the UTC offset of +13:00.
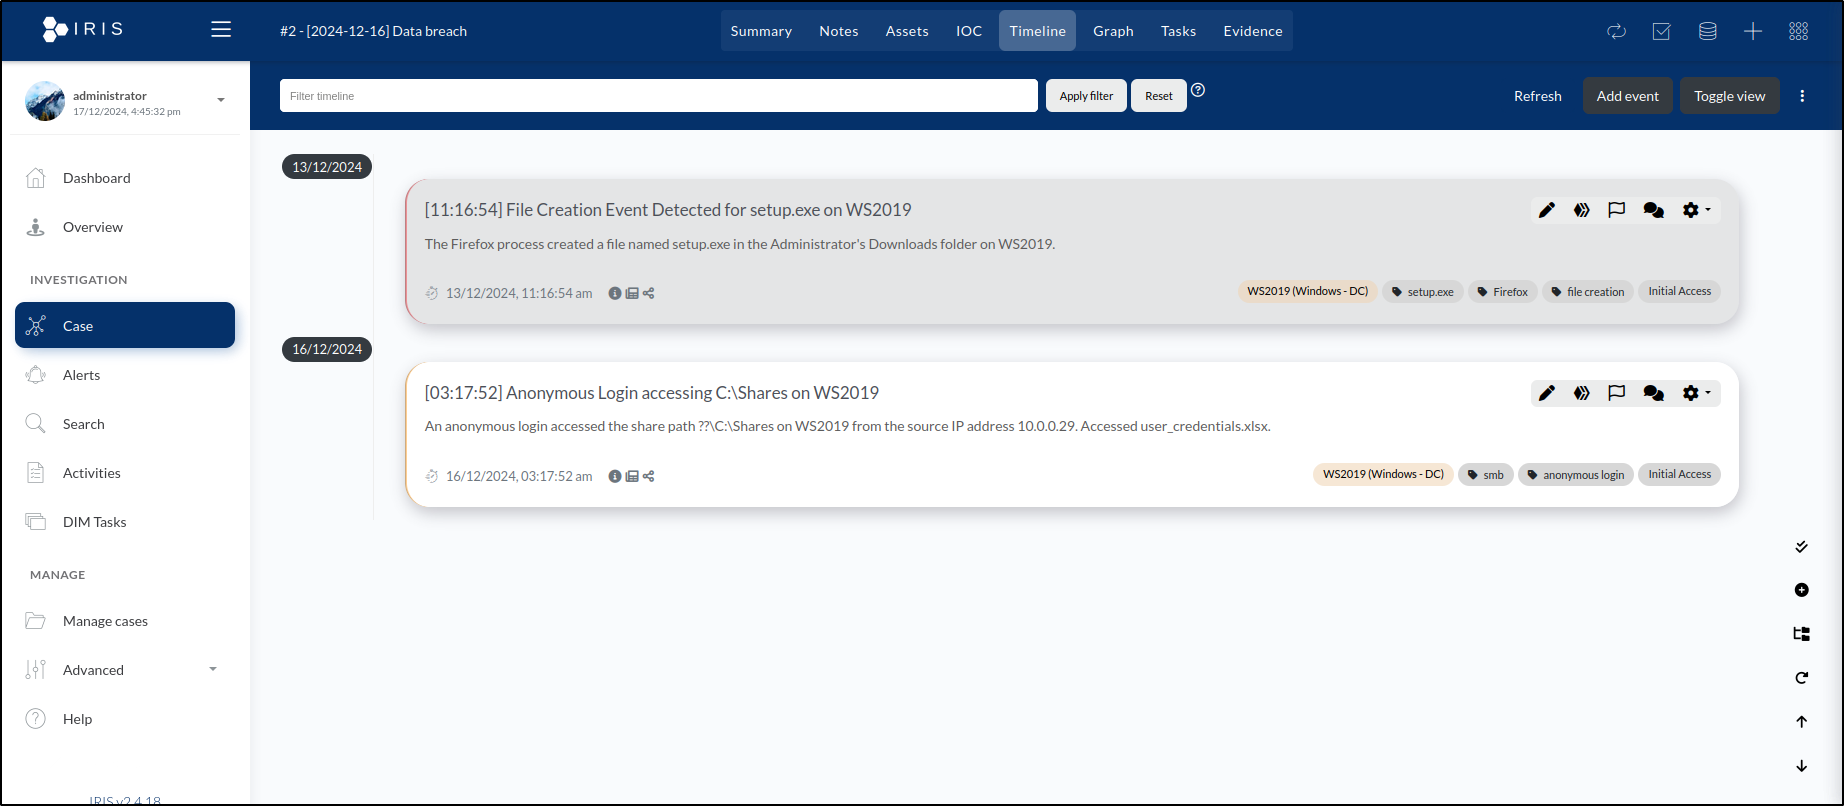
- Description: An anonymous login accessed the share path ??\C:\Shares on WS2019 from the source IP address 10.0.0.29. Accessed user_credentials.xlsx.
- Event Raw data: 12/16/2024 04:17:52 PM LogName=Security EventCode=5140 EventType=0 ComputerName=WS2019.cyber.local
- Event Source: Windows Event Log
- Event tags: anonymous login, smb
- Link to assets: WS2019
- Event category: Initial Access
- Select Add to Summary to include the event in the timeline visualisation.
- Choose Display in Graph to add the event to the graph view.
- Use the orange box to assign a colour to the event for easy identification.
- Save
After clicking Save, we are redirected to the Timeline tab, where our newly created event is now displayed.
The next event to document is Malicious Service Installed on WS2019. To locate the log for this event, search the Splunk server using the following query:
Set the timeframe to All time to ensure the event is captured.
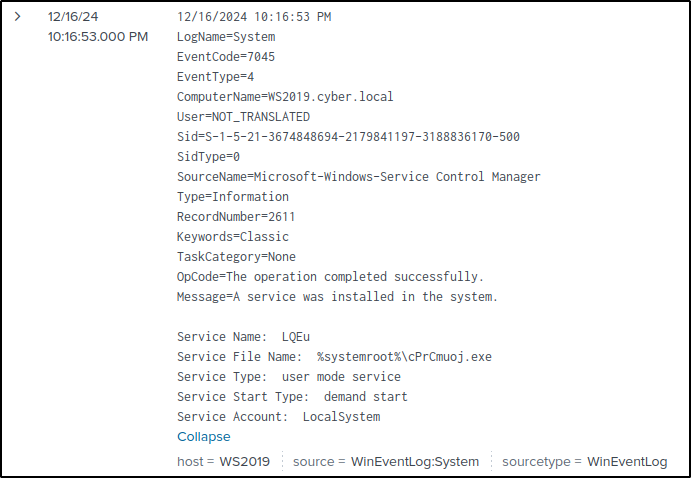
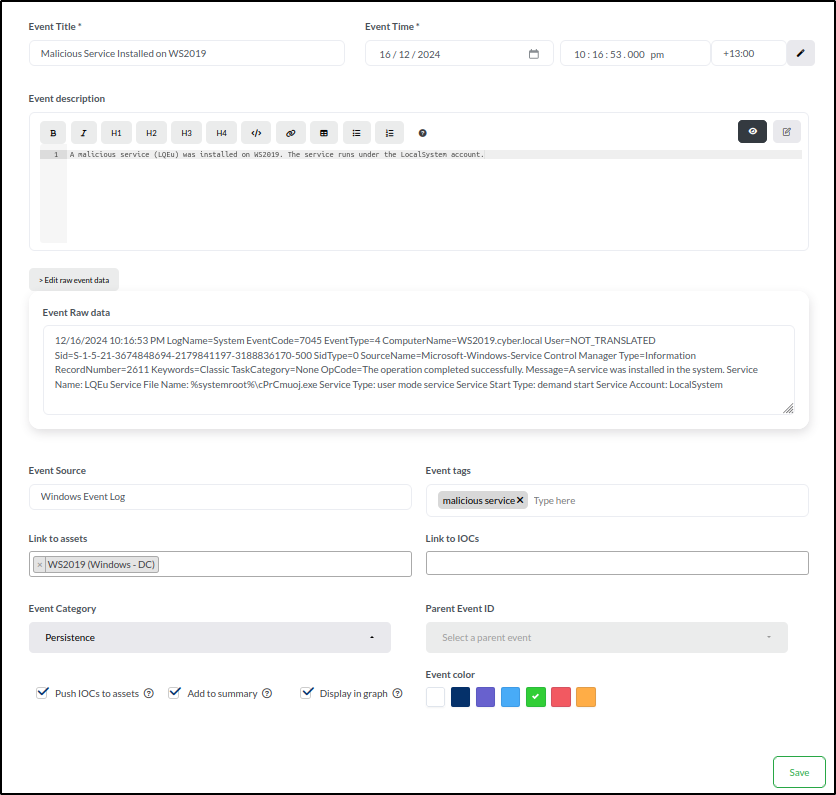
Click Add event and enter the following details:
- Title: Malicious Service Installed on WS2019
- Time: 16/12/2024 10:16:53.000 PM with the UTC offset of +13:00.
- Description: A malicious service (LQEu) was installed on WS2019. The service runs under the LocalSystem account.
- Event Raw data: 12/16/2024 10:16:53 PM LogName=System EventCode=7045 EventType=4 ComputerName=WS2019.cyber.local
- Event Source: Windows Event Log
- Event tags: malicious service
- Link to assets: WS2019
- Event category: Persistence
- Select Add to Summary to include the event in the timeline visualisation.
- Choose Display in Graph to add the event to the graph view.
- Use the green box to assign a colour to the event for easy identification.
- Save
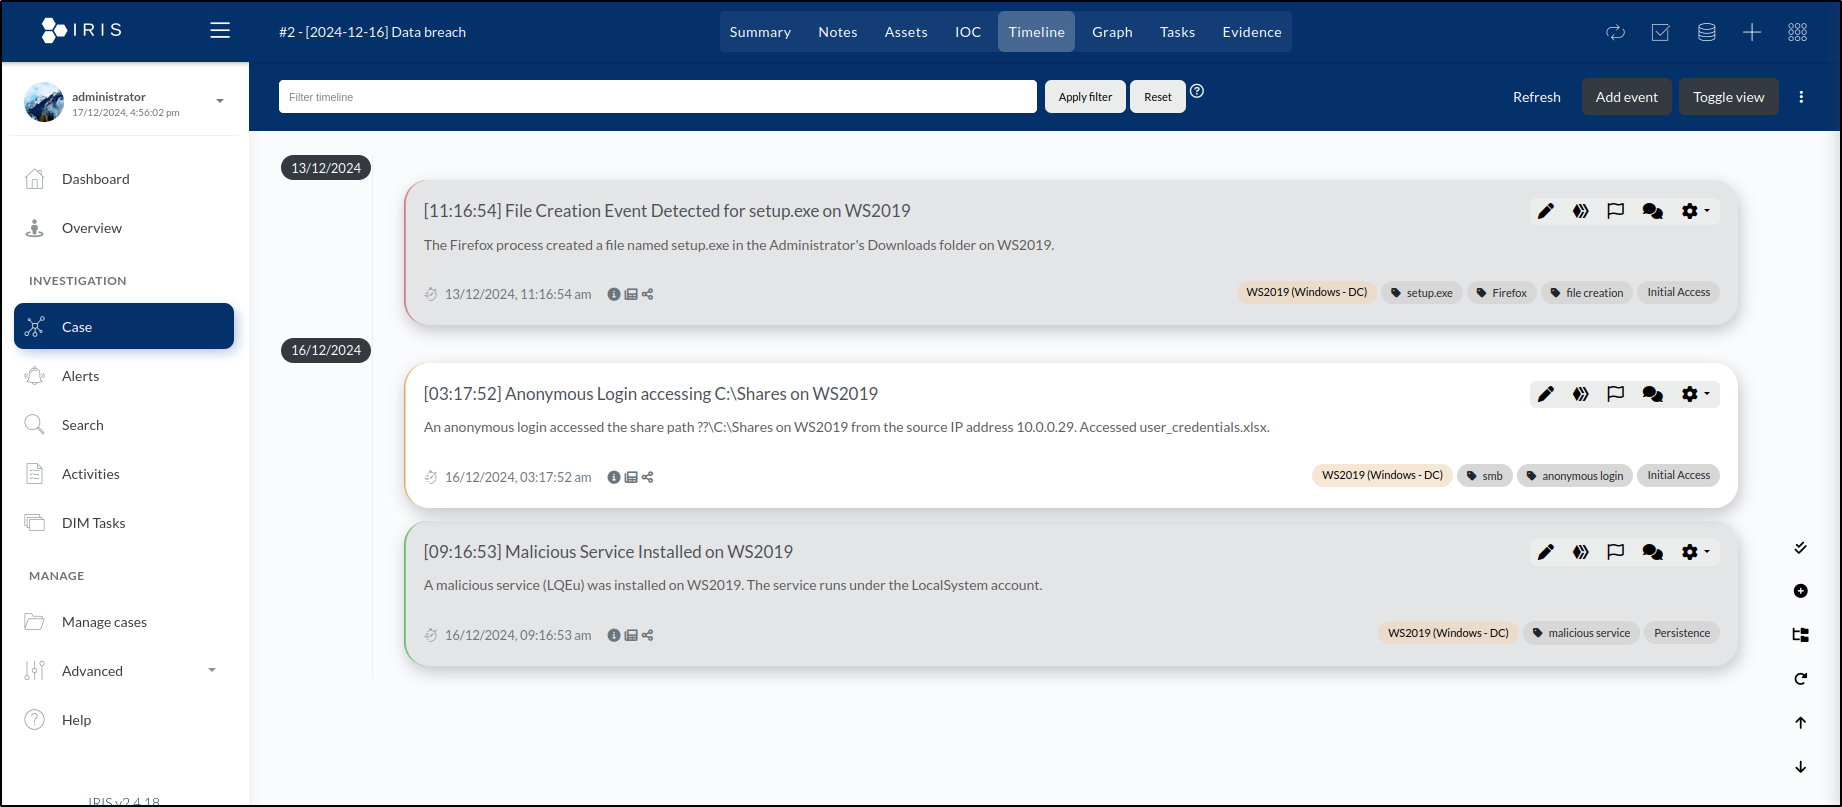
After saving, the Timeline tab displays the newly added event, bringing the total to three events.
Adding Evidence
In incident response, evidence is crucial for verifying details such as the nature, origin, timing, and potential culprits behind an incident. In this instance, we’ll include the .eml file, which contains the original phishing email that delivered the setup.exe file laced with malware.
The following is the content of our raw email:
Delivered-To: <SNIP>@gmail.com

Dear staff,

I hope this email finds you well.

Please download the required setup.exe file using this link
<http://10.0.0.29/setup.exe> as the file size is too large to attach to
this email.

Once downloaded, follow these steps to install:

1. Save the file to your computer.
2. Double-click the downloaded file to start the installation.
3. Follow the on-screen prompts to complete the setup.

Please note that some security warnings might appear when running the file.
These can be safely ignored, as many executable files are flagged as
suspicious by default.

If you experience any issues or have questions, feel free to reach out to
me directly.

Thank you for your cooperation.

Best regards,

IT helpdesk

--000000000000e1ecfe0629387b6c
Content-Type: text/html; charset="UTF-8"
Content-Transfer-Encoding: quoted-printable

<div dir=3D"ltr"><div><div><div><div dir=3D"auto"><div><div><p>Dear staff,<=
/p><p>I hope this email finds you well.<br><br>Please download the required=
 setup.exe file using this <a href=3D"http://10.0.0.29/setup.exe">link</a> =
as the file size is too large to attach to this email.<br><br>Once download=
ed, follow these steps to install:<br><br>1. Save the file to your computer=
.<br>2. Double-click the downloaded file to start the installation.<br>3. F=
ollow the on-screen prompts to complete the setup.<br><br>Please
 note that some security warnings might appear when running the file.=20
These can be safely ignored, as many executable files are flagged as=20
suspicious by default.<br><br>If you experience any issues or have question=
s, feel free to reach out to me directly.<br><br>Thank you for your coopera=
tion.<br><br>Best regards,<br><br>IT helpdesk</p></div></div></div></div></=
div></div></div>

--000000000000e1ecfe0629387b6c--
Let’s start by uploading the email.eml file, which contains the original phishing email. To do this, we’ll go to our case, click on the database icon located in the upper right corner of the window, and open the datastore.
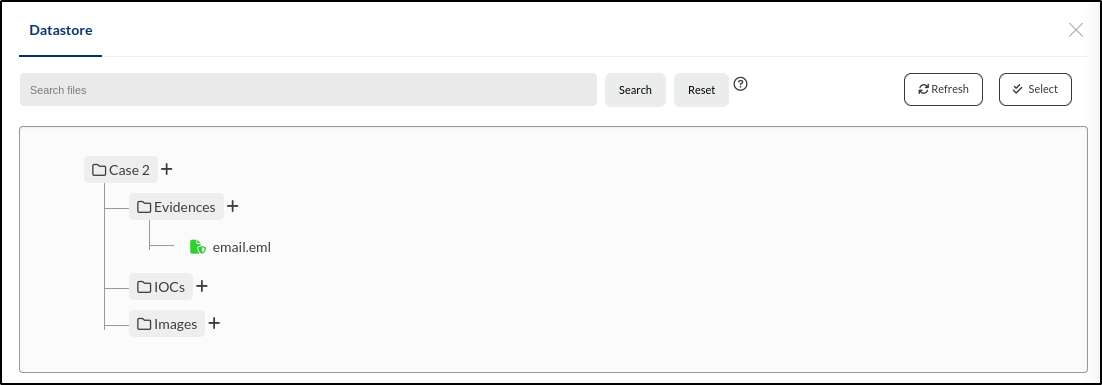
Within our case, there are three subdirectories: Evidences, IOCs, and Images. To add the file to the Evidences folder, we’ll click the + icon next to the folder name and then select Add file.
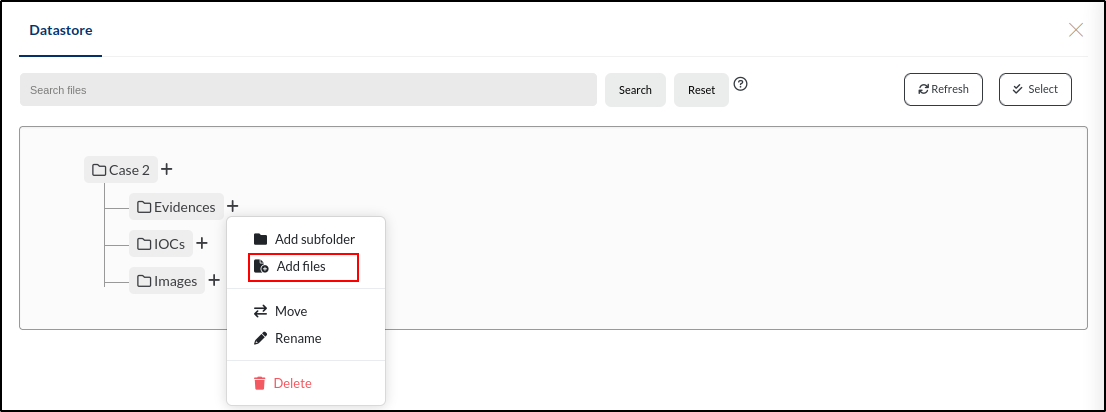
We’ll start by browsing for the file. Once selected, the Filename field will automatically populate with the file name. Next, we’ll add a brief description: Email that delivered setup.exe to the user. We’ll tag the file with phishing and malware, then select File is Evidence to ensure it’s included in the Evidence tab.
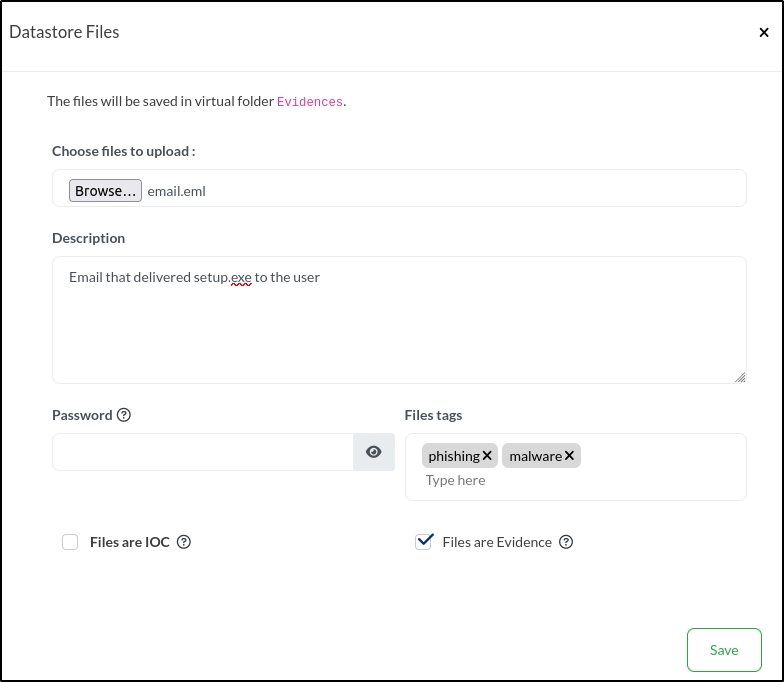
Once we click Save, the file will appear in the Evidences folder within the datastore.
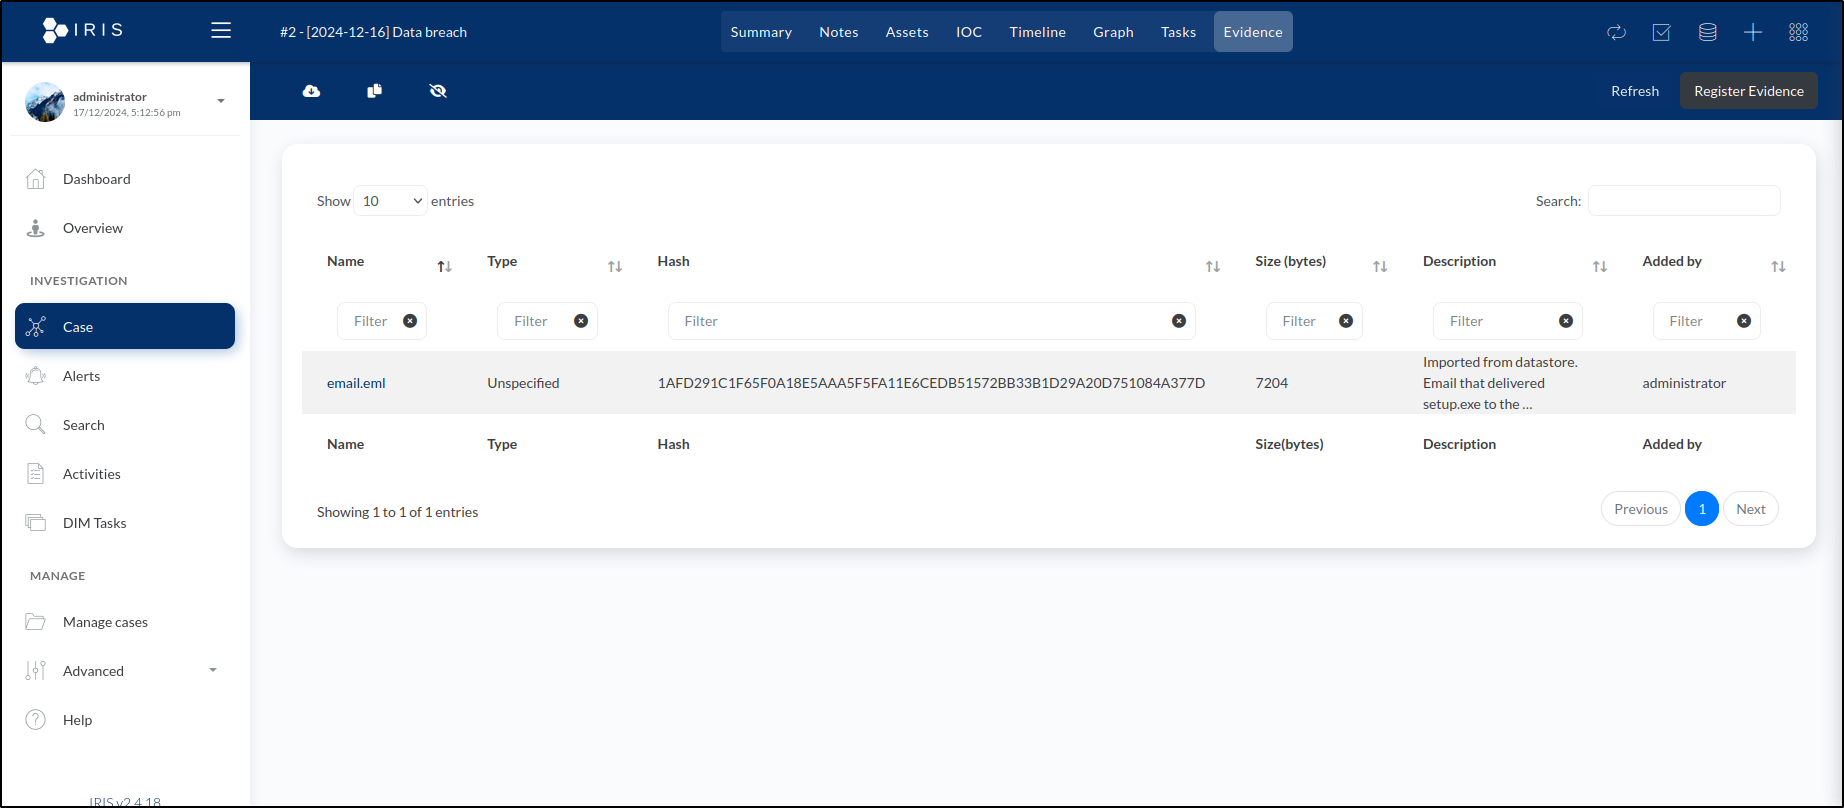
As we selected File is Evidence for each uploaded file, they were all registered as evidence under the case’s Evidences tab. Each entry includes its corresponding SHA256 hash.
Collaboration and Access Management
During incident response, we generally operate as part of a team, maintaining regular communication with our team members.
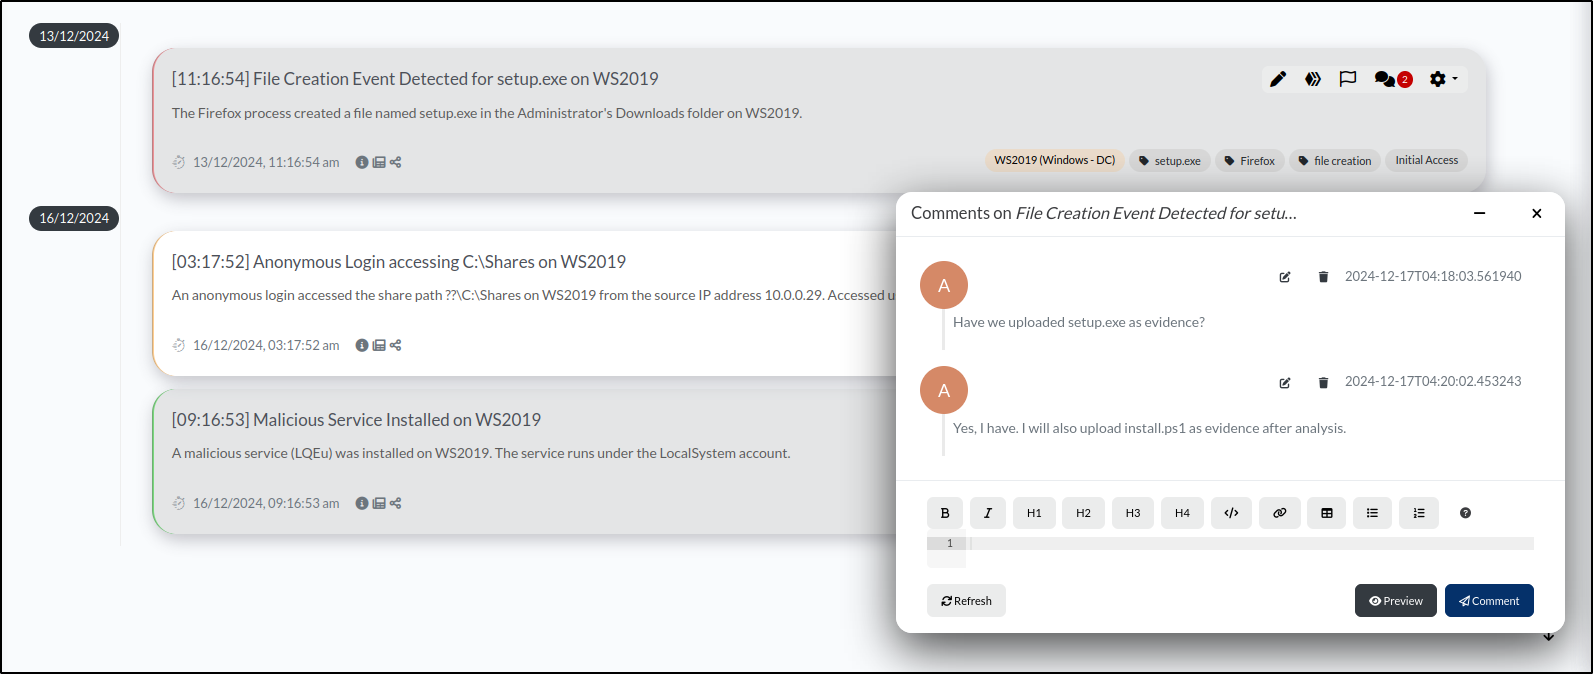
To add a comment, navigate to the Timeline tab and click on the speech bubble icon located in the upper right corner of the event. We can add multiple comments or questions here, simulating a chat.
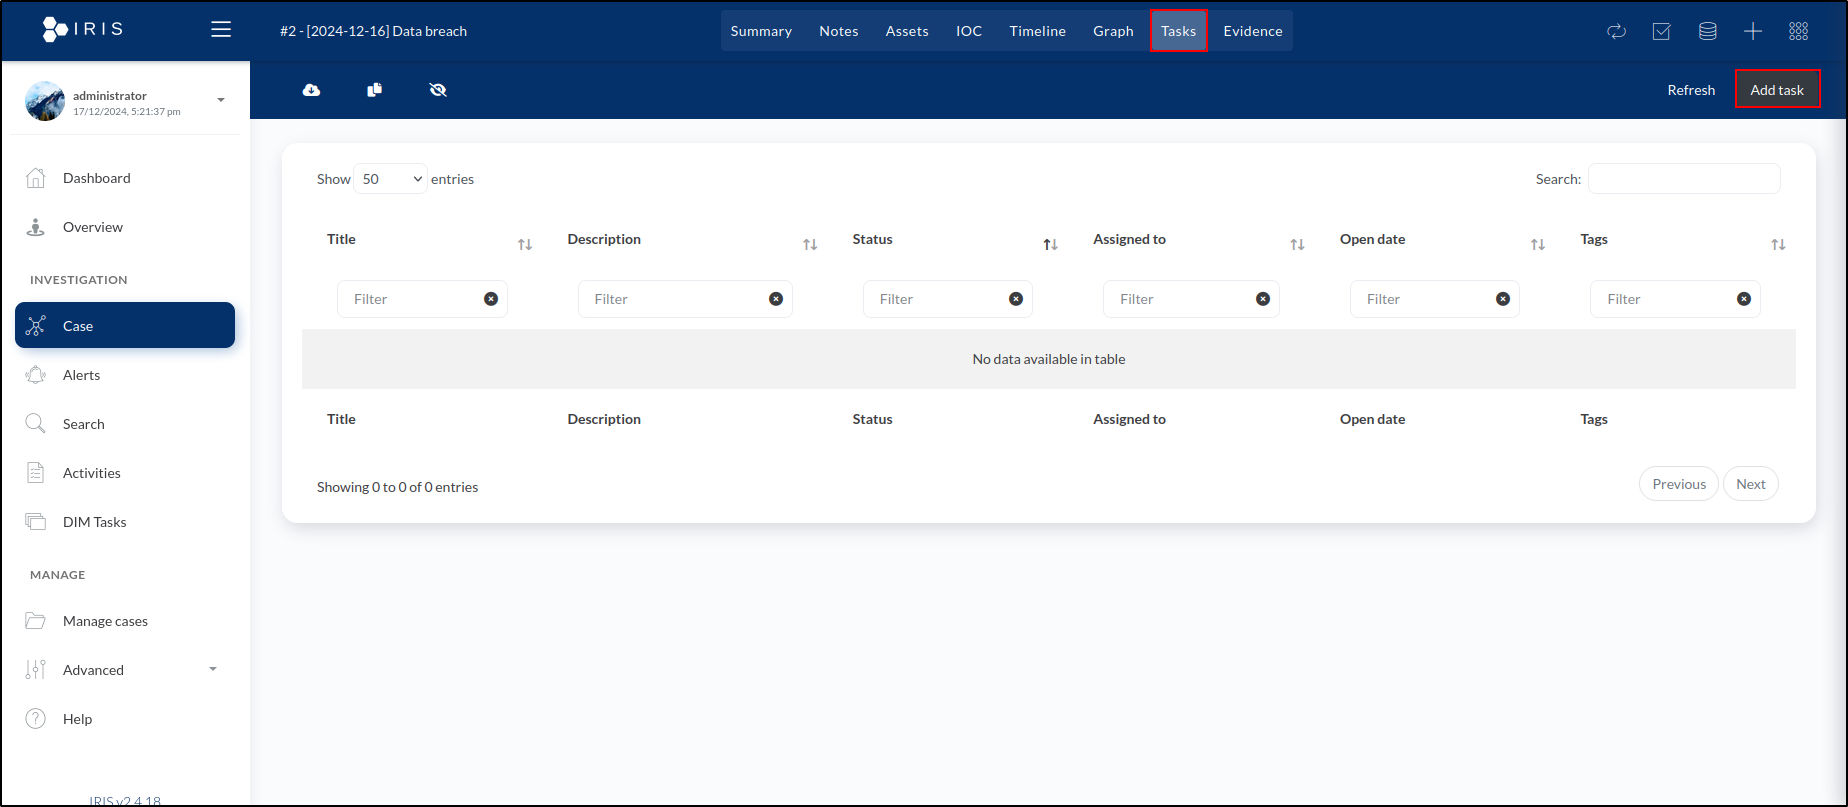
In IRIS, we can also create and assign tasks. To do this, navigate to the Tasks tab and click Add task in the upper right corner of the window.
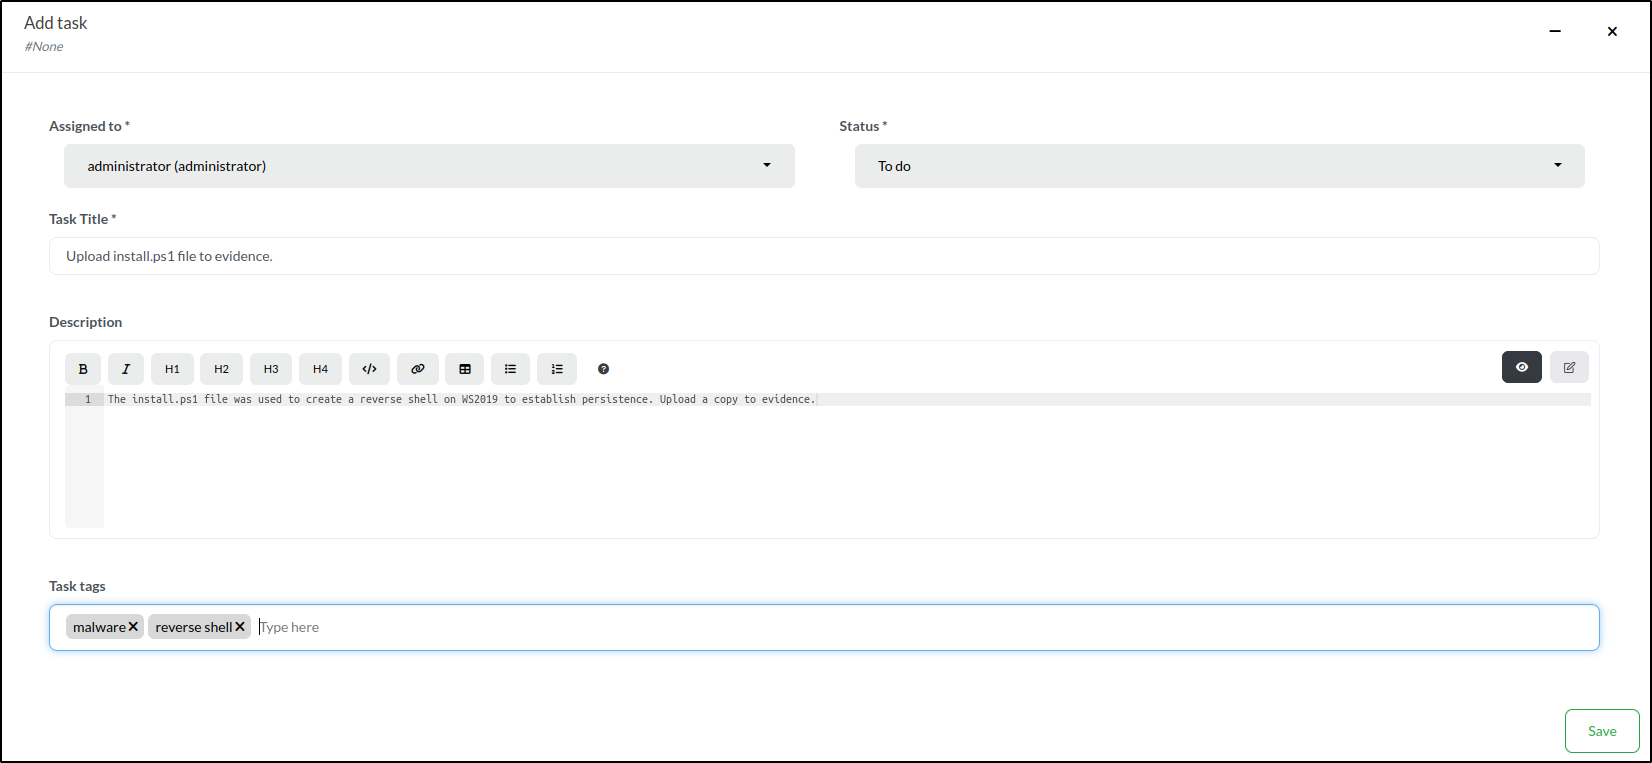
In the task creation window, we’ll:
- Assign the task to administrator (the only user for now).
- Set the Status to To do.
- Add a Task Title: Upload install.ps1 file to evidence.
- Include a detailed Description: The install.ps1 file was used to create a reverse shell on WS2019 to establish persistence. Upload a copy to evidence.
- Tag the task with malware and reverse shell.
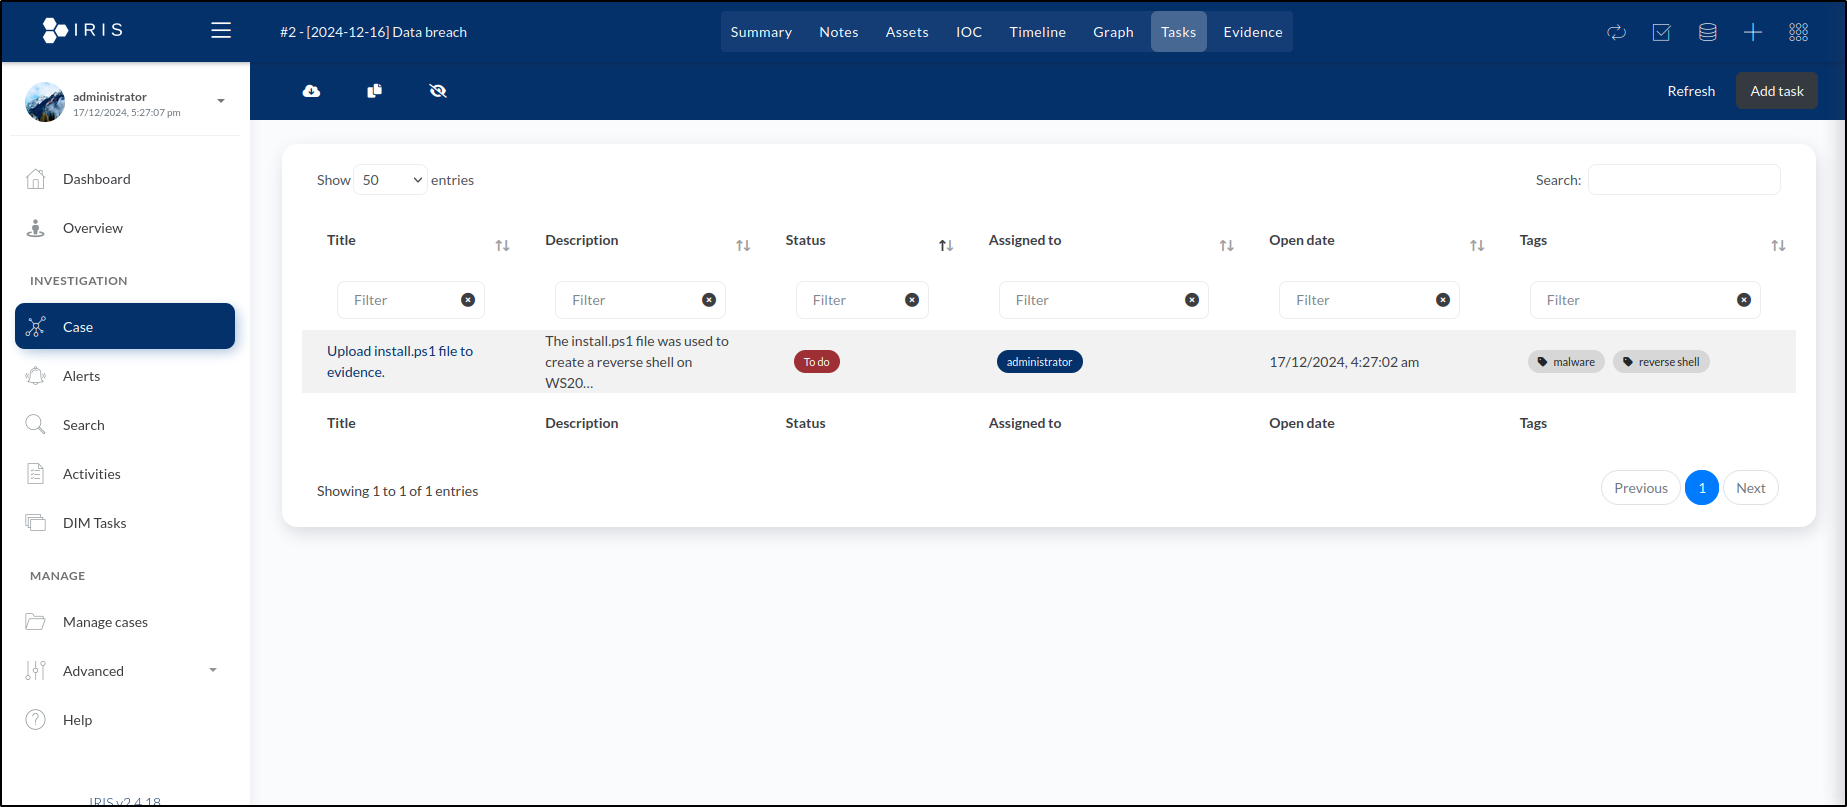
To create the task, we click the Save button. This adds it to the list of tasks displayed in the Tasks tab.
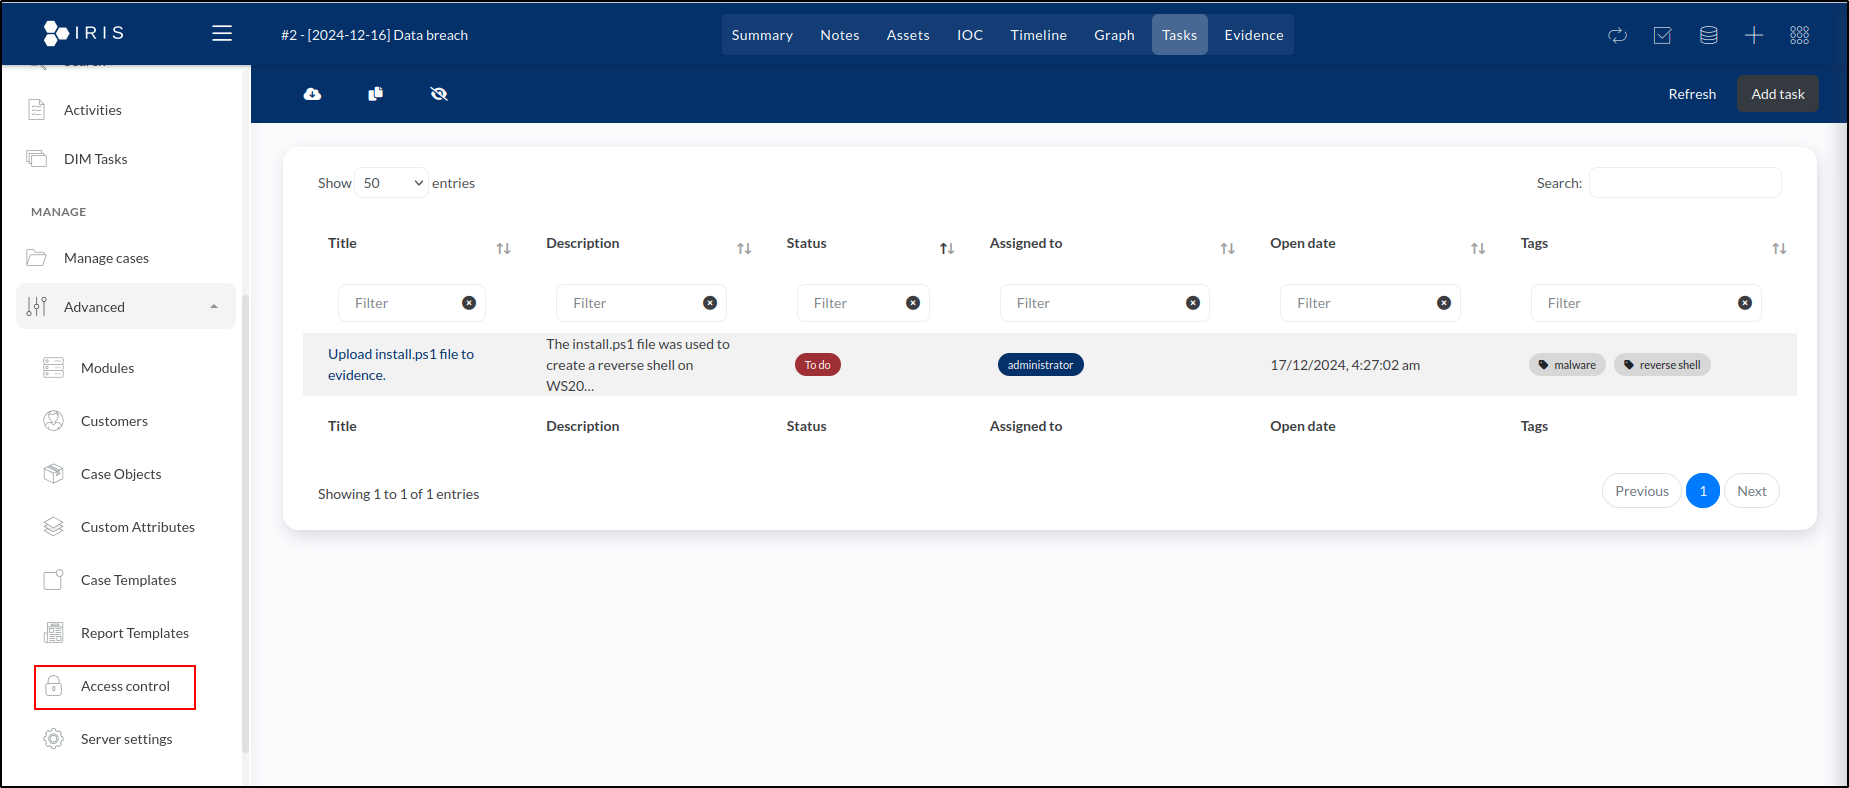
To manage user access, go to the Advanced dropdown in the sidebar and select Access Control. This allows you to control who can access specific cases or case types.
Here, we see Users and Groups as the main permission entities. The Users section displays a list of all individual users.
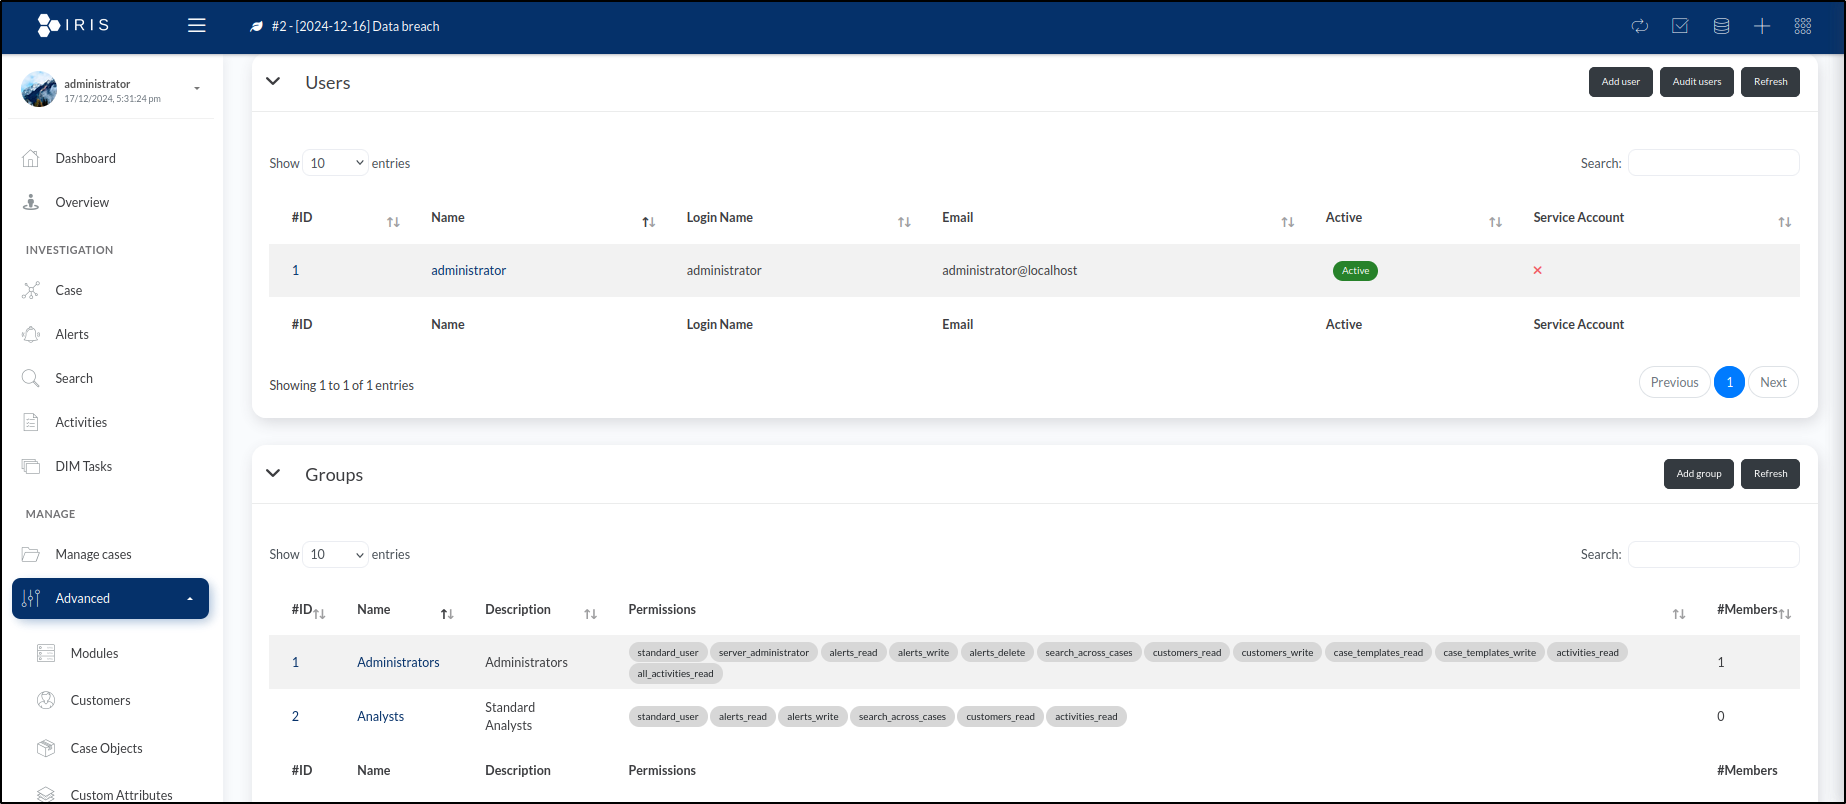
Currently, we only have one user, administrator. We’ll select this user and navigate to the Cases access tab.
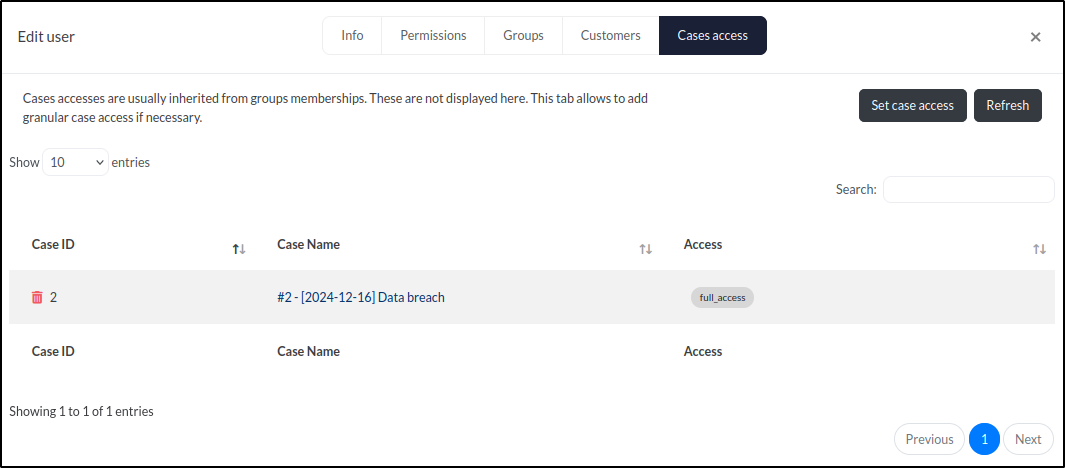
The Cases access tab shows that the administrator user has full access to one case, [2024-12-16] Data breach. To grant or restrict access to additional cases, we can click the Set case access button.
Generating a Report
We can generate reports using a report template, which ensures completeness and consistency across cases while saving time. An IRIS report template is a file that includes various tags representing different types of content.
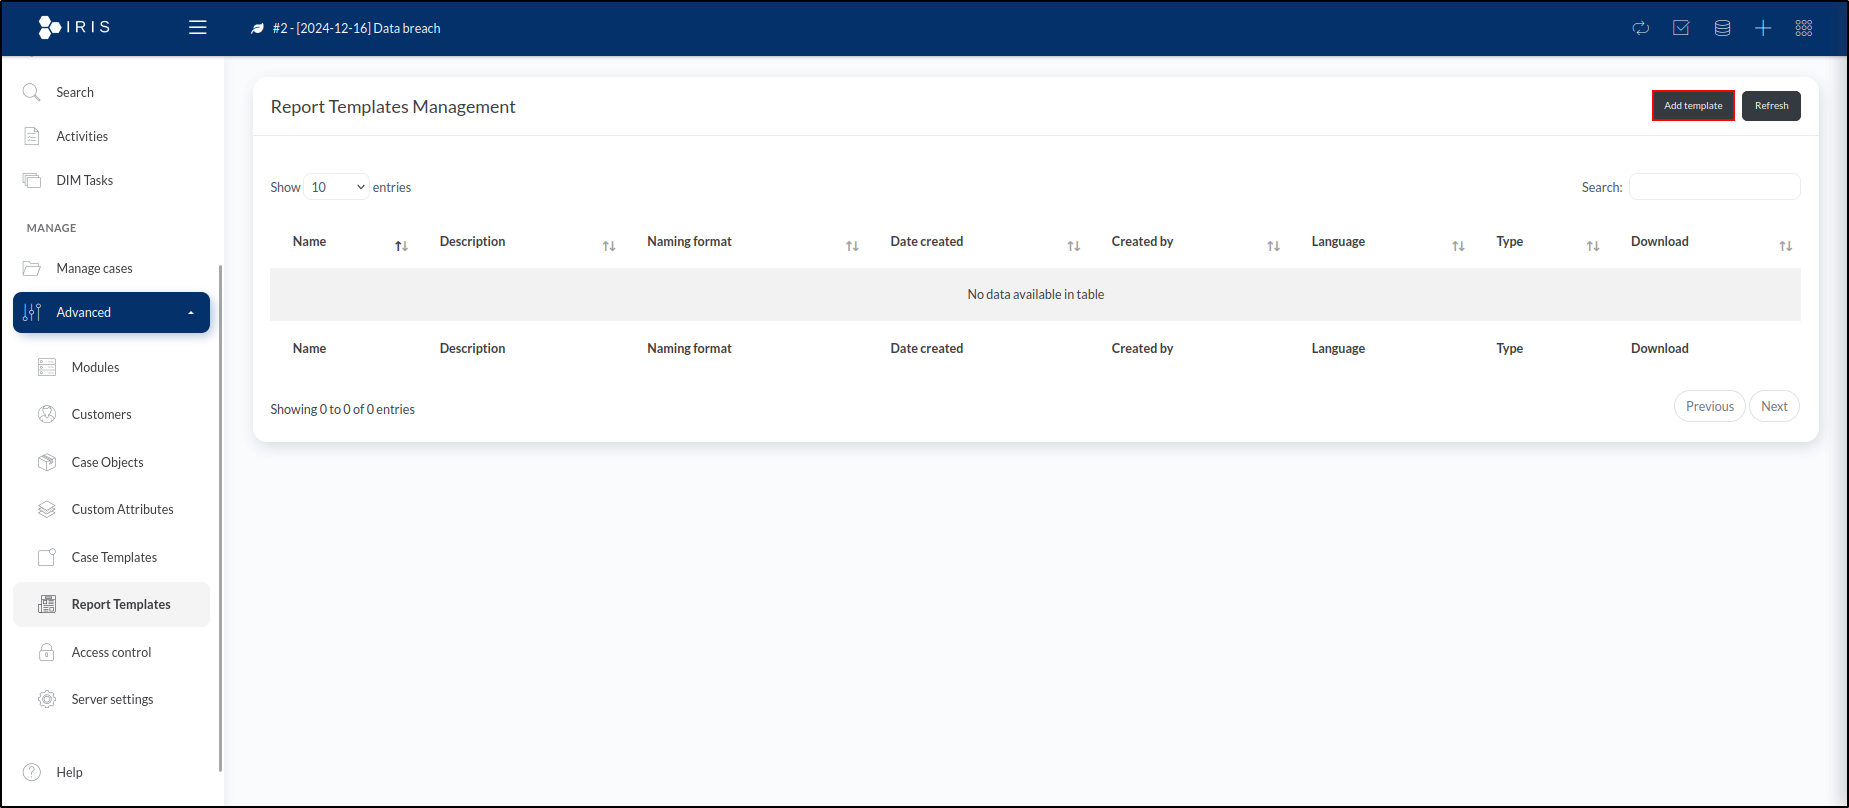
To view the default IRIS investigations report template, we’ll go to the Advanced dropdown in the sidebar menu and select Report Templates.
We can download an example of an investigation template and an activities report template. Click Add template and upload investigation template.
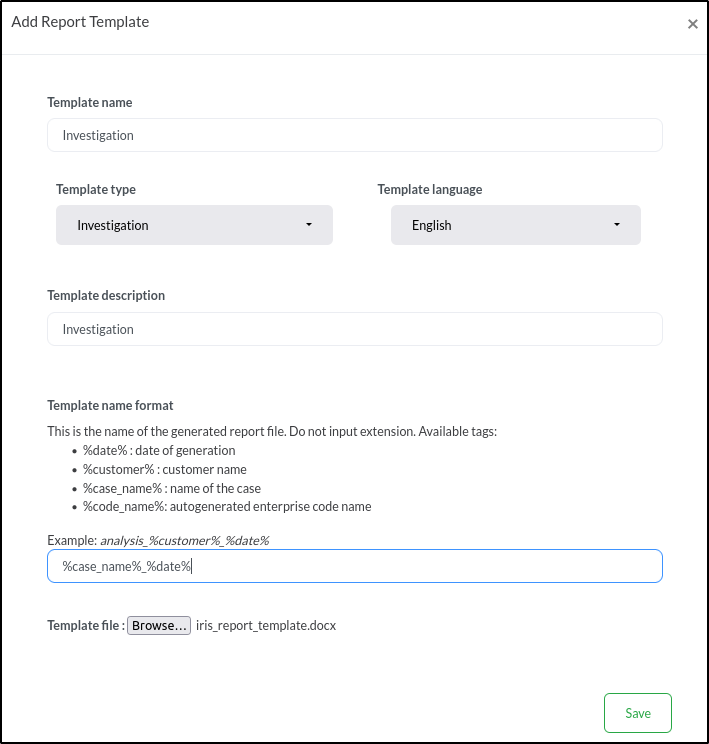
Add the following details:
- Template name: Investigation
- Template type: Investigation
- Template language: English
- Template description: Investigation
- Template name format: %case_name%_%date%
- Template file: iris_report_template.docx (investigation template)
To open the investigation template, double-click on the .docx file. By default, it will open in LibreOffice, an open-source office suite, on our Ubuntu machine.
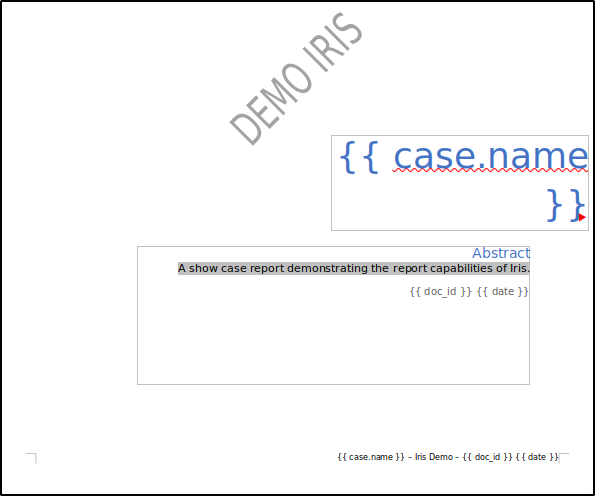
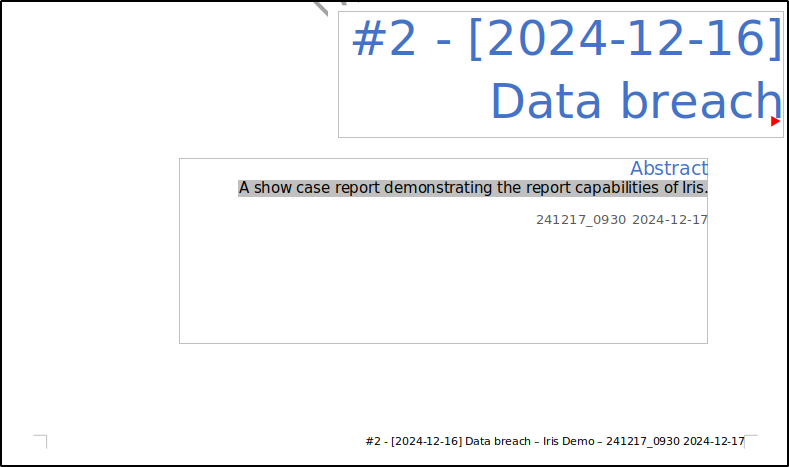
Let’s take a look at the cover page. The {{ case.name }} tag represents the case name, {{ doc_id }} corresponds to the IRIS document ID, and {{ date }} represents the current date. When the template is processed, these placeholders will be replaced with the relevant data at that point in time.
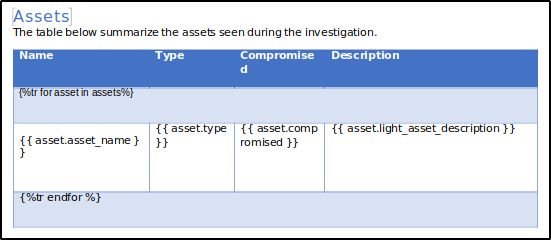
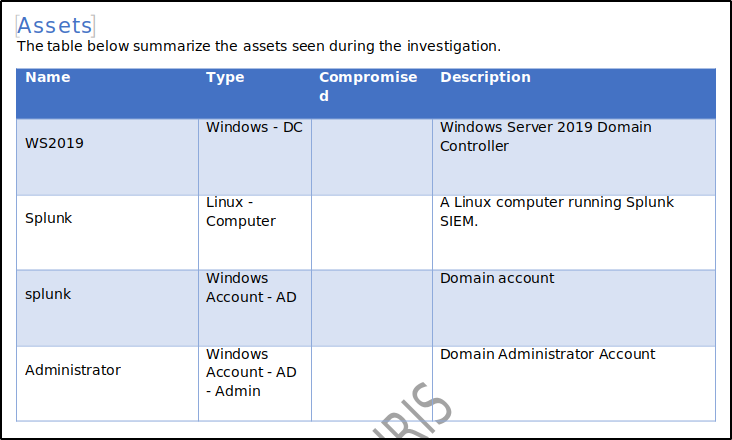
Now, let’s examine the asset list on page 3. Here, we see a small table generated using a Jinja2 for loop. The loop begins with {%tr for asset in assets %} and ends with {%tr endfor %}. For each asset, a row is created that includes its name, type, compromise status, and description, each represented by corresponding tags. The template can be customised to add or remove elements as needed.
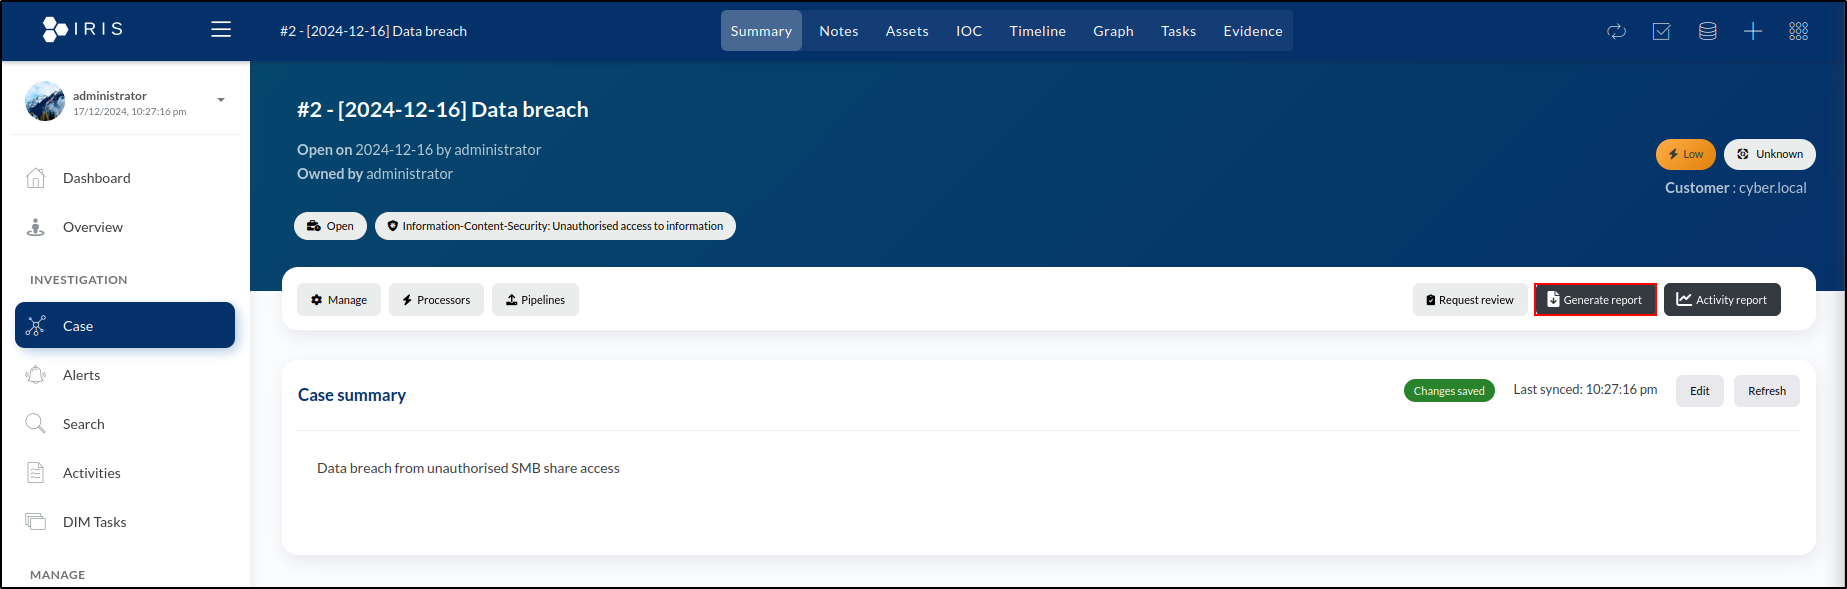
To generate an IRIS report, navigate to the Summary tab of the case and click the Generate report button.
This opens a window where we can choose a report template. We’ll select Investigation. Click the Generate button to create and download the report. Alternatively, we can click the Generate in Safe Mode button on the left. This option generates the report without including images.
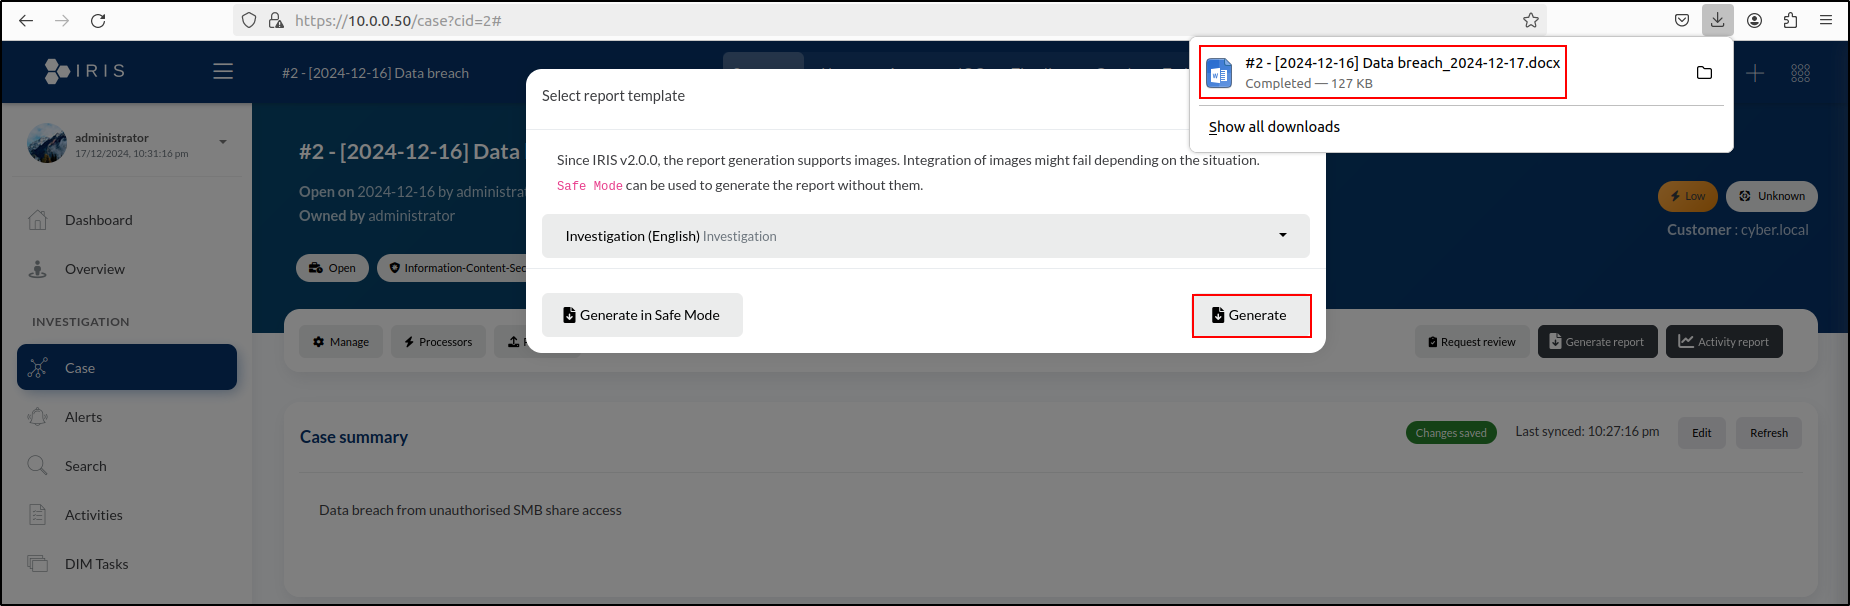
Now that the report is generated, let’s inspect the changes. Open the file by double-clicking it in the downloads list. Start by reviewing the cover page again.
This time, the placeholders have been replaced with actual data. The {{ case.name }} tag now shows the case name, "#2 - [2024-12-16] Data breach". Similarly, {{ doc_id }} is replaced with "241217_0930" and {{ date }} displays "2024-12-17".
A similar update occurred on page 3 with the asset list. The for loop populated the table with four rows, each representing the assets we created: WS2019, Splunk, splunk, and Administrator.
Case Closure and Database Backup
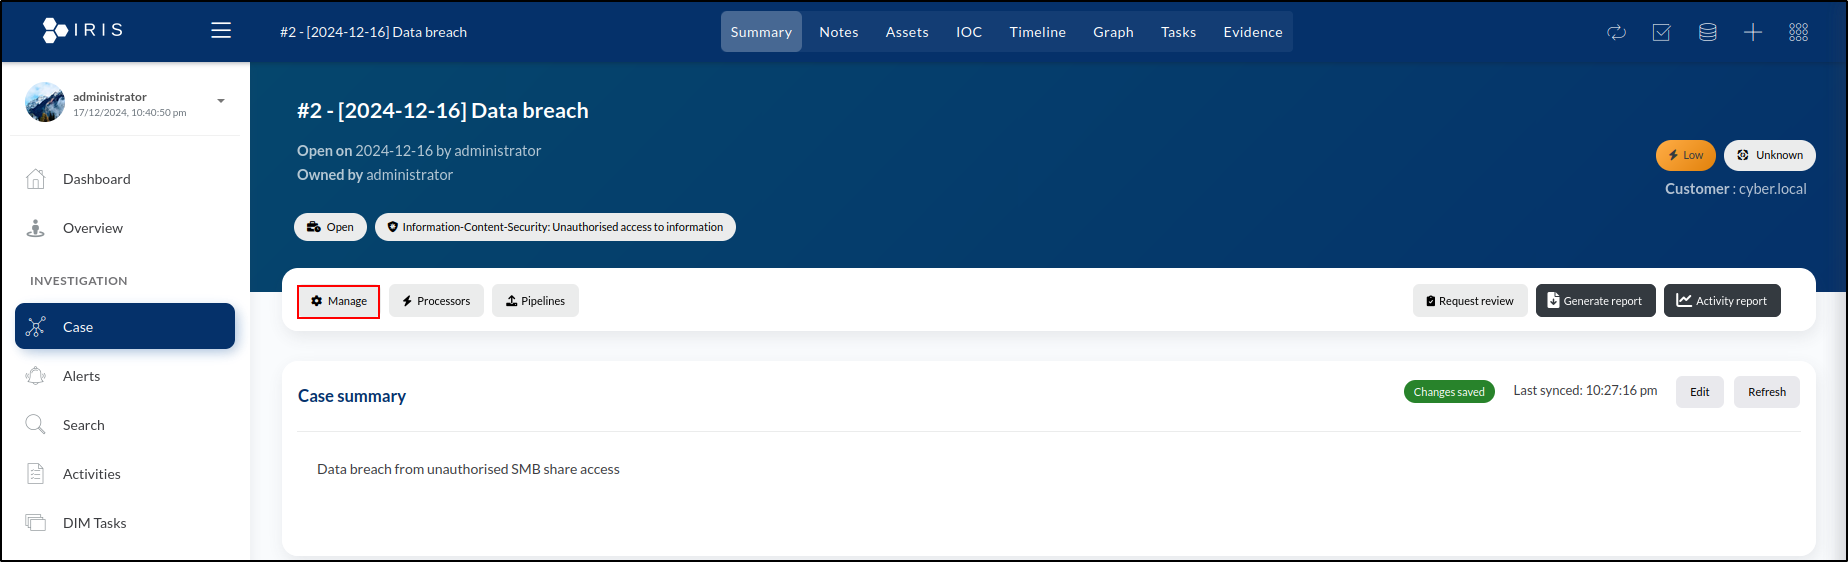
Once incident response concludes and all tasks are completed, the case can be closed. To do this, navigate to the Summary tab and click the Manage button, identified by the gear icon.
Before closing the case, we need to update its Outcome. To do this, click the Edit button.
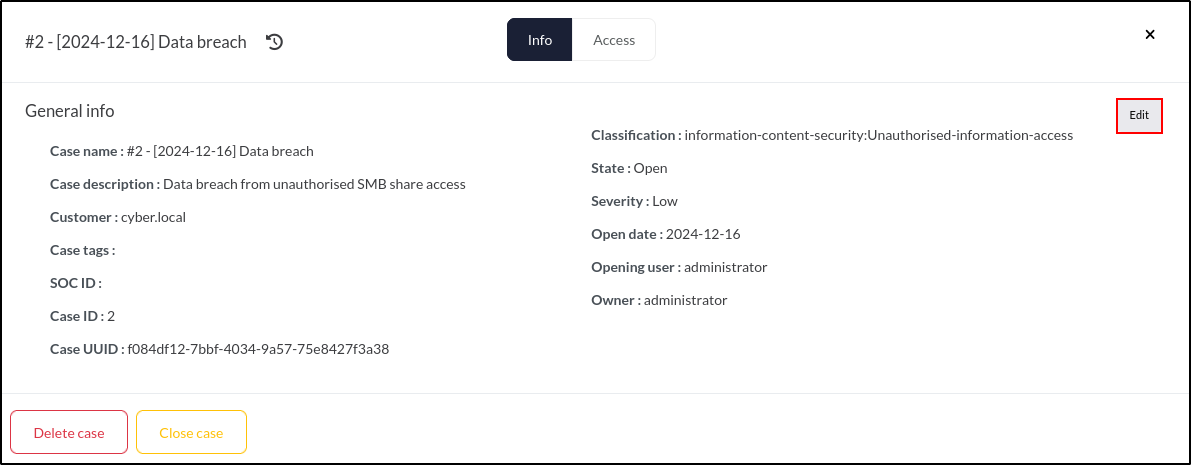
In the Outcome dropdown, we can choose from several options:
- Unknown: No clear outcome was determined.
- False Positive: The investigation confirmed no attack occurred.
- True Positive with impact: An attack occurred, affecting the organisation.
- True Positive without impact: An attack occurred but caused no impact.
- Not applicable: The investigation was not completed.
We’ll select True Positive with impact.
At the bottom left of the window, there are two choices: Delete case and Close case. We’ll choose Close case to finalise it.
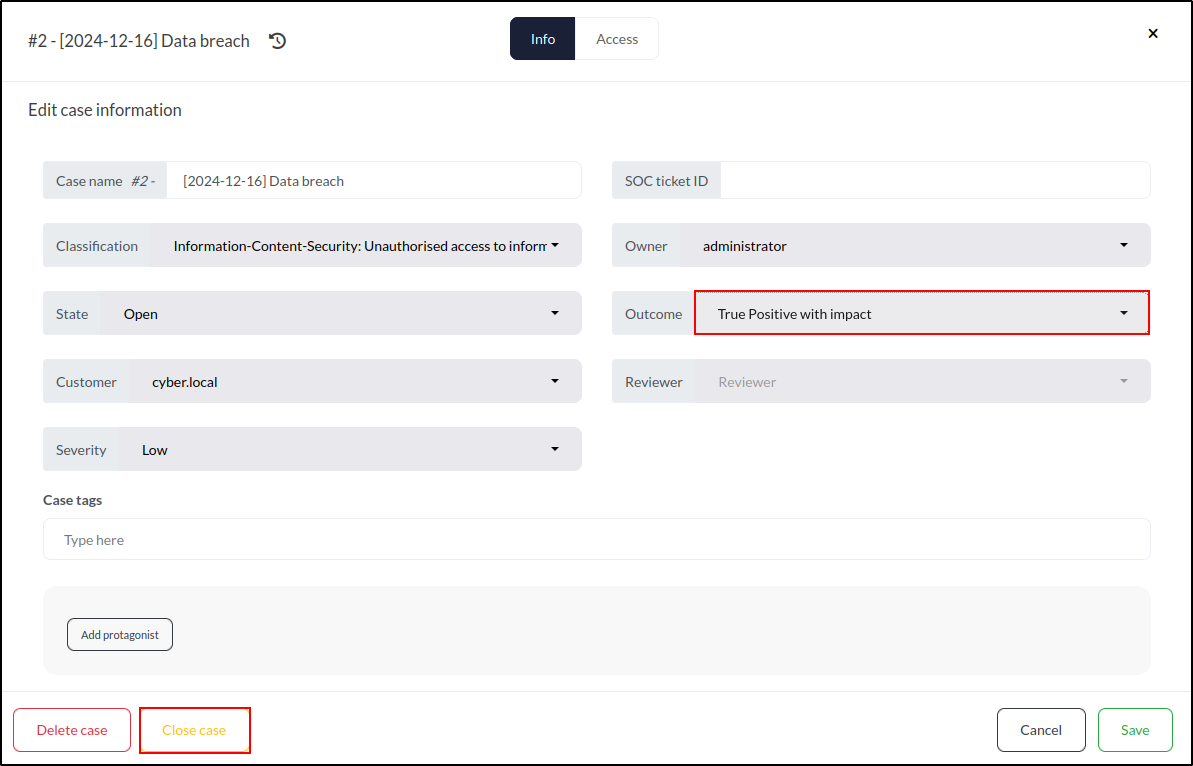
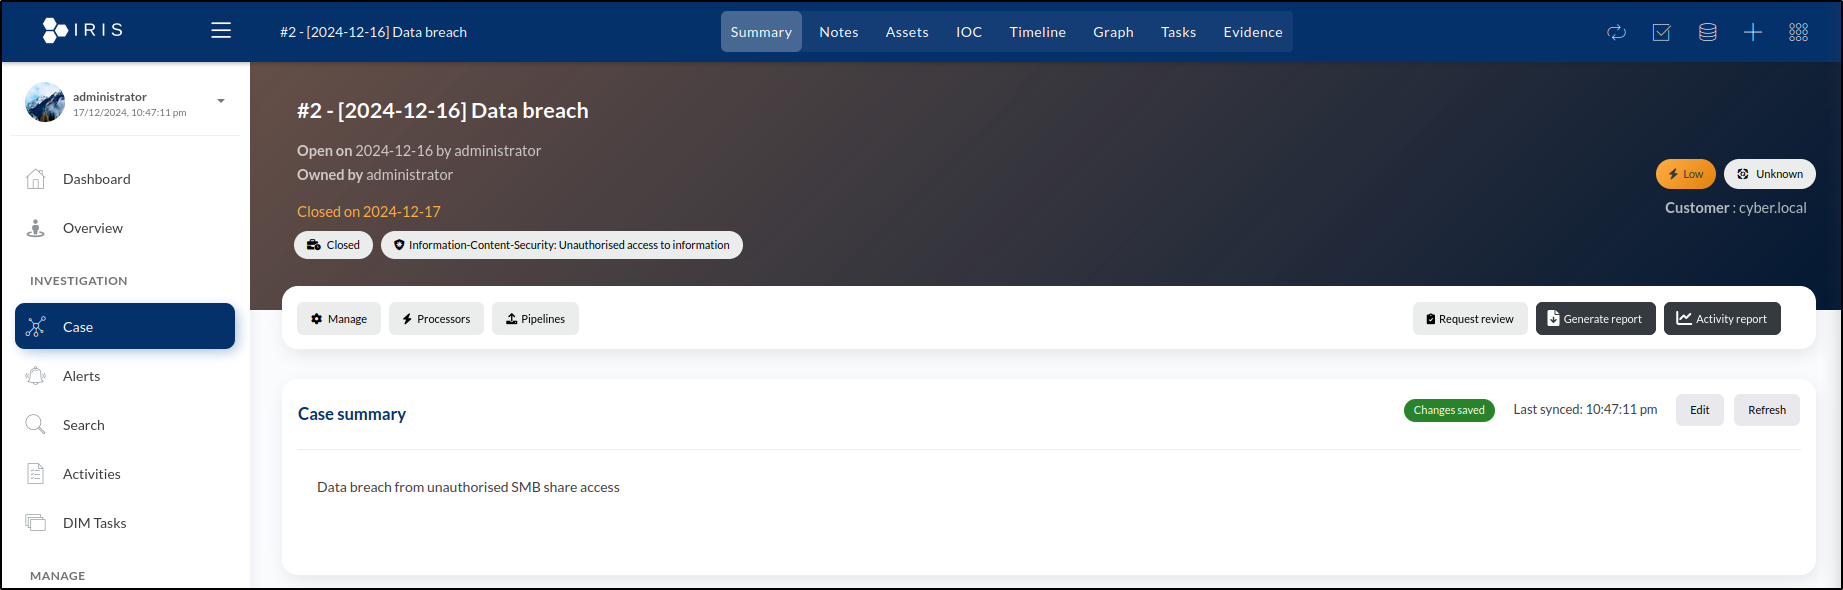
A pop-up window will appear, asking for confirmation to close the case. We’ll click OK to confirm. Once confirmed, the case will be closed, and the page colour will update to reflect its closed status.
To retain data, create a protected copy for storage elsewhere. DFIR-IRIS backs up the complete database rather than one case at a time. Run the backup from the directory containing the Compose file and refer to the stable database service name instead of a temporary container ID:
cd ~/iris-offline/iris-web
docker compose exec -T db pg_dump -U postgres iris_db | gzip > ../iris_db_backup.gz
Check that the archive is non-empty and structurally readable:
test -s ../iris_db_backup.gz
gzip -t ../iris_db_backup.gz
sha256sum ../iris_db_backup.gz | tee ../iris_db_backup.gz.sha256
A checksum and successful gzip -t check confirm that the file was transferred intact; they do not prove that the database can be restored. Test the documented restore procedure against a disposable recovery instance before relying on the backup.
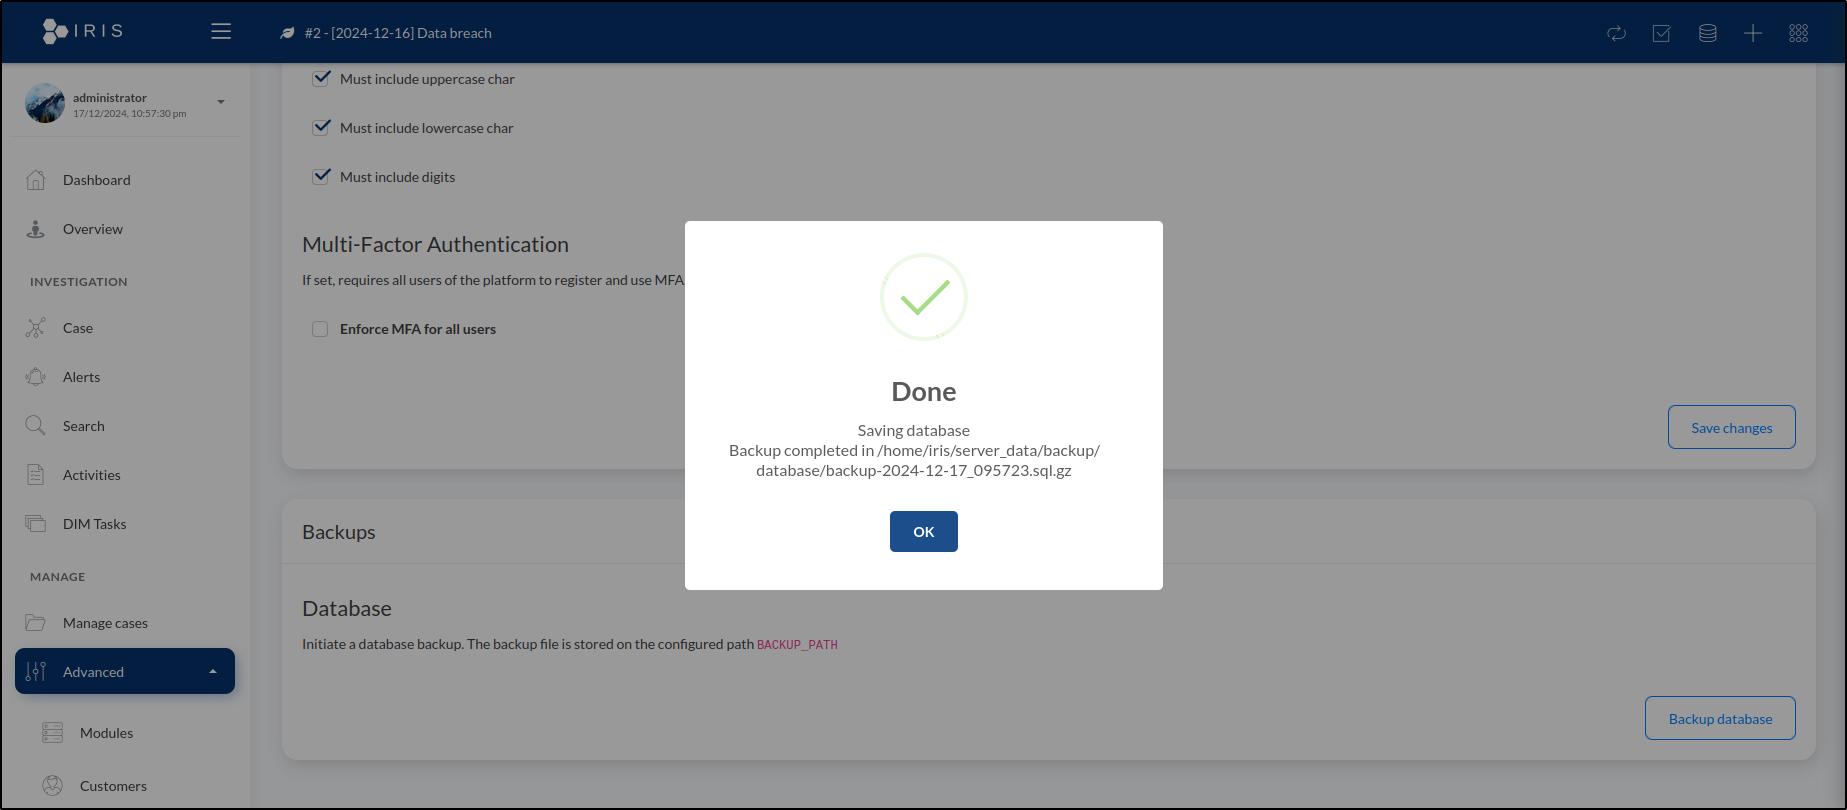
Alternatively, we can create a backup directly from the IRIS web application. To do this:
- Navigate to Advanced > Server settings > Backups > Database.
- Click on Backup database.
Before doing this, we need to set the BACKUP_PATH environment variable to specify the destination directory where the backup will be stored.