Install Wazuh
Prepare an offline package and deploy the Wazuh indexer, manager, Filebeat, and dashboard as an all-in-one lab.
Before you begin
Confirm the supported operating system, CPU, memory, storage, DNS, time synchronisation, and required ports against current Wazuh documentation. The demonstrated lab uses an all-in-one CentOS Stream host; distributed and DEB-based deployments are alternative routes.
Protect administrative access
Confirm the required source networks before changing firewall rules. Keep the current administration session open until management access has been verified.
Prepare the offline installation
On an internet-connected Linux machine, download the installation script,
architecture-specific package bundle, and certificate configuration for the
version you intend to deploy. Define stable node names and addresses in
config.yml, generate the certificates, record transfer hashes and the vendor
package checksums, and transfer the resulting files to the isolated host.
The detailed commands use the 4.14 release-family path. Before downloading,
resolve it to one tested patch version, verify every central package uses that
same patch, and record the exact filenames and checksums. Do not assume that a
bundle downloaded on a later date contains the same packages.
Use explicit placeholders such as <WAZUH_SERVER_IP> and <INDEXER_NODE_NAME> in your working notes. Do not copy example addresses into a different environment without checking them.
Alternative: distributed or DEB deployment
The detailed procedure below retains the RPM and DEB commands and the multi-node certificate examples. Choose one deployment model before starting; do not mix commands from different routes.
Detailed installation procedure
The original proof-of-concept procedure is retained below in full, including package commands, certificate deployment, configuration examples, service checks, screenshots, and optional security steps.
Prerequisites
Ensure that curl, tar, and setcap are installed on the target system for the offline installation. On some Debian-based systems, gnupg may also be required.
Additionally, some systems have cp set as an alias for cp -i, which prompts for confirmation before overwriting files. To prevent this, run unalias cp.
Configure network access by component
Open only the ports required by the selected deployment and restrict every rule
to its intended source network. In an all-in-one deployment, keep indexer port
9200/tcp on loopback and do not expose it through the host firewall. Port
55000/tcp is the Wazuh server API; it is not required for normal agent
enrollment. Agents normally connect to 1514/tcp for events and 1515/tcp
for automatic enrollment.
| Port | Purpose | Typical source | Required in this lab |
|---|---|---|---|
443/tcp |
Dashboard | Authorised analyst subnet | Yes |
1514/tcp |
Agent event channel | Monitored endpoints | Yes |
1515/tcp |
Agent enrollment | Monitored endpoints during enrollment | Yes |
55000/tcp |
Wazuh API | Dashboard or administration hosts only | Only when accessed remotely |
9200/tcp |
Indexer API | Wazuh central components only | No external access for all-in-one |
Replace <AGENT_SUBNET> and <ANALYST_SUBNET> before running these examples.
CentOS Stream / firewalld:
sudo firewall-cmd --permanent --zone=public --add-rich-rule='rule family="ipv4" source address="<AGENT_SUBNET>" port port="1514" protocol="tcp" accept'
sudo firewall-cmd --permanent --zone=public --add-rich-rule='rule family="ipv4" source address="<AGENT_SUBNET>" port port="1515" protocol="tcp" accept'
sudo firewall-cmd --permanent --zone=public --add-rich-rule='rule family="ipv4" source address="<ANALYST_SUBNET>" port port="443" protocol="tcp" accept'
sudo firewall-cmd --reload
sudo firewall-cmd --list-all
Ubuntu / UFW:
sudo ufw allow from <AGENT_SUBNET> to any port 1514 proto tcp
sudo ufw allow from <AGENT_SUBNET> to any port 1515 proto tcp
sudo ufw allow from <ANALYST_SUBNET> to any port 443 proto tcp
sudo ufw status verbose
Download packages and configuration files
From any Linux system with Internet access, run the following commands to execute a script that downloads all necessary files for offline installation on x86_64 architectures. Choose the appropriate package format to download.
RPM:
curl -sO https://packages.wazuh.com/4.14/wazuh-install.sh
chmod 744 wazuh-install.sh
./wazuh-install.sh -dw rpm -da x86_64
DEB:
curl -sO https://packages.wazuh.com/4.14/wazuh-install.sh
chmod 744 wazuh-install.sh
./wazuh-install.sh -dw deb -da amd64
Download the certificates configuration file.
Modify config.yml to set up certificate creation.
- For an all-in-one deployment, replace
"<indexer-node-ip>","<wazuh-manager-ip>", and"<dashboard-node-ip>"with127.0.0.1. - For a distributed deployment, update the node names and IP addresses with the correct values for the Wazuh server, indexer, and dashboard. Add extra node fields as required.
nodes:
  # Wazuh indexer nodes
  indexer:
    - name: node-1
      ip: 10.0.0.20
    #- name: node-2
    #  ip: "<indexer-node-ip>"
    #- name: node-3
    #  ip: "<indexer-node-ip>"

  # Wazuh server nodes
  # If there is more than one Wazuh server
  # node, each one must have a node_type
  server:
    - name: wazuh-1
      ip: 10.0.0.20
    #  node_type: master
    #- name: wazuh-2
    #  ip: "<wazuh-manager-ip>"
    #  node_type: worker
    #- name: wazuh-3
    #  ip: "<wazuh-manager-ip>"
    #  node_type: worker

  # Wazuh dashboard nodes
  dashboard:
    - name: dashboard
      ip: 10.0.0.20
Run the ./wazuh-install.sh -g to generate the certificates. For a multi-node cluster, these certificates need to be later deployed to all Wazuh instances in your cluster.
Transfer the following files to a directory on the host(s) where the offline installation will be performed. You can use scp for this:
wazuh-install.shwazuh-offline.tar.gzwazuh-install-files.tar
Record SHA-256 checksums before transfer and verify them on every destination:
sha256sum wazuh-install.sh wazuh-offline.tar.gz wazuh-install-files.tar > wazuh-transfer.sha256
sha256sum --check wazuh-transfer.sha256
Before installing packages, also compare their SHA-512 values with the package checksums published for the selected Wazuh release. Stop if any checksum differs.
Install Wazuh components
In the working directory where you placed wazuh-offline.tar.gz and wazuh-install-files.tar, execute the following command to decompress the installation files:
Install the Wazuh indexer
RPM:
The following dependencies must be installed on the Wazuh indexer nodes.
- coreutils
rpm --import ./wazuh-offline/wazuh-files/GPG-KEY-WAZUH
rpm -ivh ./wazuh-offline/wazuh-packages/wazuh-indexer*.rpm
DEB:
The following dependencies must be installed on the Wazuh indexer nodes.
- debconf
- adduser
- procps
Run the following commands replacing <indexer-node-name> with the name of the Wazuh indexer node you are configuring as defined in config.yml. For example, node-1. This deploys the SSL certificates to encrypt communications between the Wazuh central components.
NODE_NAME=<INDEXER_NODE_NAME>
install -d -m 500 -o wazuh-indexer -g wazuh-indexer /etc/wazuh-indexer/certs
mv -n wazuh-install-files/$NODE_NAME.pem /etc/wazuh-indexer/certs/indexer.pem
mv -n wazuh-install-files/$NODE_NAME-key.pem /etc/wazuh-indexer/certs/indexer-key.pem
mv wazuh-install-files/admin-key.pem /etc/wazuh-indexer/certs/
mv wazuh-install-files/admin.pem /etc/wazuh-indexer/certs/
cp wazuh-install-files/root-ca.pem /etc/wazuh-indexer/certs/
chmod 500 /etc/wazuh-indexer/certs
chmod 400 /etc/wazuh-indexer/certs/*
chown -R wazuh-indexer:wazuh-indexer /etc/wazuh-indexer/certs
Move each node’s certificate and key files (e.g., node-1.pem and node-1-key.pem) to their respective certs folder. These files are specific to each node and shouldn’t be shared with others. However, do not move the root-ca.pem certificate—copy it instead, so it can be deployed to other component folders later.
Edit /etc/wazuh-indexer/opensearch.yml and modify the following settings:
network.host– Defines the node’s address for HTTP and transport traffic. It should match the address used inconfig.ymlwhen generating SSL certificates.node.name– Set this to the Wazuh indexer node name as defined inconfig.yml(e.g.,node-1).cluster.initial_master_nodes– List the names of master-eligible nodes, as specified inconfig.yml.
network.host: "10.0.0.20"
node.name: "node-1"
cluster.initial_master_nodes:
- "node-1"
#- "node-2"
#- "node-3"
discovery.seed_hosts– Contains the addresses of master-eligible nodes. Leave it commented for a single-node setup, but for multi-node configurations, uncomment it and specify the node addresses.
plugins.security.nodes_dn– Lists the Distinguished Names (DNs) of certificates for all Wazuh indexer cluster nodes. Uncomment and modify these based on your settings andconfig.yml.
plugins.security.nodes_dn:
- "CN=node-1,OU=Wazuh,O=Wazuh,L=California,C=US"
- "CN=node-2,OU=Wazuh,O=Wazuh,L=California,C=US"
- "CN=node-3,OU=Wazuh,O=Wazuh,L=California,C=US"
Enable and start the Wazuh indexer service. Verify Wazuh indexer is active and running (exit with q)
systemctl daemon-reload
systemctl enable wazuh-indexer
systemctl start wazuh-indexer
systemctl status wazuh-indexer
Once all Wazuh indexer nodes are running, execute the indexer-security-init.sh script on any Wazuh indexer node. This updates the certificate information and initiates the cluster.
The offline bundle initially uses temporary indexer credentials. Treat them as installation-only secrets, do not place them directly in shell history, and replace them during the security step before making the deployment available to other users.
Run the following commands to check that the installation is successful. The example uses the generated root CA instead of disabling certificate verification; adjust the certificate path if you stored the bundle elsewhere.
read -rp 'Temporary indexer username: ' INDEXER_USERNAME
read -rsp 'Temporary indexer password: ' INDEXER_PASSWORD; echo
curl --fail --show-error \
  --cacert /etc/wazuh-indexer/certs/root-ca.pem \
  --user "${INDEXER_USERNAME}:${INDEXER_PASSWORD}" \
  https://10.0.0.20:9200
unset INDEXER_PASSWORD
#Example output
{
  "name" : "node-1",
  "cluster_name" : "wazuh-cluster",
  "cluster_uuid" : "6hQpHd5cSzCLrhFo0T-Crg",
  "version" : {
    "number" : "7.10.2",
    "build_type" : "rpm",
    "build_hash" : "eee49cb340edc6c4d489bcd9324dda571fc8dc03",
    "build_date" : "2023-09-20T23:54:29.889267151Z",
    "build_snapshot" : false,
    "lucene_version" : "9.7.0",
    "minimum_wire_compatibility_version" : "7.10.0",
    "minimum_index_compatibility_version" : "7.0.0"
  },
  "tagline" : "The OpenSearch Project: https://opensearch.org/"
}
Install the Wazuh server
Run the following commands to import the Wazuh key and install the Wazuh manager.
RPM:
rpm --import ./wazuh-offline/wazuh-files/GPG-KEY-WAZUH
rpm -ivh ./wazuh-offline/wazuh-packages/wazuh-manager*.rpm
DEB:
On systems with apt as package manager, the following dependencies must be installed on the Wazuh server nodes.
- gnupg
- apt-transport-https
Store the temporary Wazuh indexer username and password in the Wazuh manager
keystore using the wazuh-keystore tool. Enter the values interactively so the
password is not recorded in shell history. Replace these temporary credentials
in the secure the Wazuh installation step.
read -rp 'Temporary indexer username: ' INDEXER_USERNAME
read -rsp 'Temporary indexer password: ' INDEXER_PASSWORD; echo
printf '%s' "$INDEXER_USERNAME" | /var/ossec/bin/wazuh-keystore -f indexer -k username
printf '%s' "$INDEXER_PASSWORD" | /var/ossec/bin/wazuh-keystore -f indexer -k password
unset INDEXER_PASSWORD
Enable and start the Wazuh manager service. Verify Wazuh manager is active and running (exit with q)
systemctl daemon-reload
systemctl enable wazuh-manager
systemctl start wazuh-manager
systemctl status wazuh-manager
Install Filebeat
Filebeat must be installed and configured on the same server as the Wazuh manager. Run the following command to install Filebeat.
RPM:
DEB:
Copy the configuration files to the correct location. When prompted, type "yes" to overwrite /etc/filebeat/filebeat.yml.
Note for CentOS: Remove &&\ from the command.
cp ./wazuh-offline/wazuh-files/filebeat.yml /etc/filebeat/ &&\
cp ./wazuh-offline/wazuh-files/wazuh-template.json /etc/filebeat/ &&\
chmod go+r /etc/filebeat/wazuh-template.json
Edit the /etc/filebeat/filebeat.yml configuration file and replace the following value:
hosts: The list of Wazuh indexer nodes to connect to. You can use either IP addresses or hostnames. By default, the host is set to localhost hosts: ["127.0.0.1:9200"]. Replace it with your Wazuh indexer address accordingly.
If you have more than one Wazuh indexer node, you can separate the addresses using commas. For example, hosts: ["10.0.0.1:9200", "10.0.0.2:9200", "10.0.0.3:9200"]
# Wazuh - Filebeat configuration file
 output.elasticsearch:
 hosts: ["10.0.0.20:9200"]
 protocol: https
 username: ${username}
 password: ${password}
Create a Filebeat keystore to securely store authentication credentials.
Add the temporary indexer username and password to the Filebeat secrets keystore. Do not place the password in shell history; the commands below read it without echoing it.
printf '%s' 'admin' | filebeat keystore add username --stdin --force
read -rsp 'Temporary indexer password: ' INDEXER_PASSWORD
printf '%s' "$INDEXER_PASSWORD" | filebeat keystore add password --stdin --force
unset INDEXER_PASSWORD
Install the Wazuh module for Filebeat.
Replace <SERVER_NODE_NAME> with your Wazuh server node certificate name, the same used in config.yml when creating the certificates. For example, wazuh-1. Then, move the certificates to their corresponding location.
NODE_NAME=<SERVER_NODE_NAME>
install -d -m 500 -o root -g root /etc/filebeat/certs
mv -n wazuh-install-files/$NODE_NAME.pem /etc/filebeat/certs/filebeat.pem
mv -n wazuh-install-files/$NODE_NAME-key.pem /etc/filebeat/certs/filebeat-key.pem
cp wazuh-install-files/root-ca.pem /etc/filebeat/certs/
chmod 500 /etc/filebeat/certs
chmod 400 /etc/filebeat/certs/*
chown -R root:root /etc/filebeat/certs
Enable and start the Filebeat service. Verify Filebeat is active and running (exit with q)
systemctl daemon-reload
systemctl enable filebeat
systemctl start filebeat
systemctl status filebeat
Run the following command to make sure Filebeat is successfully installed.
#Example output
elasticsearch: https://10.0.0.20:9200...
  parse url... OK
  connection...
    parse host... OK
    dns lookup... OK
    addresses: 10.0.0.20
    dial up... OK
  TLS...
    security: server's certificate chain verification is enabled
    handshake... OK
    TLS version: TLSv1.3
    dial up... OK
  talk to server... OK
  version: 7.10.2
Wazuh server node is now successfully installed.
Install the Wazuh dashboard
RPM:
The following dependencies must be installed on the Wazuh dashboard node.
- libcap
rpm --import ./wazuh-offline/wazuh-files/GPG-KEY-WAZUH
rpm -ivh ./wazuh-offline/wazuh-packages/wazuh-dashboard*.rpm
DEB:
The following dependencies must be installed on the Wazuh dashboard node.
- debhelper version 9 or later
- tar
- curl
- libcap2-bin
Replace <DASHBOARD_NODE_NAME> with your Wazuh dashboard node name, the same used in config.yml to create the certificates. For example, dashboard. Then, move the certificates to their corresponding location.
NODE_NAME=<DASHBOARD_NODE_NAME>
install -d -m 500 -o wazuh-dashboard -g wazuh-dashboard /etc/wazuh-dashboard/certs
mv -n wazuh-install-files/$NODE_NAME.pem /etc/wazuh-dashboard/certs/dashboard.pem
mv -n wazuh-install-files/$NODE_NAME-key.pem /etc/wazuh-dashboard/certs/dashboard-key.pem
cp wazuh-install-files/root-ca.pem /etc/wazuh-dashboard/certs/
chmod 500 /etc/wazuh-dashboard/certs
chmod 400 /etc/wazuh-dashboard/certs/*
chown -R wazuh-dashboard:wazuh-dashboard /etc/wazuh-dashboard/certs
Edit the /etc/wazuh-dashboard/opensearch_dashboards.yml file and replace the following values:
server.host: This setting specifies the host of the back end server. To allow remote users to connect, set the value to the IP address or DNS name of the Wazuh dashboard. The value0.0.0.0will accept all the available IP addresses of the host.opensearch.hosts: The URLs of the Wazuh indexer instances to use for all your queries. The Wazuh dashboard can be configured to connect to multiple Wazuh indexer nodes in the same cluster. The addresses of the nodes can be separated by commas. For example,["https://10.0.0.2:9200", "https://10.0.0.3:9200","https://10.0.0.4:9200"]
server.host: 10.0.0.20
server.port: 443
opensearch.hosts: https://10.0.0.20:9200
opensearch.ssl.verificationMode: certificate
Enable and start the Wazuh dashboard. Verify Wazuh dashboard is active and running (exit with q)
systemctl daemon-reload
systemctl enable wazuh-dashboard
systemctl start wazuh-dashboard
systemctl status wazuh-dashboard
Edit the file /usr/share/wazuh-dashboard/data/wazuh/config/wazuh.yml and replace the url value with the IP address or hostname of the Wazuh server master node.
hosts:
  - default:
      url: https://10.0.0.20
      port: 55000
      username: wazuh-wui
      password: wazuh-wui
      run_as: false
Access the web interface.
- URL: https://
- Username: admin
- Password: admin
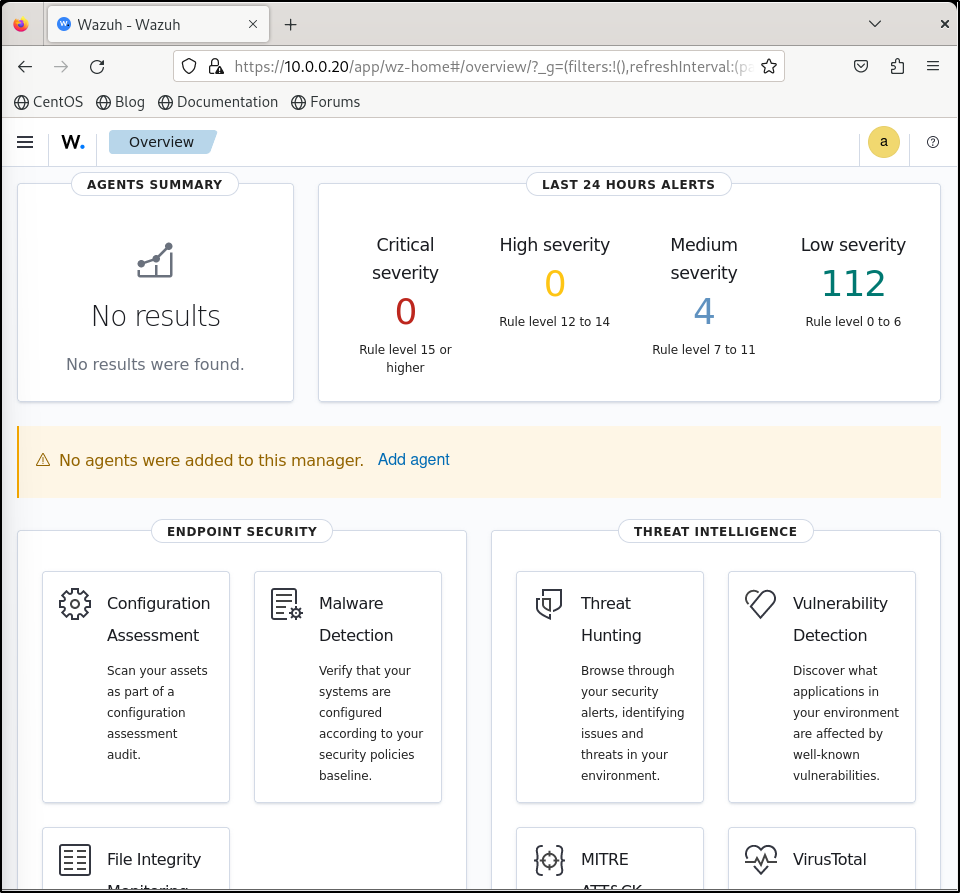
Import the certificate
Upon the first access to the Wazuh dashboard, the browser shows a warning message stating that the certificate was not issued by a trusted authority. An exception can be added in the advanced options of the web browser or, for increased security, the root-ca.pem file previously generated can be imported to the certificate manager of the browser.
Copy /etc/wazuh-dashboard/certs/root-ca.pem to user’s home directory
Change ownership of user's home directory to the non-root user to enable read access to root-ca.pem
On Firefox, go to Settings, Privacy & Security and Certificates. Click View Certificates.
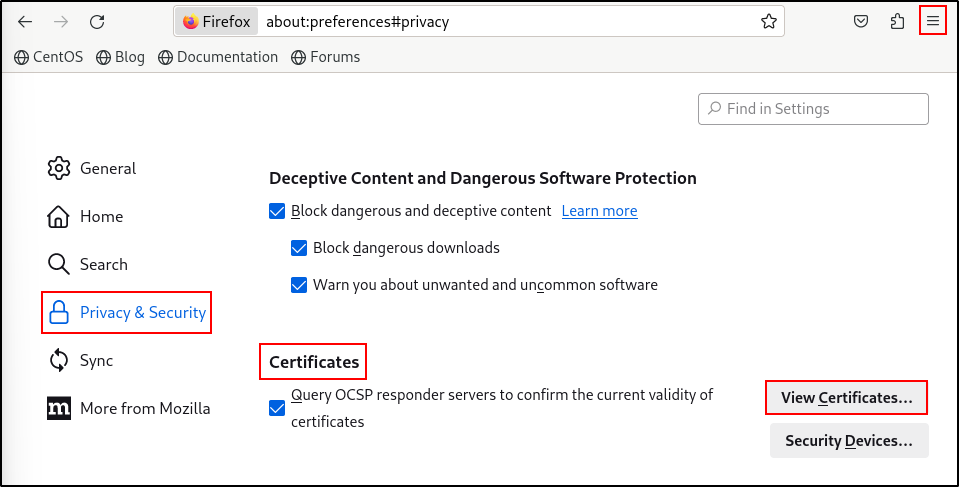
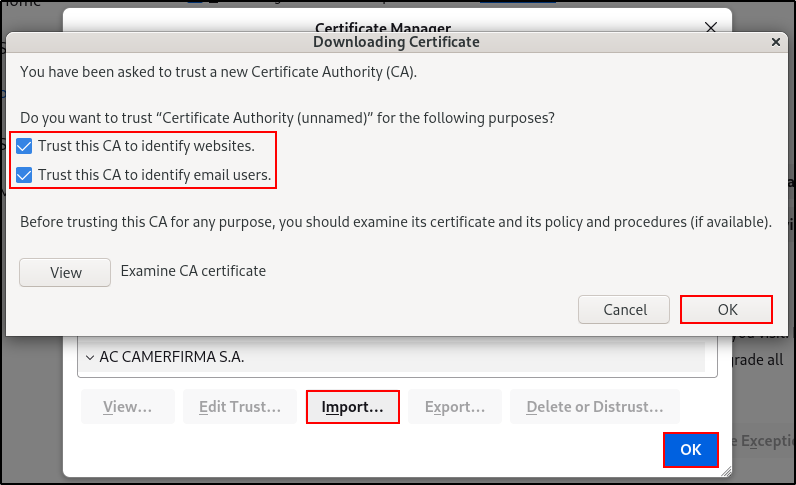
Click Import, select root-ca.pem in user’s home directory. Select Trust this CA to identify website and email users. Click OK.
Delete root-ca.pem from user’s home directory.
Secure the Wazuh installation
You have now installed and configured all the Wazuh central components. We recommend changing the default credentials to protect your infrastructure from possible attacks.
Use the Wazuh passwords tool to change all the internal users passwords.
/usr/share/wazuh-indexer/plugins/opensearch-security/tools/wazuh-passwords-tool.sh --api --change-all --admin-user wazuh --admin-password wazuh
Save the new Wazuh indexer password into the Wazuh manager keystore. Restart Wazuh manager service.
/var/ossec/bin/wazuh-keystore -f indexer -k password -v '<NEW_INDEXER_PASSWORD>'
systemctl restart wazuh-manager
systemctl status wazuh-manager
Add the new password to the Filebeat secrets keystore. Restart the Filebeat service
printf '%s' '<NEW_INDEXER_PASSWORD>' | filebeat keystore add password --stdin --force
systemctl restart filebeat
filebeat test output
Verify that new password has been added to /usr/share/wazuh-dashboard/data/wazuh/config/wazuh.yml. Restart the Wazuh dashboard.
nano /usr/share/wazuh-dashboard/data/wazuh/config/wazuh.yml
systemctl restart wazuh-dashboard
systemctl status wazuh-dashboard
Checkpoint: verify the central services
Check each service separately:
sudo systemctl status wazuh-indexer
sudo systemctl status wazuh-manager
sudo systemctl status filebeat
sudo systemctl status wazuh-dashboard
Expected: every required service reports active (running). Then test Filebeat output and open the dashboard from an authorised workstation. If a check fails, inspect that service's journal before changing unrelated configuration.