Configure Active Response
Test a narrowly scoped automated response, prove that it executed, and confirm that access or state is safely restored.
Automation can disrupt access
Define the target, trigger, duration, rollback, exclusions, and recovery route before enabling a response. Keep out-of-band access available and never test against production systems.
Select a response
The demonstrated lab provides a temporary network-blocking procedure and retains an account-disable result as a case study. Use the network path for the guided exercise; implement account disabling only after defining and testing its full configuration and rollback independently.
Detailed active-response procedures
The original module explanation, default and custom actions, account-lockout example, malicious-address list, custom rule, response configuration, controlled test, and dashboard evidence are retained below.
The goal of incident response is to effectively handle a security incident and restore normal business operations as quickly as possible. As organizations’ digital assets continuously grow, managing incidents manually becomes increasingly challenging, hence the need for automation.
Understand the Wazuh Active Response module
The Wazuh Active Response module allows users to run automated actions when incidents are detected on endpoints. This improves an organization's incident response processes, enabling security teams to take immediate and automated actions to counter detected threats.
Review default active-response actions
Out-of-the-box scripts are available on every operating system that runs the Wazuh agents. Some of the default active response scripts include
| Name of script | Description |
|---|---|
| disable-account | Disables a user account |
| firewall-drop | Adds an IP address to the iptables deny list. |
| firewalld-drop | Adds an IP address to the firewalld drop list. |
| restart.sh | Restarts the Wazuh agent or server. |
| netsh.exe | Blocks an IP address using netsh. |
Review custom active-response actions
One of the benefits of the Wazuh Active Response module is its adaptability. Wazuh allows security teams to create custom active response actions in any programming language, tailoring them to their specific needs.
Account-disable case study
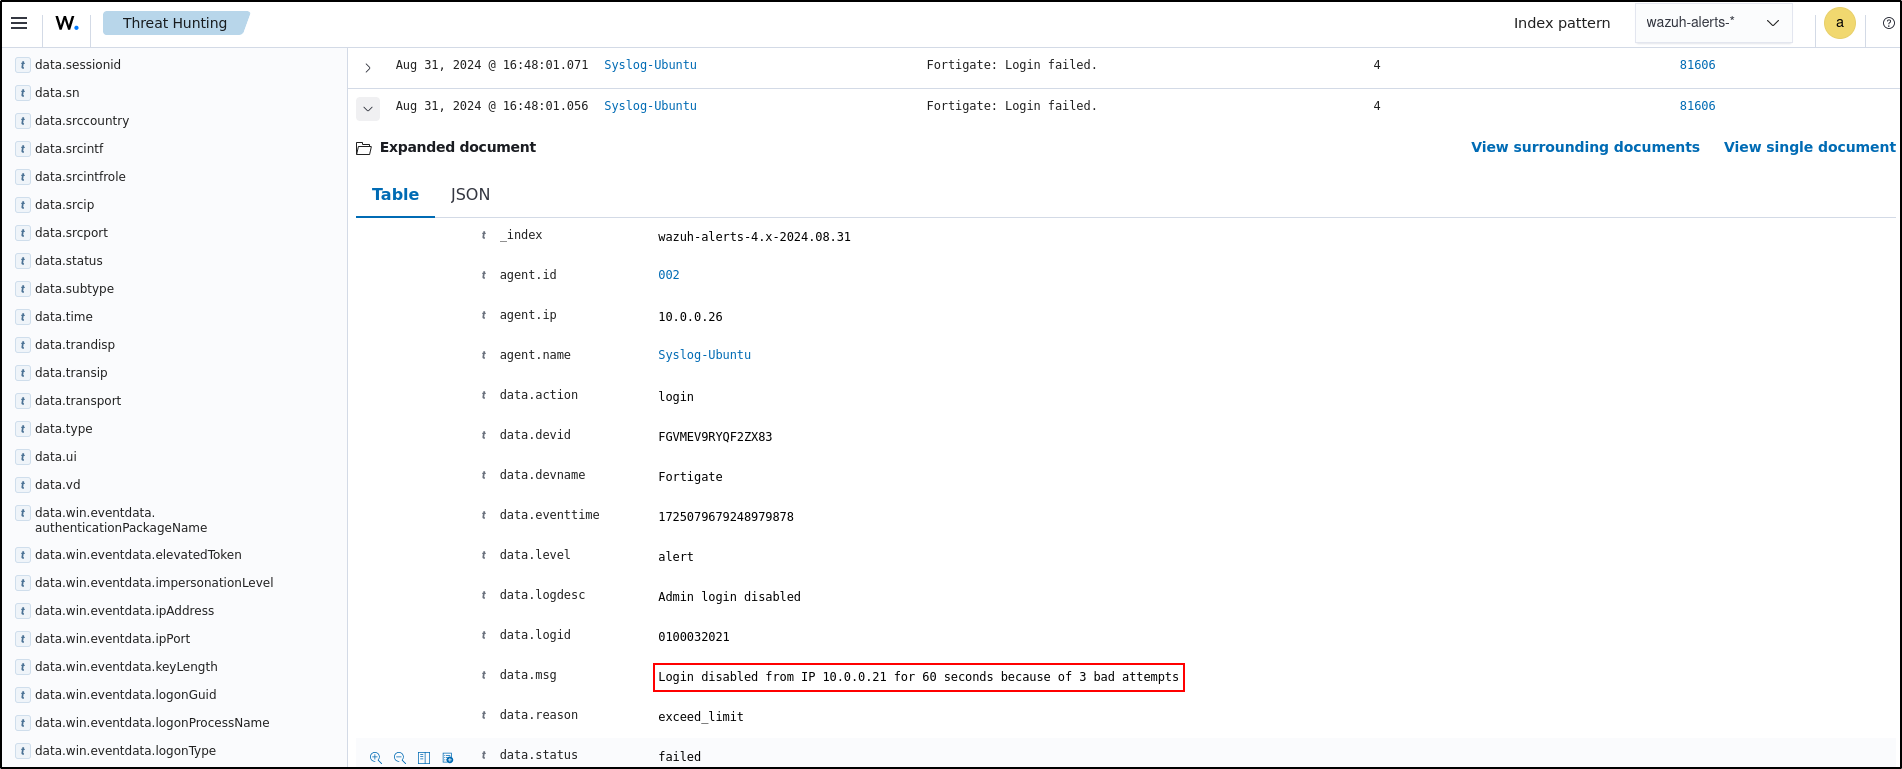
Account lockout can limit repeated authentication attempts, but an automated account-disable action can also lock out administrators or service accounts. The following screenshot is retained as evidence from the original PoC; it is not a complete reproducible procedure. Before implementing this response, define the exact rule, endpoint group, excluded accounts, timeout, response log, and tested manual re-enable command.
In the image below, the Wazuh Active Response module disables the account on a Linux endpoint and re-enables it again after 5 minutes.
In the original test, three failed SSH attempts triggered a temporary account disable. Reproduce this only with a dedicated lab account and out-of-band access.
Block a known malicious address
In this use case, we demonstrate how to block malicious IP addresses from accessing web resources on a web server.
Configure the Ubuntu endpoint
Update local packages and install the Apache web server:
If the firewall is enabled, modify the firewall to allow external access to web ports. Skip this step if the firewall is disabled:
Check the status of the Apache service to verify that the web server is running:
Use the curl command or open http://<UBUNTU_IP> in a browser to view the Apache landing page and verify the installation:
Add the following to /var/ossec/etc/ossec.conf file to configure the Wazuh agent and monitor the Apache access logs:
<localfile>
  <log_format>syslog</log_format>
  <location>/var/log/apache2/access.log</location>
</localfile>
Restart the Wazuh agent to apply the changes:
Configure the Wazuh server
Download the utilities and configure the CDB list. Download the Alienvault IP reputation database:
sudo wget https://raw.githubusercontent.com/firehol/blocklist-ipsets/master/alienvault_reputation.ipset -O /var/ossec/etc/lists/alienvault_reputation.ipset
sha256sum /var/ossec/etc/lists/alienvault_reputation.ipset
Append the IP address of the attacker endpoint to the IP reputation database. Replace <ATTACKER_IP> with the Kali IP address in the command below:
Download a script to convert from the .ipset format to the .cdb list format:
sudo wget https://wazuh.com/resources/iplist-to-cdblist.py -O /tmp/iplist-to-cdblist.py
sha256sum /tmp/iplist-to-cdblist.py
Compare both hashes with reviewed values recorded in the lab notes. These URLs can change over time; do not execute newly downloaded content until it has been reviewed.
Convert the alienvault_reputation.ipset file to a .cdb format using the previously downloaded script:
sudo /var/ossec/framework/python/bin/python3 /tmp/iplist-to-cdblist.py /var/ossec/etc/lists/alienvault_reputation.ipset /var/ossec/etc/lists/blacklist-alienvault
Assign the right permissions and ownership to the generated file:
Configure active response to block the test address
Add a custom rule to trigger a Wazuh active response script. Do this in the Wazuh server /var/ossec/etc/rules/local_rules.xml custom ruleset file:
<group name="attack,">
  <rule id="100100" level="10">
    <if_group>web|attack|attacks</if_group>
    <list field="srcip" lookup="address_match_key">etc/lists/blacklist-alienvault</list>
    <description>IP address found in AlienVault reputation database.</description>
  </rule>
</group>
Edit the Wazuh server /var/ossec/etc/ossec.conf configuration file and add the etc/lists/blacklist-alienvault list to the <ruleset> section:
<ossec_config>
  <ruleset>
    <!-- Default ruleset -->
    <decoder_dir>ruleset/decoders</decoder_dir>
    <rule_dir>ruleset/rules</rule_dir>
    <rule_exclude>0215-policy_rules.xml</rule_exclude>
    <list>etc/lists/audit-keys</list>
    <list>etc/lists/amazon/aws-eventnames</list>
    <list>etc/lists/security-eventchannel</list>
    <list>etc/lists/blacklist-alienvault</list>

    <!-- User-defined ruleset -->
    <decoder_dir>etc/decoders</decoder_dir>
    <rule_dir>etc/rules</rule_dir>
  </ruleset>

</ossec_config>
Add the active response block to the Wazuh server /var/ossec/etc/ossec.conf file:
The firewall-drop command integrates with the Ubuntu local iptables firewall and drops incoming network connection from the attacker endpoint for 60 seconds:
Remember to uncomment the code block (remove <!-- and --> )
<ossec_config>
  <active-response>
    <command>firewall-drop</command>
    <location>local</location>
    <rules_id>100100</rules_id>
    <timeout>60</timeout>
  </active-response>
</ossec_config>
Validate the rule and manager configuration before restarting:
Paste one representative Apache log event into wazuh-logtest and confirm that
rule 100100 matches. Exit with Ctrl+D. If either validation reports an
error, restore the configuration rather than restarting the manager.
Restart the Wazuh manager to apply the changes:
Run the controlled test
Access any of the web servers from the Kali endpoint using the corresponding IP address. Replace <WEBSERVER_IP> with the appropriate value and execute the following command from the attacker endpoint:
The attacker endpoint connects to the victim's web servers the first time. After the first connection, the Wazuh active response module temporarily blocks any successive connection to the web servers for 60 seconds.
On the endpoint, retain evidence from the active-response log and firewall state:
After the timeout, confirm that the rule is absent and authorised access works.
Before testing, record the exact iptables -S INPUT entry created in your
environment. If automatic reversal fails, remove only that exact rule with
iptables -D; never flush the firewall.
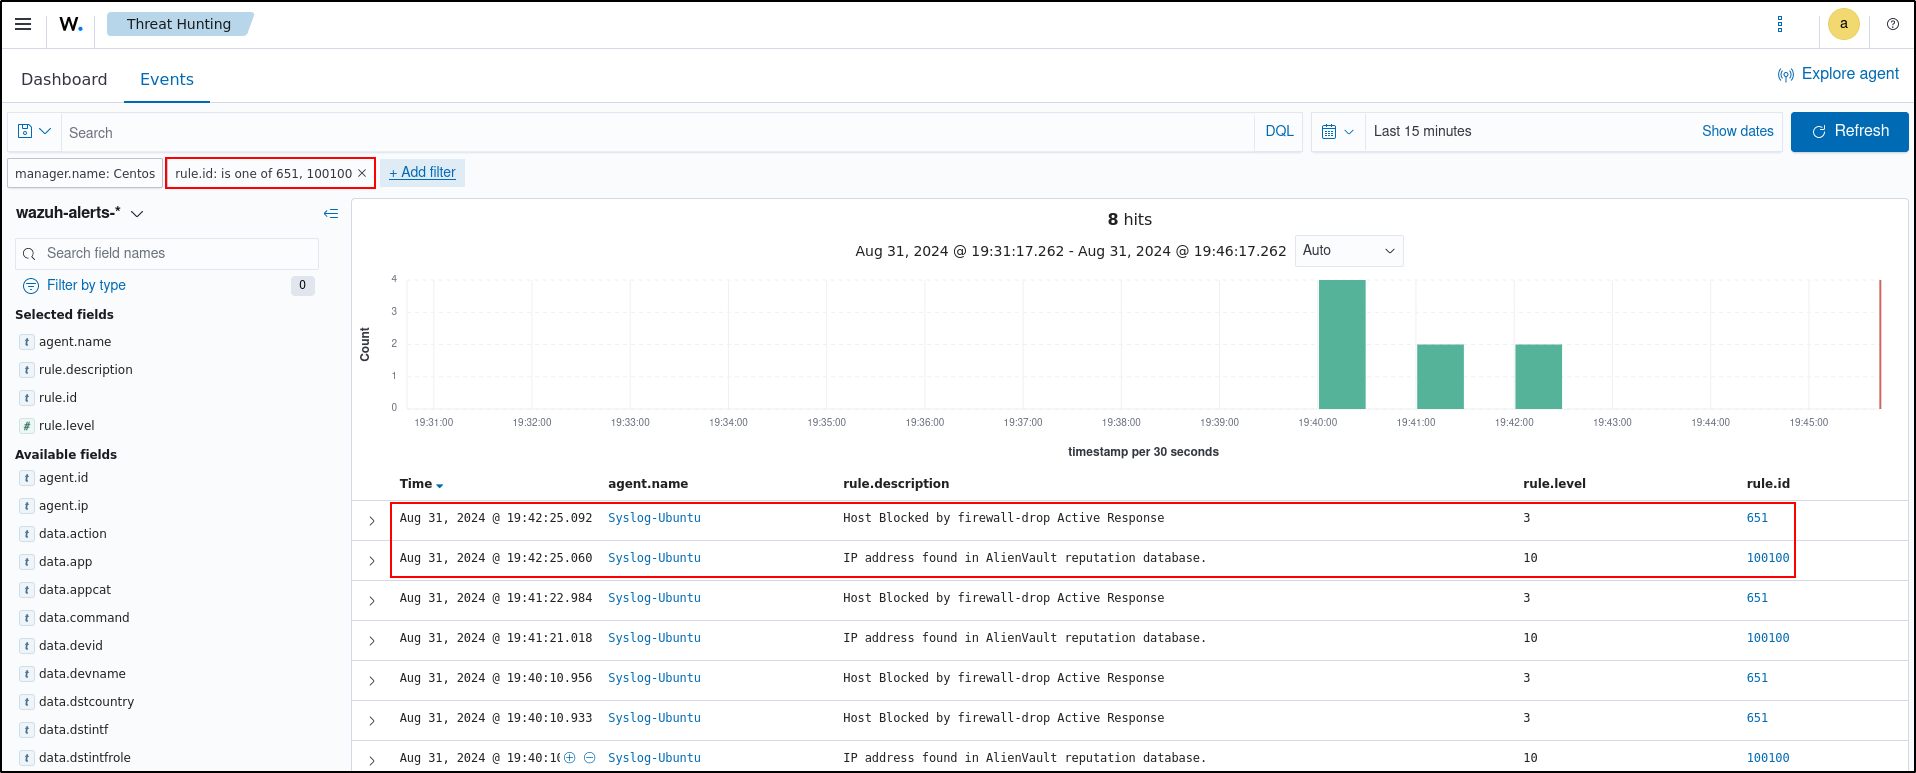
Visualise alerts
You can visualize the alert data in the Wazuh dashboard. To do this, go to the Threat Hunting module and add the filters in the search bar to query the alerts: rule.id is one of 651, 100100
Apply safety boundaries
- Restrict the response to the intended rule ID and endpoint group.
- Use a short timeout during initial testing.
- Exclude management addresses and essential service accounts.
- Validate configuration syntax before restarting the manager.
- Record the manager and endpoint logs that will prove execution.
- Prepare a manual reversal command before triggering the rule.
Checkpoint: prove execution and reversal
Trigger one controlled event. Confirm the alert, response invocation, affected account or address, start time, timeout, and restoration. Then confirm legitimate access works again.