Run Snort on pfSense
Evaluate the pfSense Snort package as a distinct gateway deployment. Do not assume its engine, DAQ, rule or interface behaviour matches the Ubuntu Snort 3 build.
Before you begin
Record the pfSense release, Snort package version, underlying engine version, interface driver, rule sources and licence. Review current Netgate package documentation before applying historical screenshots.
Protect gateway access
Keep console access and a configuration backup. Begin in alert-only mode on an isolated interface. Enabling blocking on the wrong interface or policy can disconnect clients or expose services.
Lab topology and design choice
The historical lab used pfSense 2.7.2 with a WAN and 10.0.0.0/24 LAN. A Kali
host generated authorised traffic and a Windows test client sat behind pfSense.
Use private or documentation address ranges in the guide; do not expose a real
WAN address to reproduce the test.
Choose the monitored interface from the traffic path:
| Interface | Visibility | Typical use |
|---|---|---|
| WAN | Post-/pre-NAT visibility depends on direction and pfSense processing | Internet-facing scans and inbound policy validation |
| LAN | Internal client addresses and outbound activity | Client-focused detections and controlled egress tests |
| Dedicated lab OPT | Isolated test segment | Safest place for first blocking evaluation |
Document how NAT changes the addresses an alert is expected to show. An alert on the wrong address can indicate an incorrect assumption about inspection placement rather than a detection failure.
Safe evaluation workflow
- Back up the pfSense configuration and record current firewall/NAT state.
- Install the Snort package from the supported pfSense package manager.
- Configure one authorised rule source without exposing the Oinkcode.
- Add one lab interface and begin with blocking disabled.
- Select only the categories required for the test and update rules.
- Generate one controlled event and confirm the alert identifies the correct interface, source, destination, SID and time.
- Review false-positive suppression and pass-list behaviour.
- Enable blocking only for a narrowly scoped disposable test.
- Confirm a benign comparison remains reachable.
- Disable blocking and remove temporary NAT, virtual IP and test-rule changes.
Historical PoC: WAN rules and legacy blocking
The original page demonstrated the complete pfSense 2.7.2 WAN workflow. It is preserved here for reference, while the isolated local-rule workflow below is the recommended first test.
- Install the Snort package through System > Package Manager.
- Under Services > Snort > Global Settings, enable the authorised Snort VRT source and enter the account Oinkcode, then enable the demonstrated GPLv2, ET Open, OpenAppID, AppID text and FEODO sources.
- Set the rule update interval, hide deprecated categories, choose the blocked-host retention interval, save, and run Update Rules.
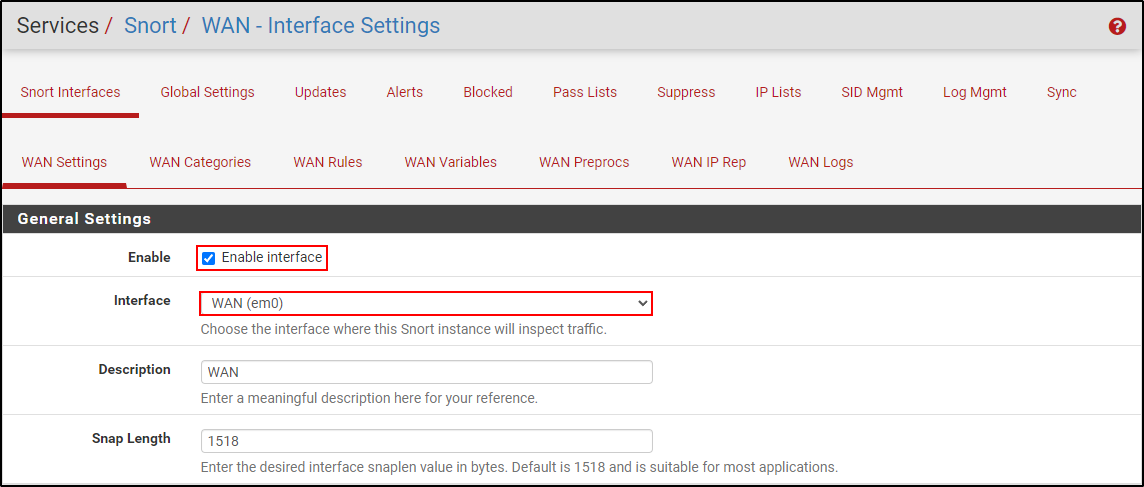
- Add and enable the WAN interface under Snort Interfaces.
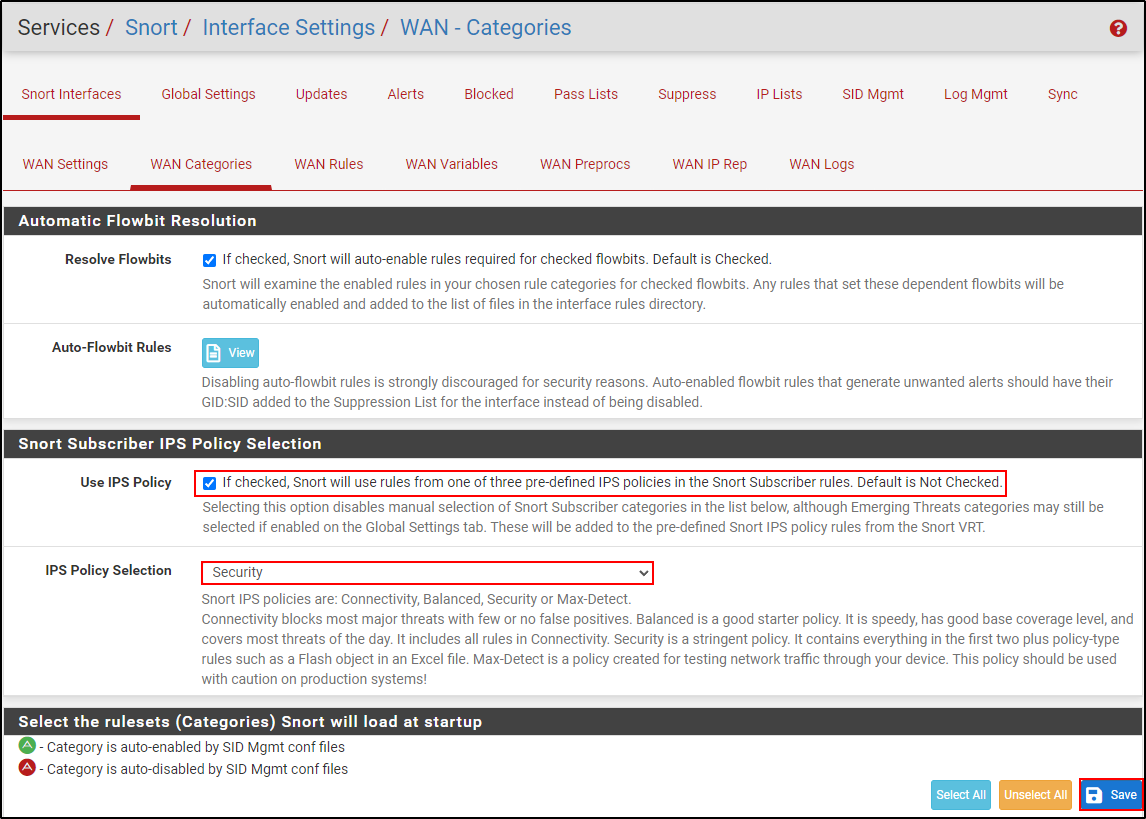
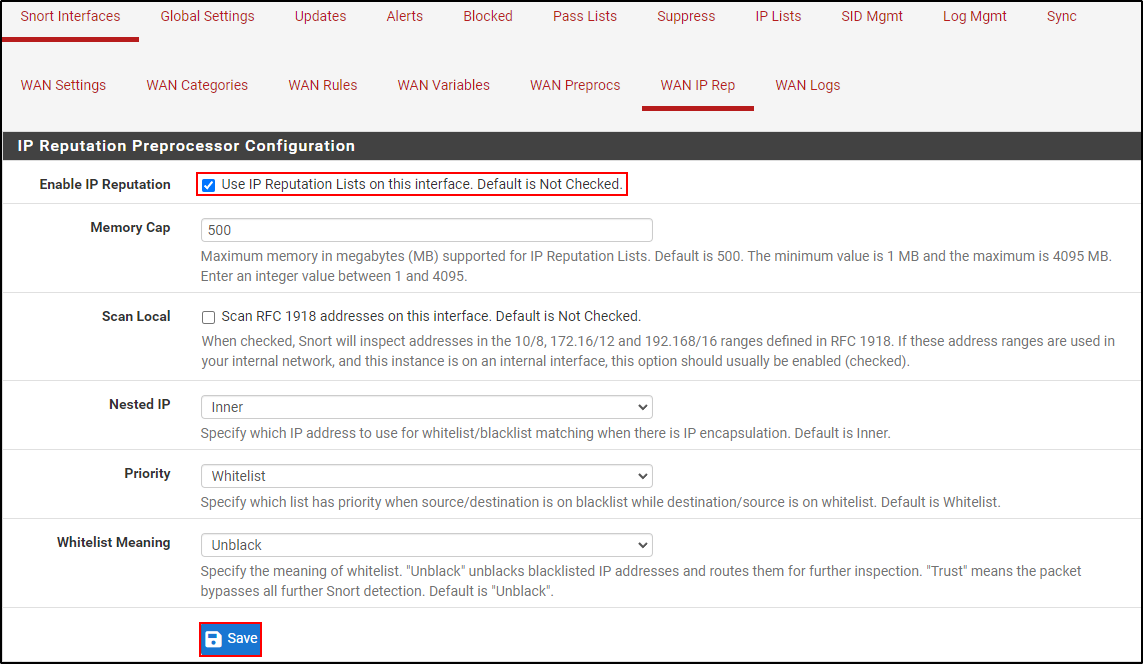
- The demonstration enabled Block Offenders, selected Legacy Mode, chose the source IP as the block target, enabled the Security IPS policy and enabled IP reputation.
- It confirmed the interface was running, exposed a disposable Windows test host through temporary 1:1 NAT and a virtual IP, and ran an authorised Nmap scan from the Kali test host.
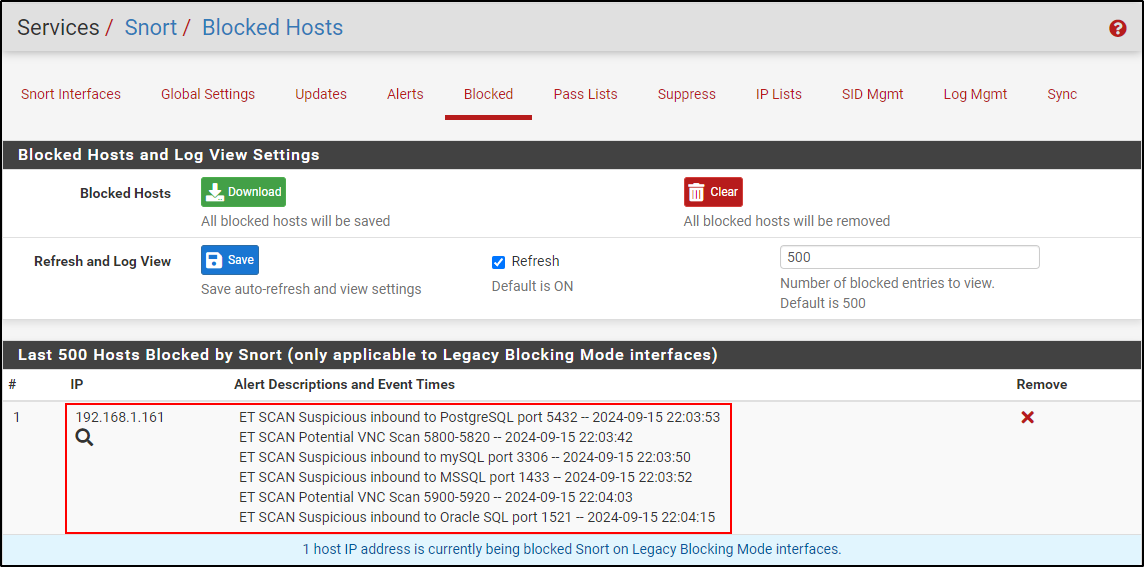
- It verified the scan SIDs in Alerts and the test source in Blocked, then removed the temporary exposure and block.
Do not reproduce the public exposure casually
Temporary NAT and virtual-IP changes expose a host and can affect the gateway. Use a dedicated lab WAN, documentation addresses, console access and a configuration backup. Do not scan or expose systems without explicit authorisation. The current local-rule exercise proves the same alert/block path without requiring Internet exposure.
The original NAT and public-IP screenshots remain stored as image 13.png,
public_ip.png and public_ip 1.png. They are intentionally not rendered
because they contain a real external address. The other historical pfSense
screenshots appear beside the corresponding steps below.
Install and record the package
In the pfSense web interface, open System > Package Manager > Available Packages, install snort, then record the installed package and engine versions from Installed Packages and Snort's status/log output. Take a new configuration backup after installation but before interface configuration.
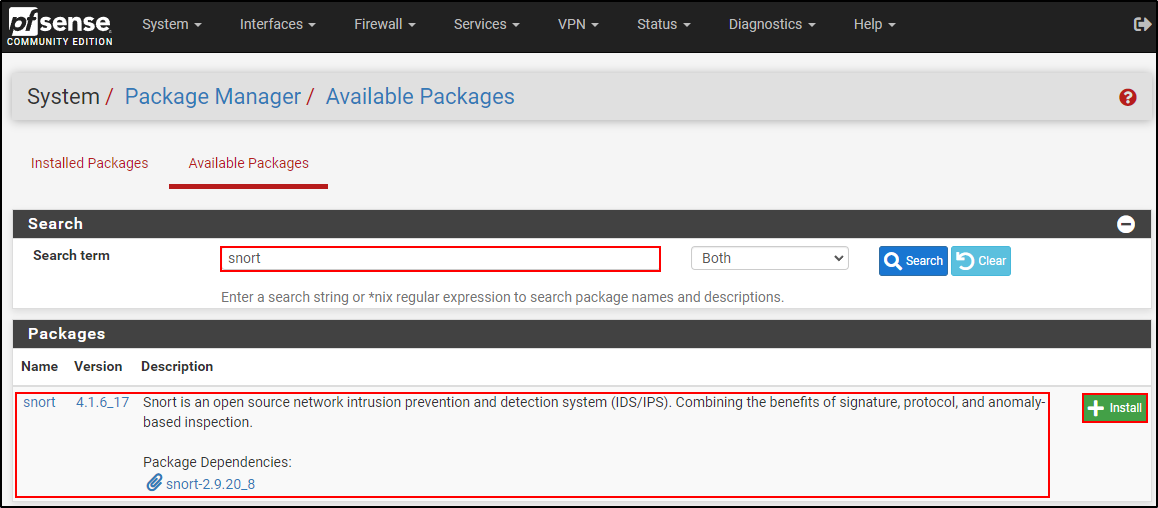
The screenshot is from the pfSense 2.7.2 PoC. Package and engine versions in a current repository may differ; record what the package manager actually installs.
Under Services > Snort > Global Settings:
- Select only authorised rule sources.
- Enter an Oinkcode only if the account and licence require it.
- Enable GPLv2, ET Open, OpenAppID or reputation sources only when they serve an explicit test objective.
- Set a deliberate update interval and retain the last-known-good rules.
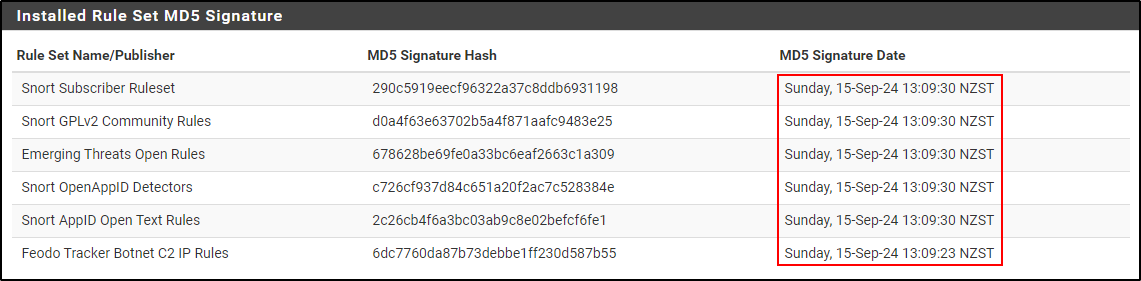
- Update rules and confirm timestamps and logs show success.
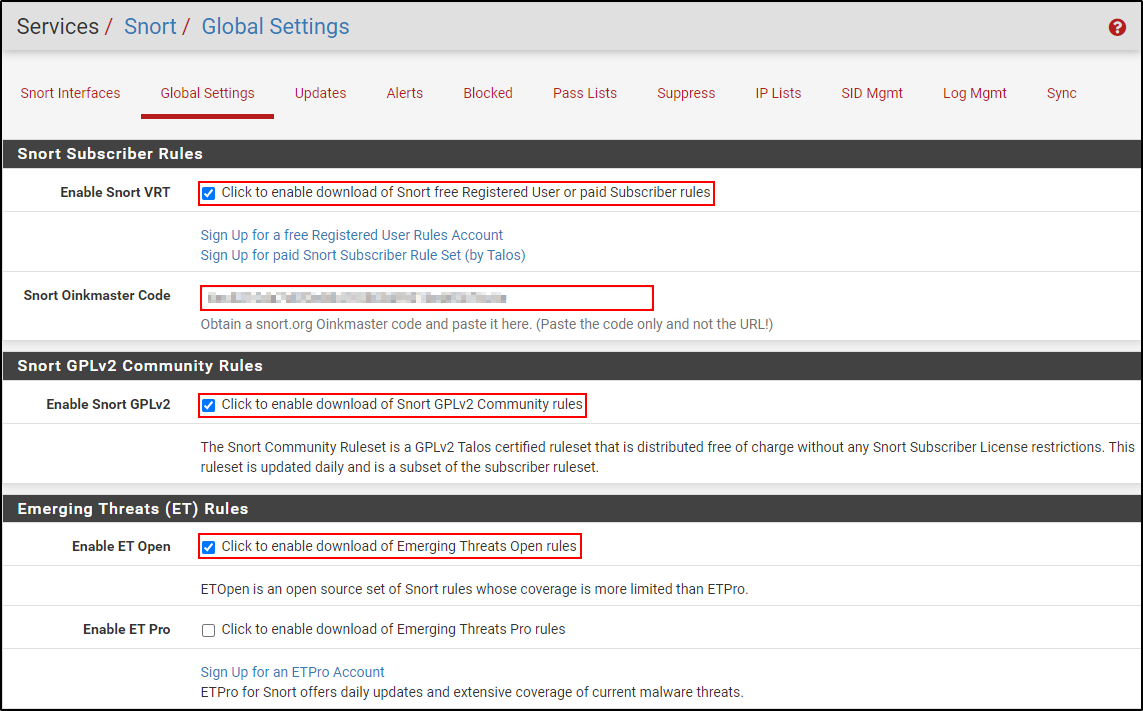
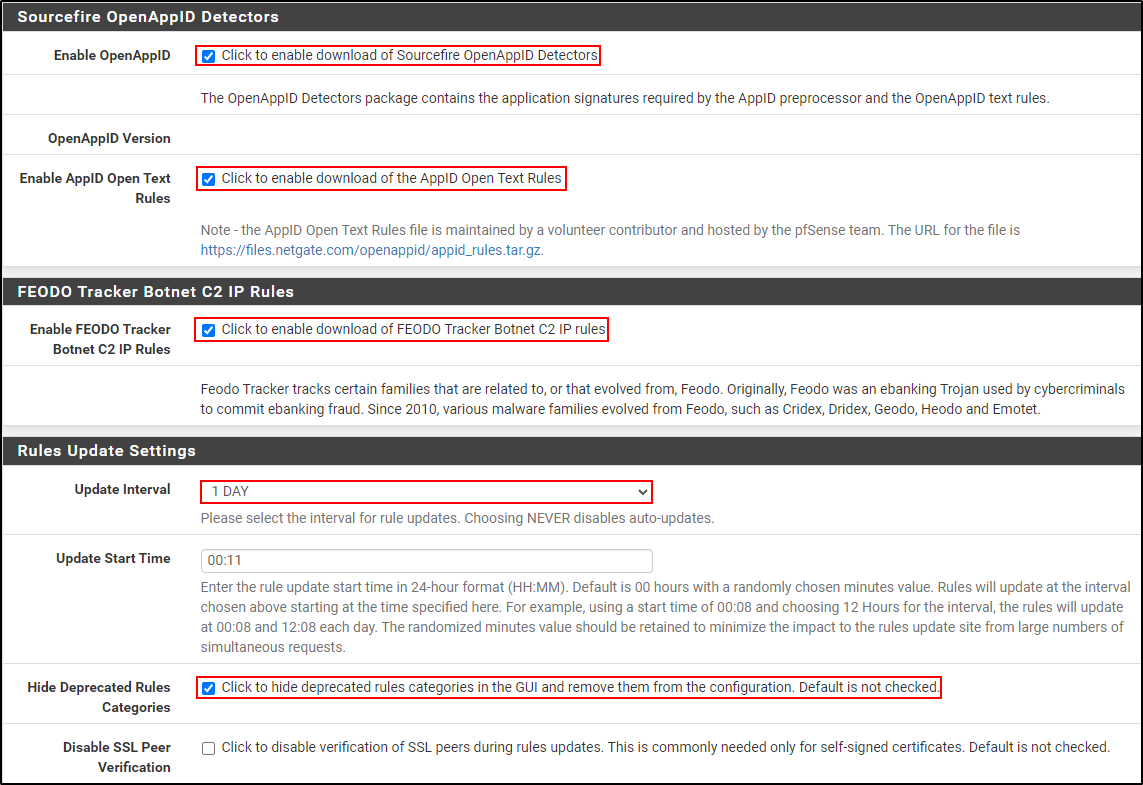
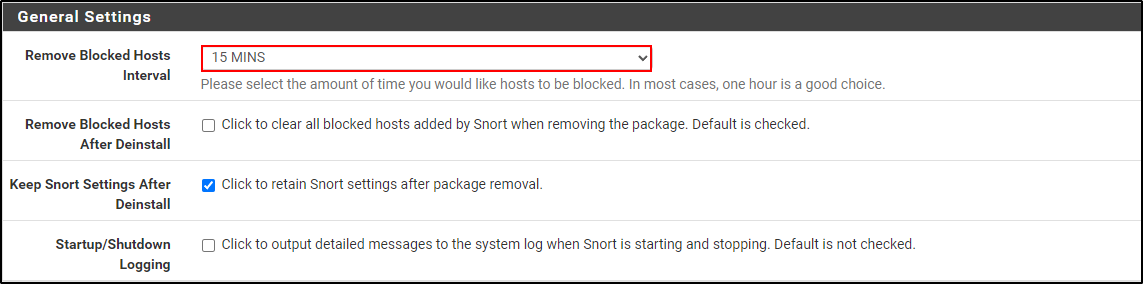
The historical PoC enabled several sources to demonstrate the interface. A new lab should select only the sources required by its objective.
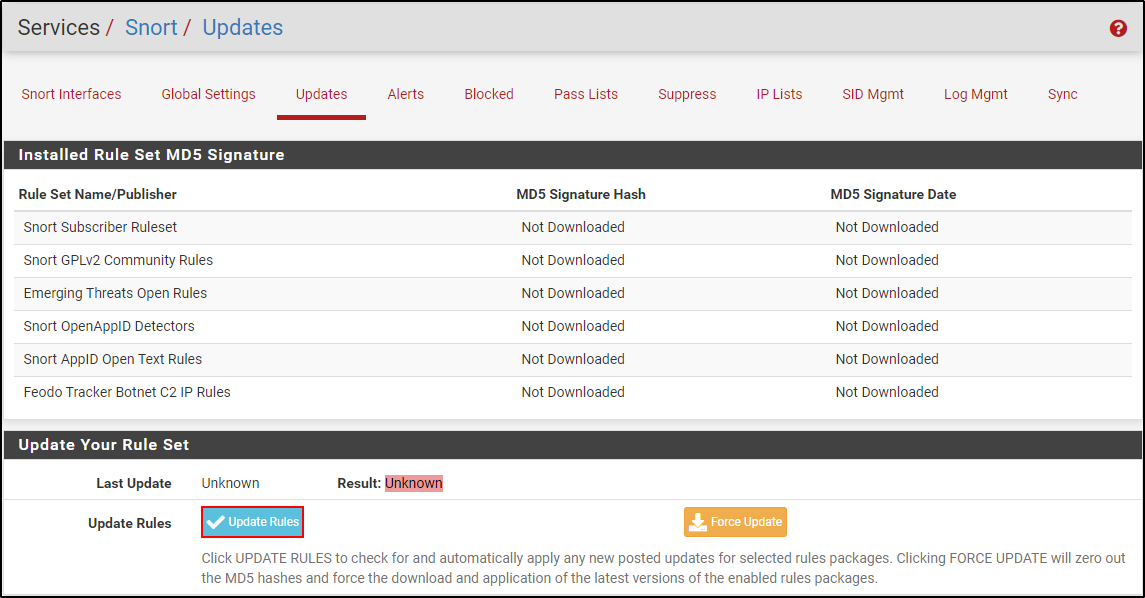
Open Services > Snort > Updates, run the update, and retain both the update log and the displayed rule timestamps.
More sources do not automatically mean better detection. They increase rule count, resource use, duplication and tuning work.
Build an alert-only baseline
Add one isolated interface under Services > Snort > Interfaces. Leave blocking disabled. Record:
- interface and address role;
HOME_NETand pass-list contents;- enabled categories or IPS policy;
- preprocessors and AppID settings;
- rule update timestamp; and
- CPU, memory and alert rate before testing.
If evaluating a vendor IPS policy, record the policy and every additional category enabled alongside it. Do not select a policy simply because it appears more restrictive.
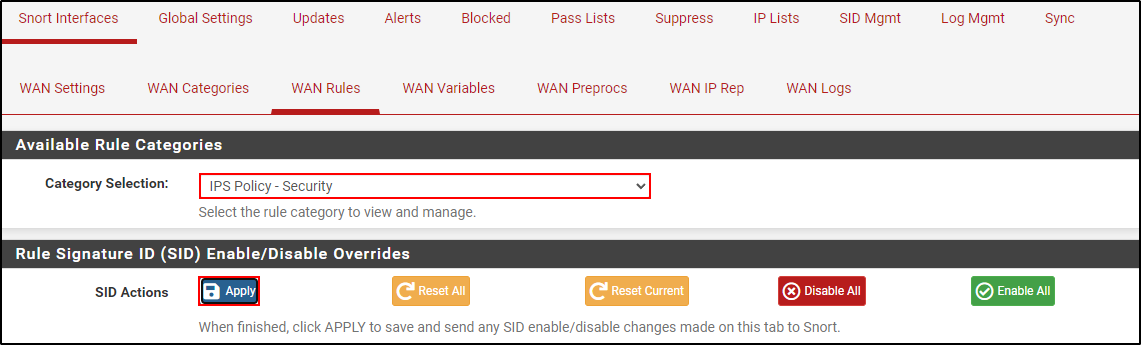
IP reputation is a separate control with its own memory and allow/block semantics. Enable it only when it is part of the test plan.
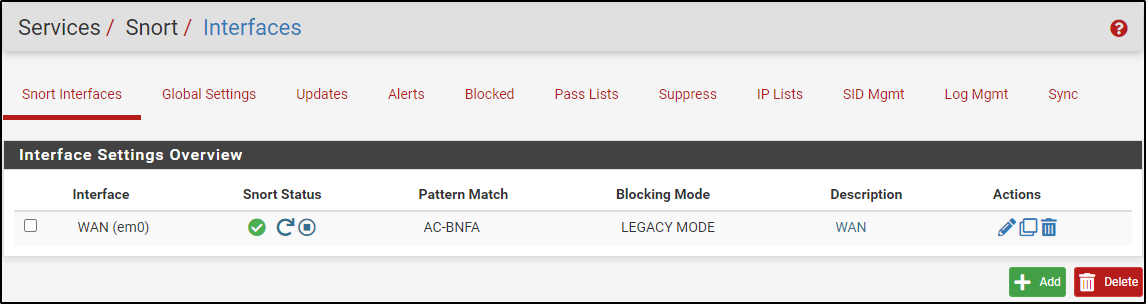
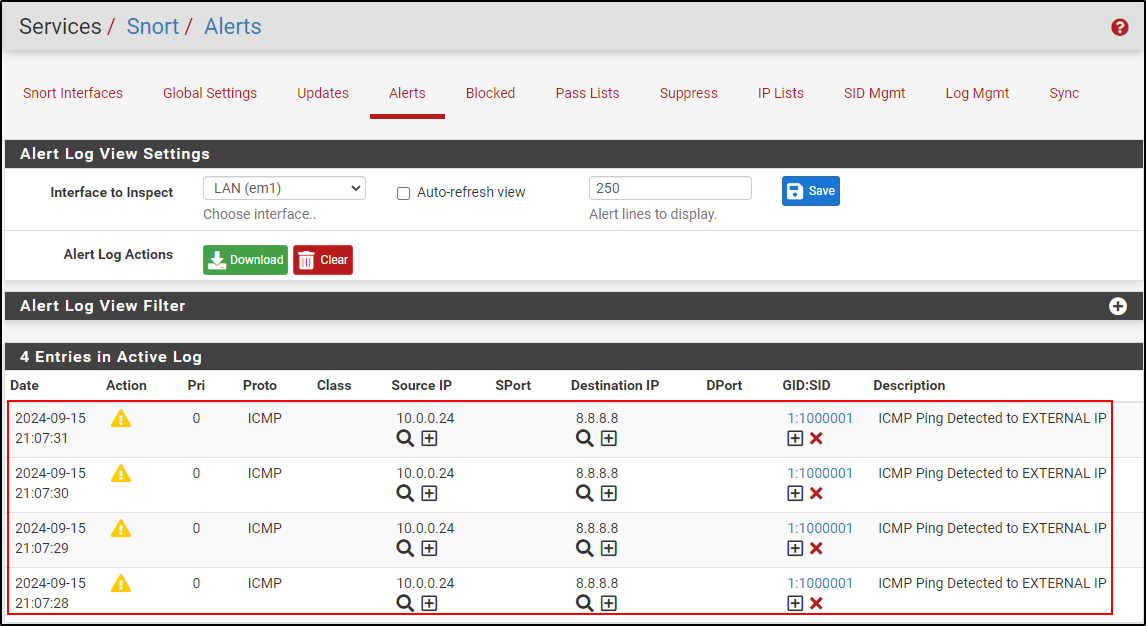
Start Snort and confirm the interface reports healthy. Generate one benign, locally controlled test matching a local SID rather than exposing a host with temporary 1:1 NAT. Verify interface, timestamp, source, destination, protocol, GID:SID:revision and message in Alerts.
Add and test a custom rule
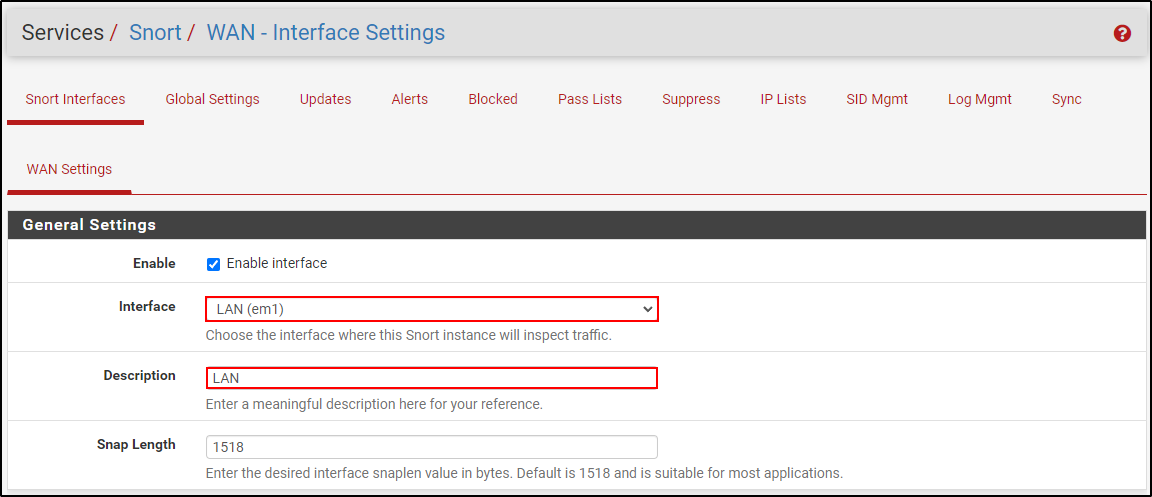
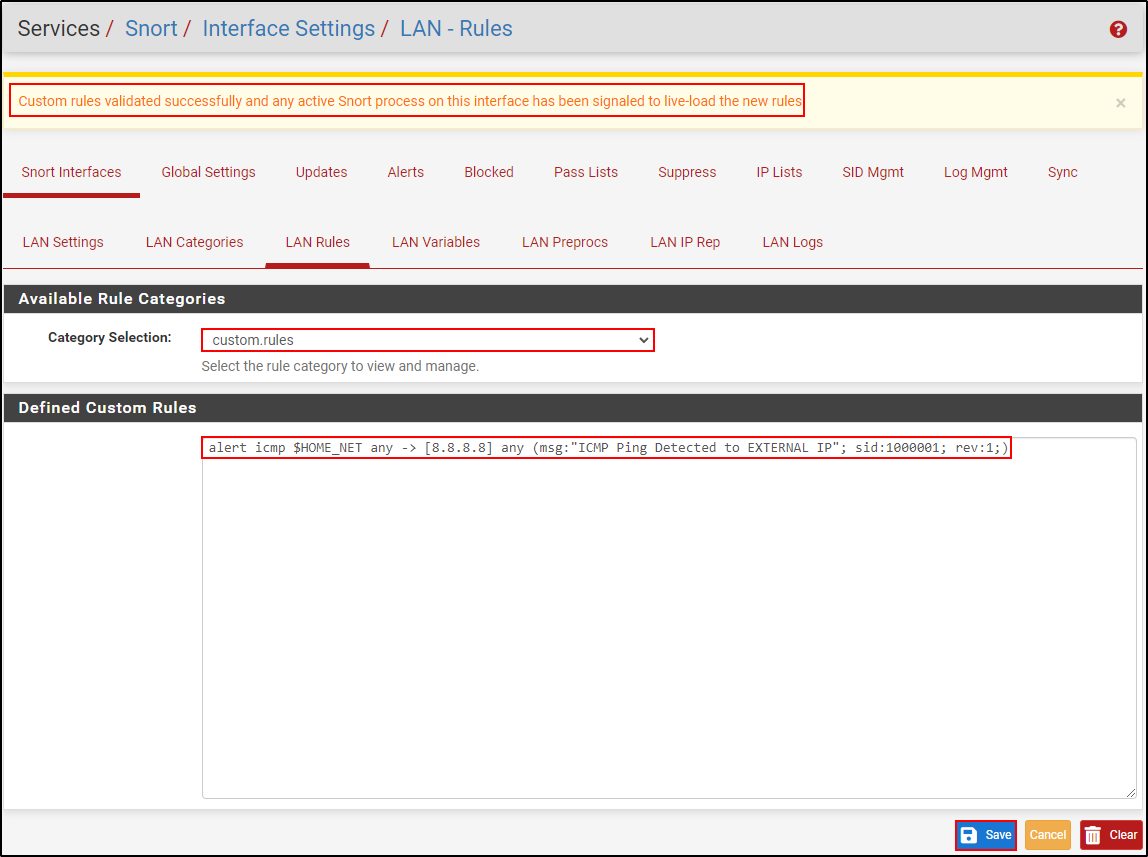
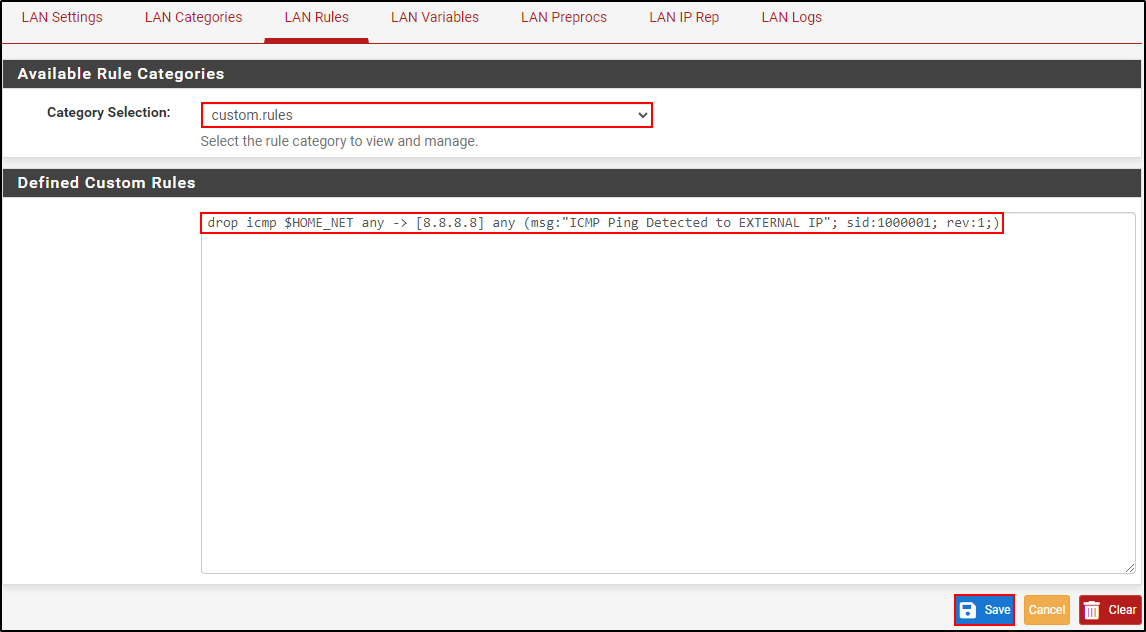
Select custom.rules for the lab interface and add a narrow rule using local
addresses. For example:
alert icmp 10.0.0.24 any -> 10.0.0.2 any (
    msg:"LOCAL PFSENSE LAB ICMP echo request";
    itype:8;
    sid:1000101;
    rev:1;
)
Apply the rule, restart the interface if the package requires it, and send one ping from the test client. Run a negative test from another source. If both fire, refine the rule before considering blocking.
The historical screenshot below used an external demonstration address. Use the isolated addresses from the current rule instead.
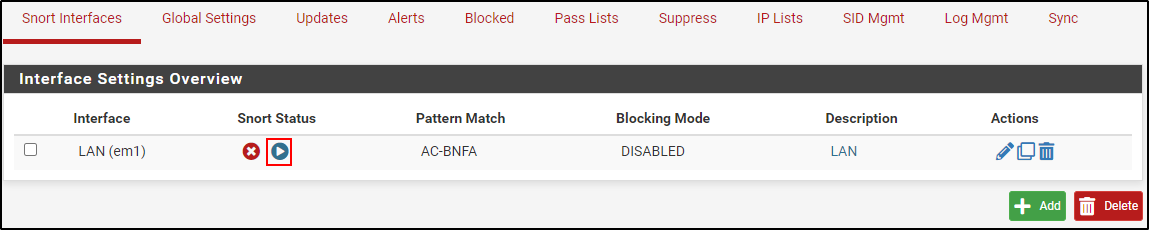
Start the configured interface from Snort Interfaces and wait for its status to become healthy before generating the test event.
Tune false positives
Use this order:
- Confirm the alert is truly benign and identify the matching packet.
- Check whether
HOME_NET, pass lists or interface selection are wrong. - Narrow the rule or category when the environment supports it.
- Use thresholding or suppression for a known noisy tuple where appropriate.
- Disable a SID only with an owner, rationale, date and review condition.
- Repeat positive and negative tests after every change.
Do not pass-list broad networks merely to reduce alert volume; pass lists can also affect blocking and conceal traffic that still needs detection.
Stage a blocking test
Legacy blocking and inline IPS have different enforcement behaviour. Record the package's selected mode and verify the interface driver supports it. Use a dedicated lab interface, console access and a configuration backup.
Legacy mode can add an offender to a block table after detection, while inline mode can enforce the rule verdict in the packet path. The package UI explains the distinction and lists driver constraints; verify them against the installed pfSense and package versions.
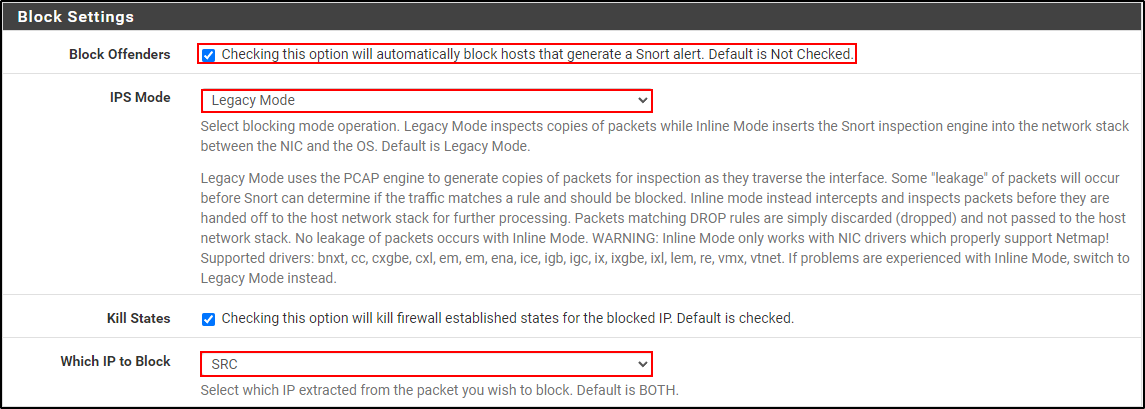
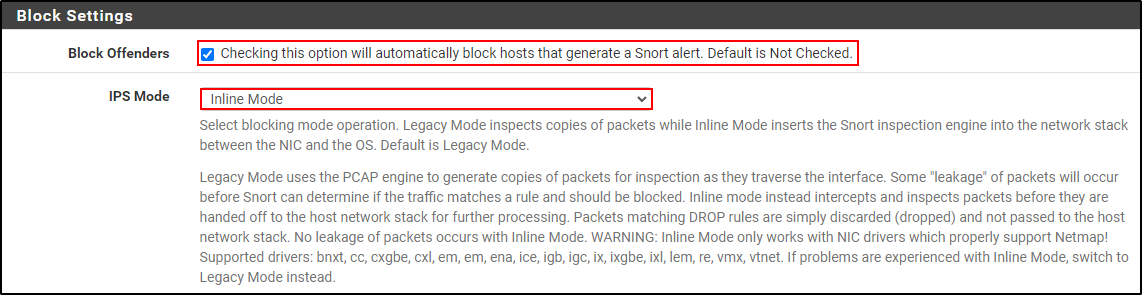
Change only the proven local test rule from alert to drop, increment rev,
and enable the minimum blocking setting required by the selected mode:
drop icmp 10.0.0.24 any -> 10.0.0.2 any (
    msg:"LOCAL PFSENSE LAB ICMP drop";
    itype:8;
    sid:1000101;
    rev:2;
)
Confirm the intended ping fails, the drop is logged, a comparison flow passes,
and management remains available. Then return the rule to alert, disable
blocking, clear temporary blocks and retest connectivity.
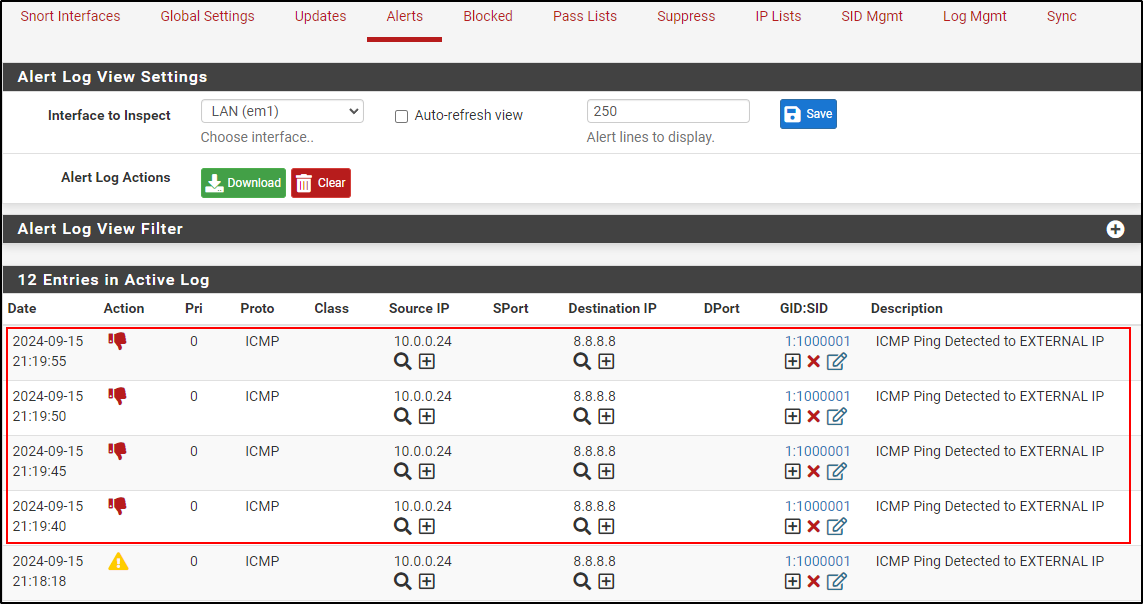
For a legacy-mode test, verify the offender and associated SIDs in Blocked, then clear the temporary block during cleanup.
Operational checks
Monitor Snort and system logs, interface status, packet-drop counters, CPU, memory and disk consumption. A green status icon proves only that a process is running; it does not prove correct packet visibility, rule loading or acceptable loss. Review the effect of checksum and segmentation offloads according to the current pfSense package guidance before changing them globally.
Recovery
If traffic or management fails, use the console to stop Snort on the affected interface, disable blocking, clear Snort-created blocks, restore the saved configuration if necessary, and verify firewall/NAT operation without Snort. Record which action restored service before attempting the test again.
Do not publish a real public address in screenshots. Use documentation ranges or redact addresses and Oinkcodes before committing images.