Configure Apps and Indexes
Install the supporting Splunk add-ons, create their indexes, and configure Windows, Sysmon, and Linux data collection.
Installing Splunk Apps
Earlier, we downloaded the following Splunk Apps (tar archive files)
- Splunk Add-on for MS Windows
- Splunk Add-on for Sysmon
- Fortinet FortiGate Add-on for Splunk (optional: required if ingesting FortiGate logs through this app)
- Splunk Add-on for Unix and Linux

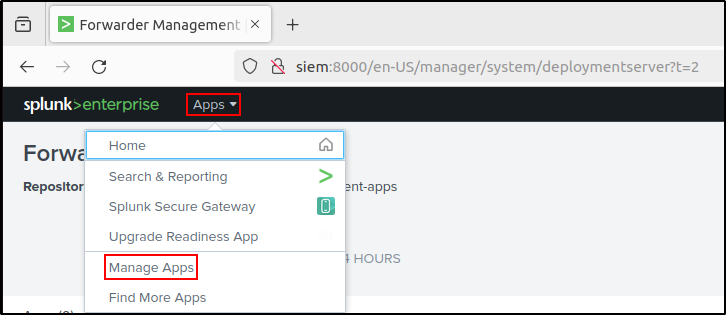
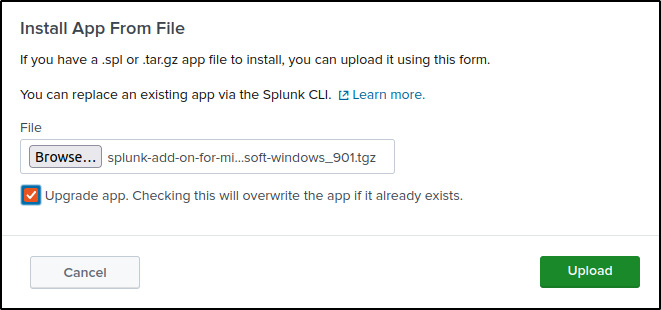
Install the add-ons (apps) on Splunk Enterprise web UI. Go to Apps > Manage Apps > Install app from file > Upload the tar archive files. Check Upgrade app.

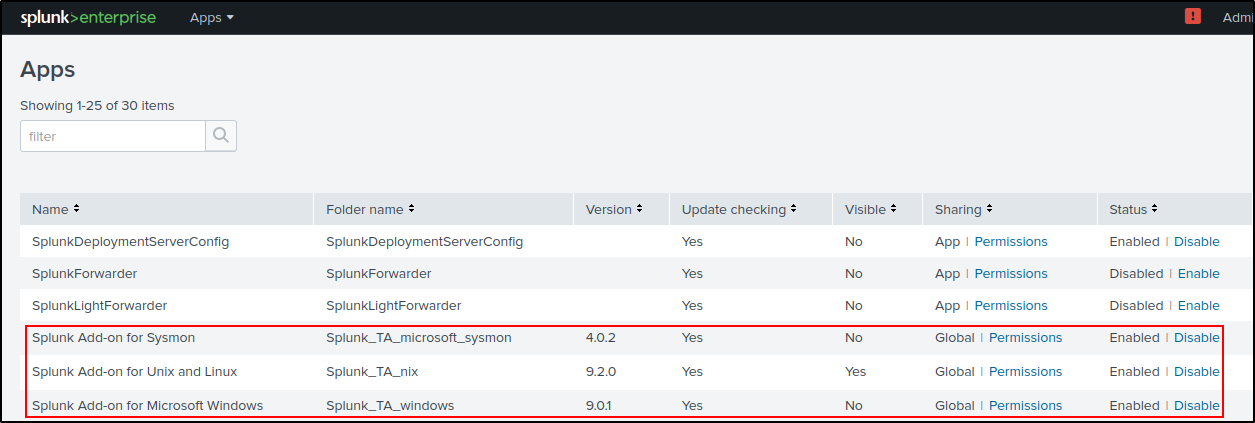
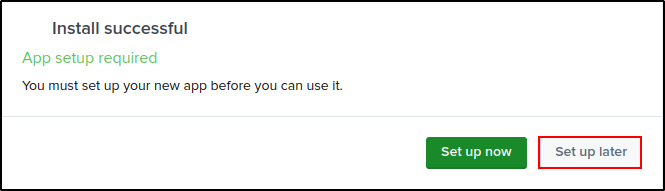
If prompted to set up the apps, click set up later.
On terminal of the Splunk VM where Splunk Enterprise is installed, verify that there are Windows, Sysmon, Linux and FortiGate Apps in the /opt/splunk/etc/apps directory. Copy the apps to /opt/splunk/etc/deployment-apps directory.
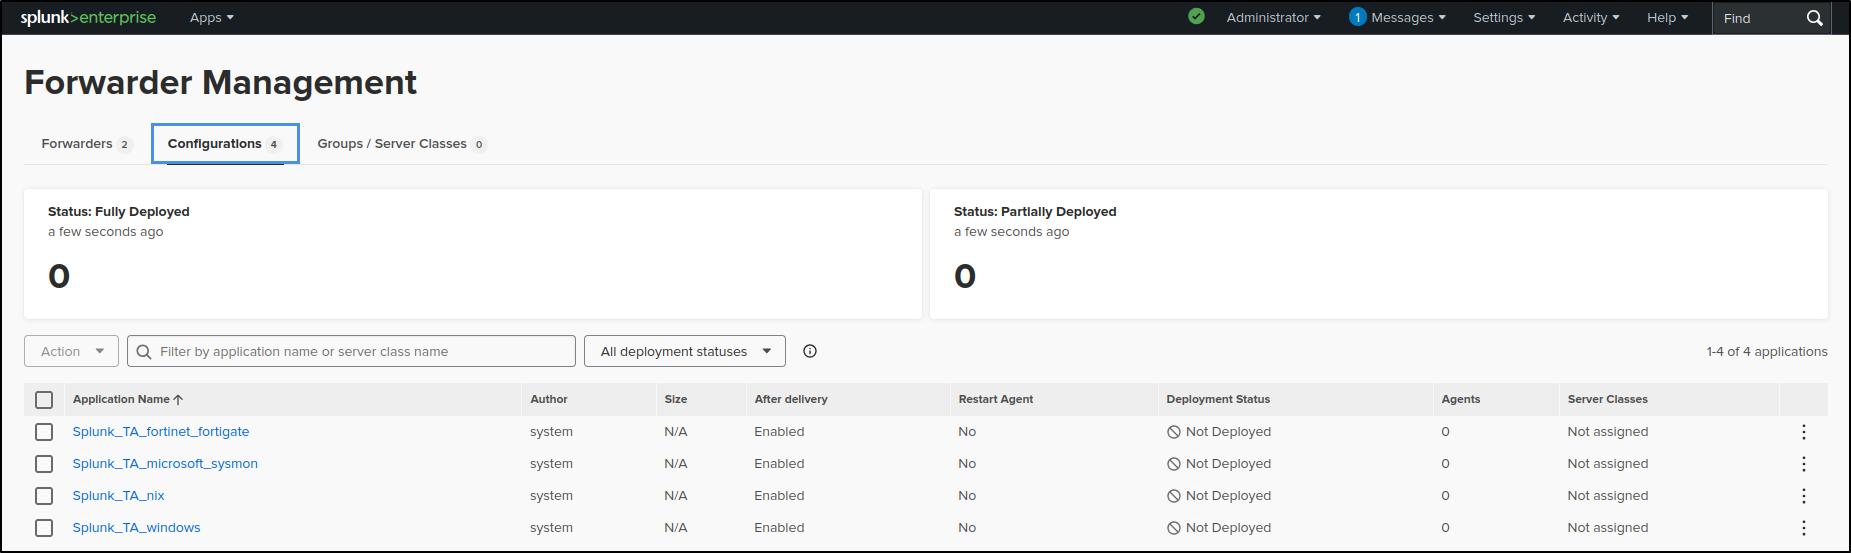
Verify that the apps are shown in the Splunk Enterprise web UI. Go to Settings > Forwarder Management > Configurations.
Creating Indexes for Apps
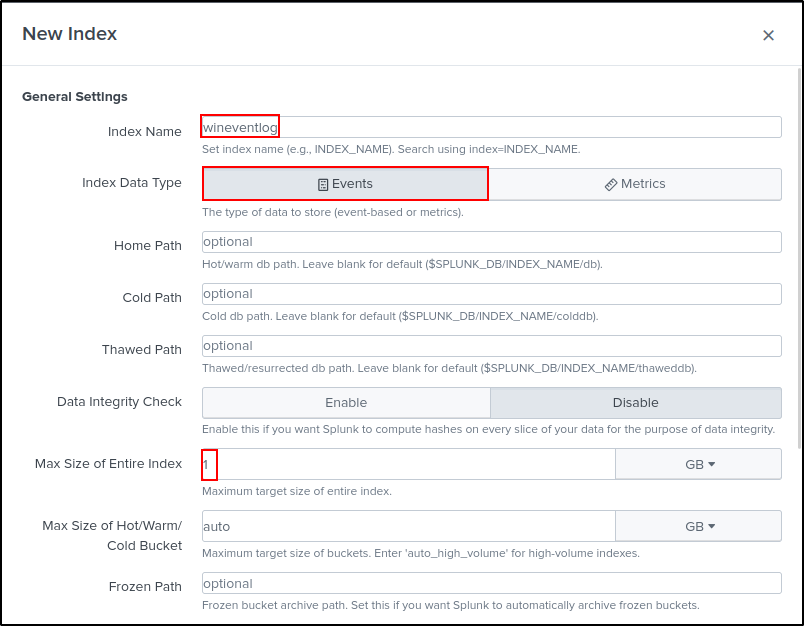
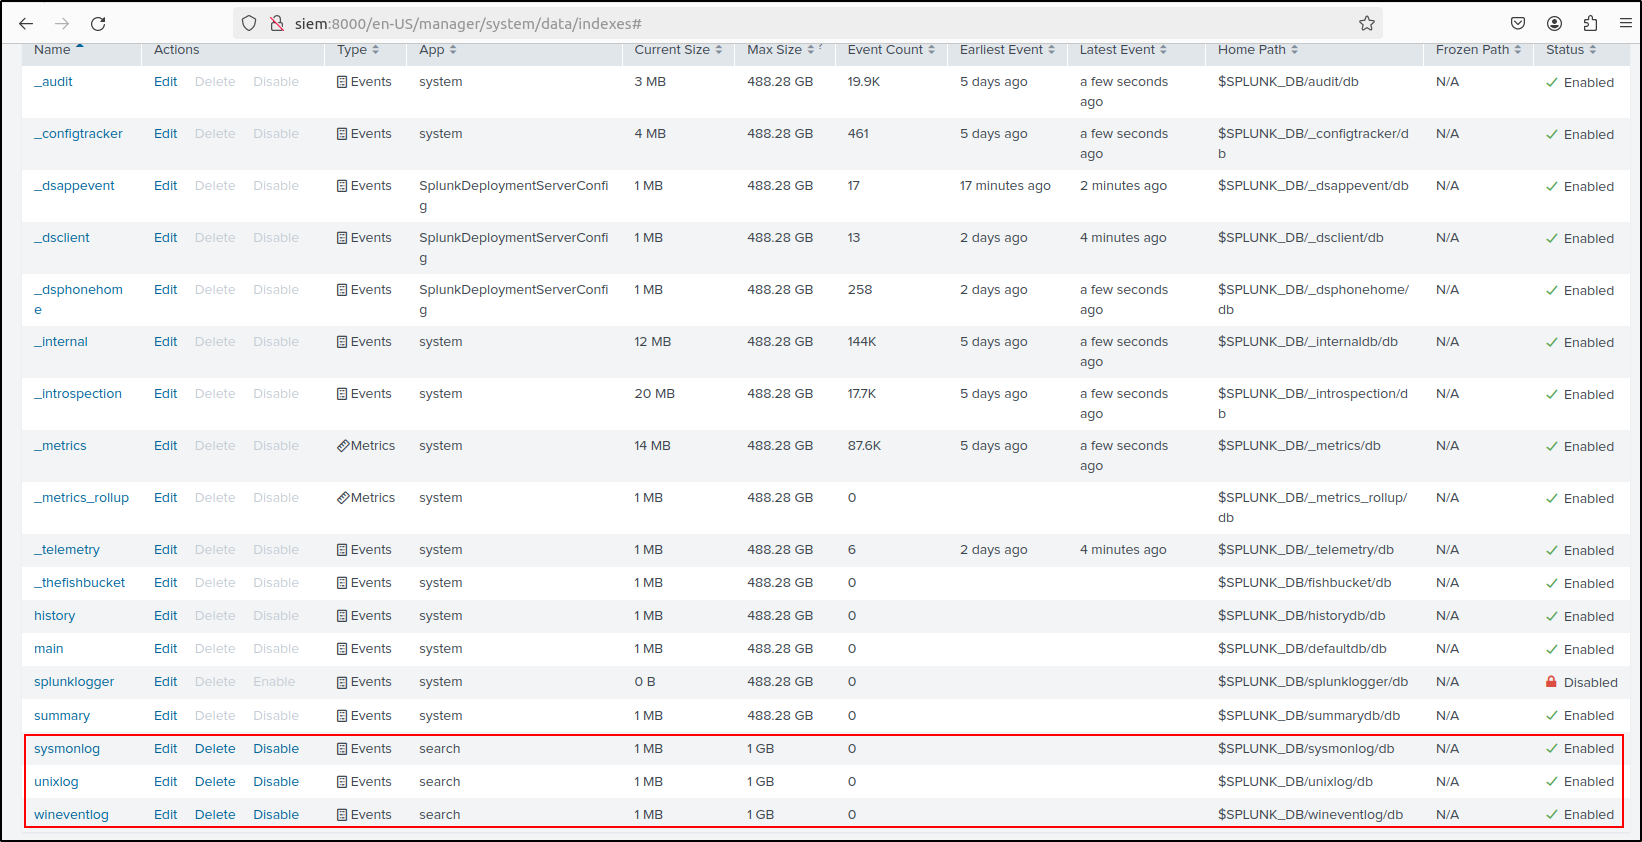
Create indexes on the web UI. Your index name must match with index name in inputs.conf in each app. Go to settings > indexes > New Index.
| Index Name | wineventlog | sysmonlog | unixlog (optional) |
|---|---|---|---|
| Index Data Type | Events | Events | Events |
| Max Size of entire Index | 1 GB (Default is 500 GB so adjust accordingly) | 1 GB (Default is 500 GB so adjust accordingly) | 1 GB (Default is 500 GB so adjust accordingly) |
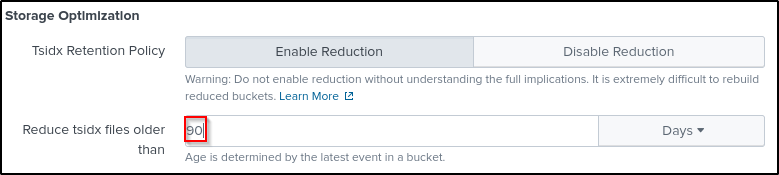
| Enable Reduction | Enable (optional) | Enable (optional) | Enable (optional) |
| Reduce tisdx files older than | 90 days | 90 days | 90 days |
Verify that indexes have been created and enabled.
Configuring Linux App
For Splunk UF v9.4.0 and above:
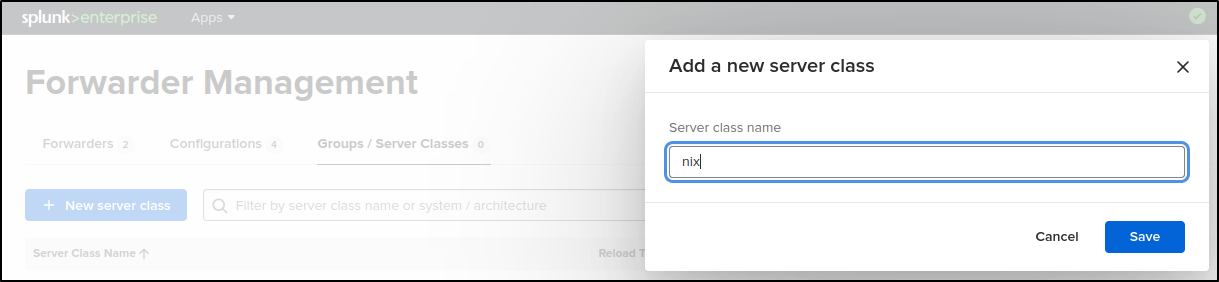
Navigate to Groups / Server Classes > New server class. Add a new server class called nix and click Save.
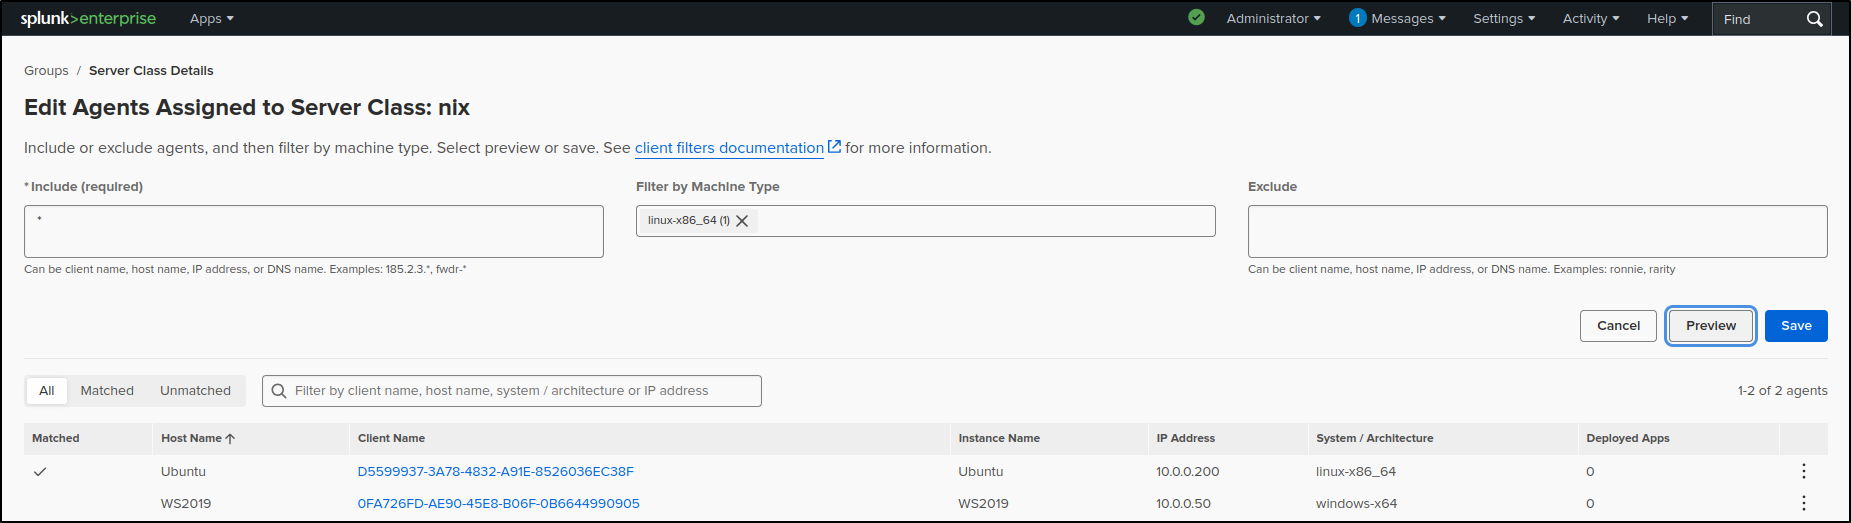
Click the nix server class. Navigate to Agents > Edit agent assignment.

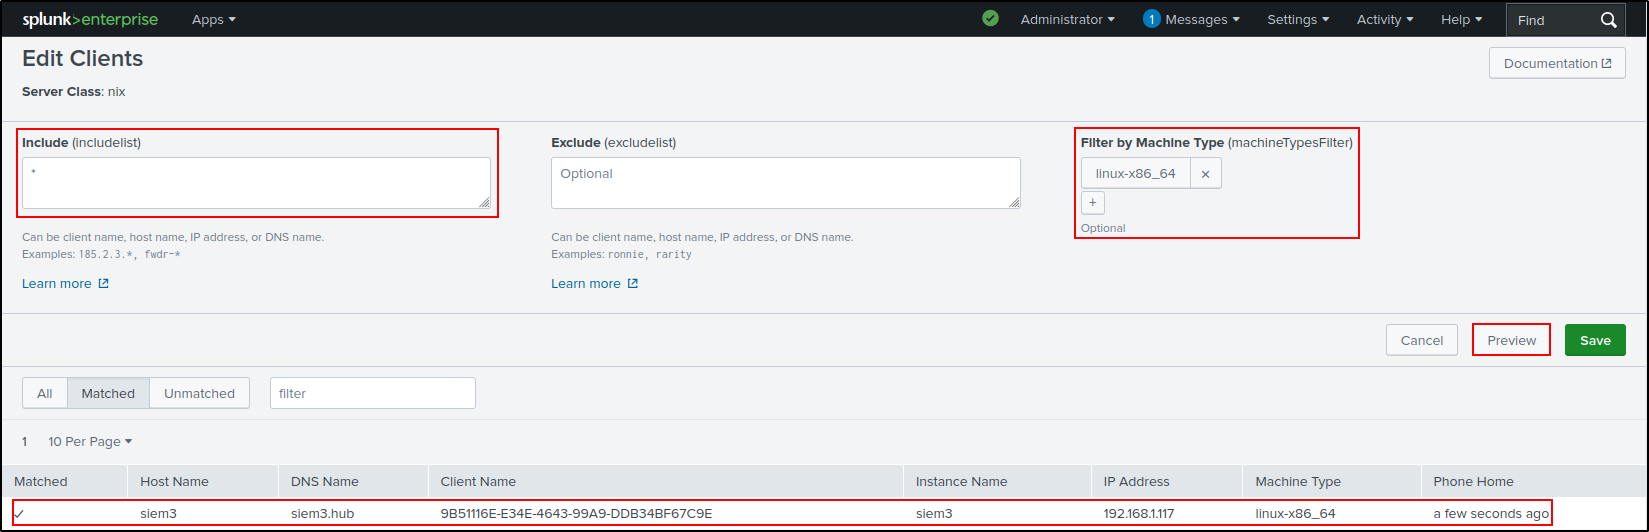
Put * in Include, and filter by linux-x86_64. Click Preview and make sure you can see a tick next to the hostname of the client. Click Save.
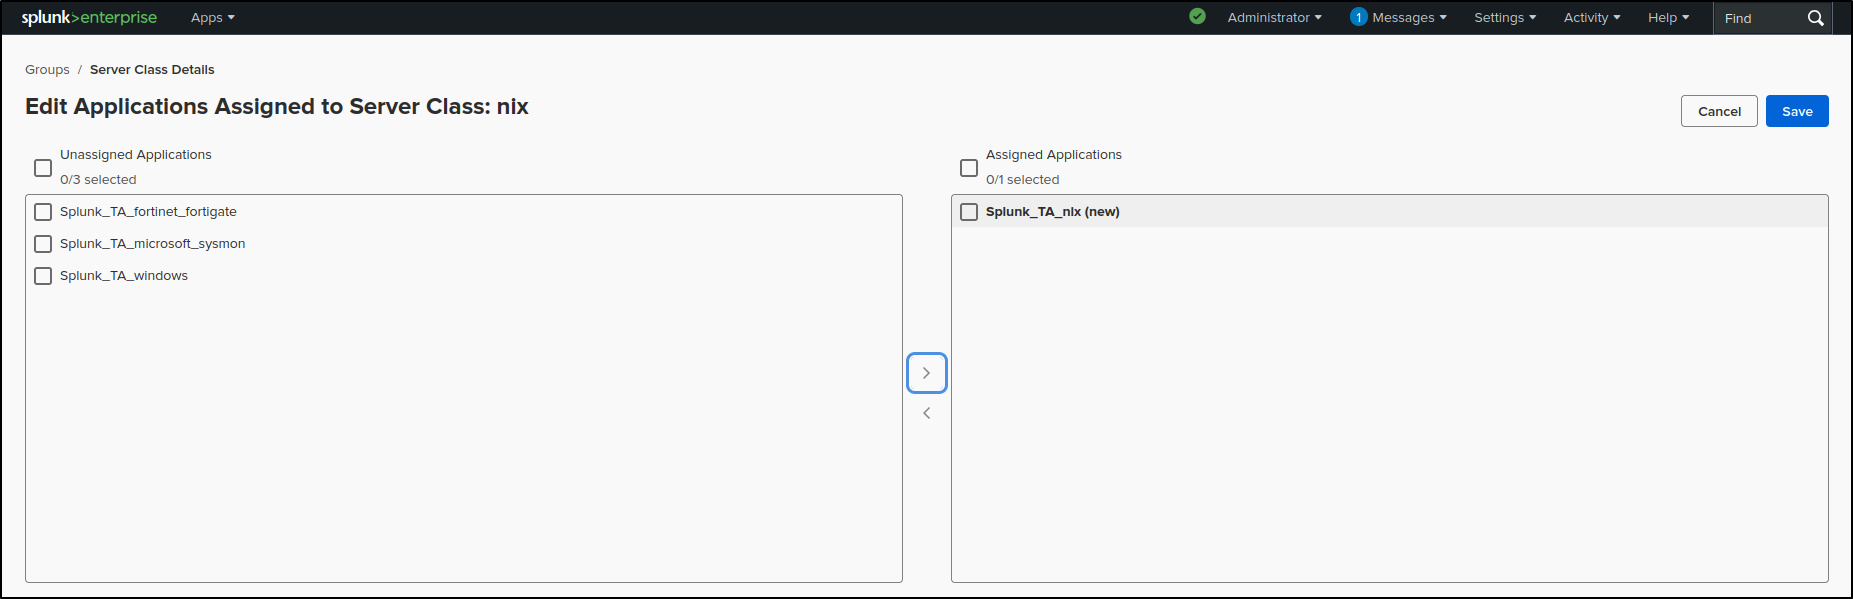
Navigate to nix server class configurations > Edit configurations.

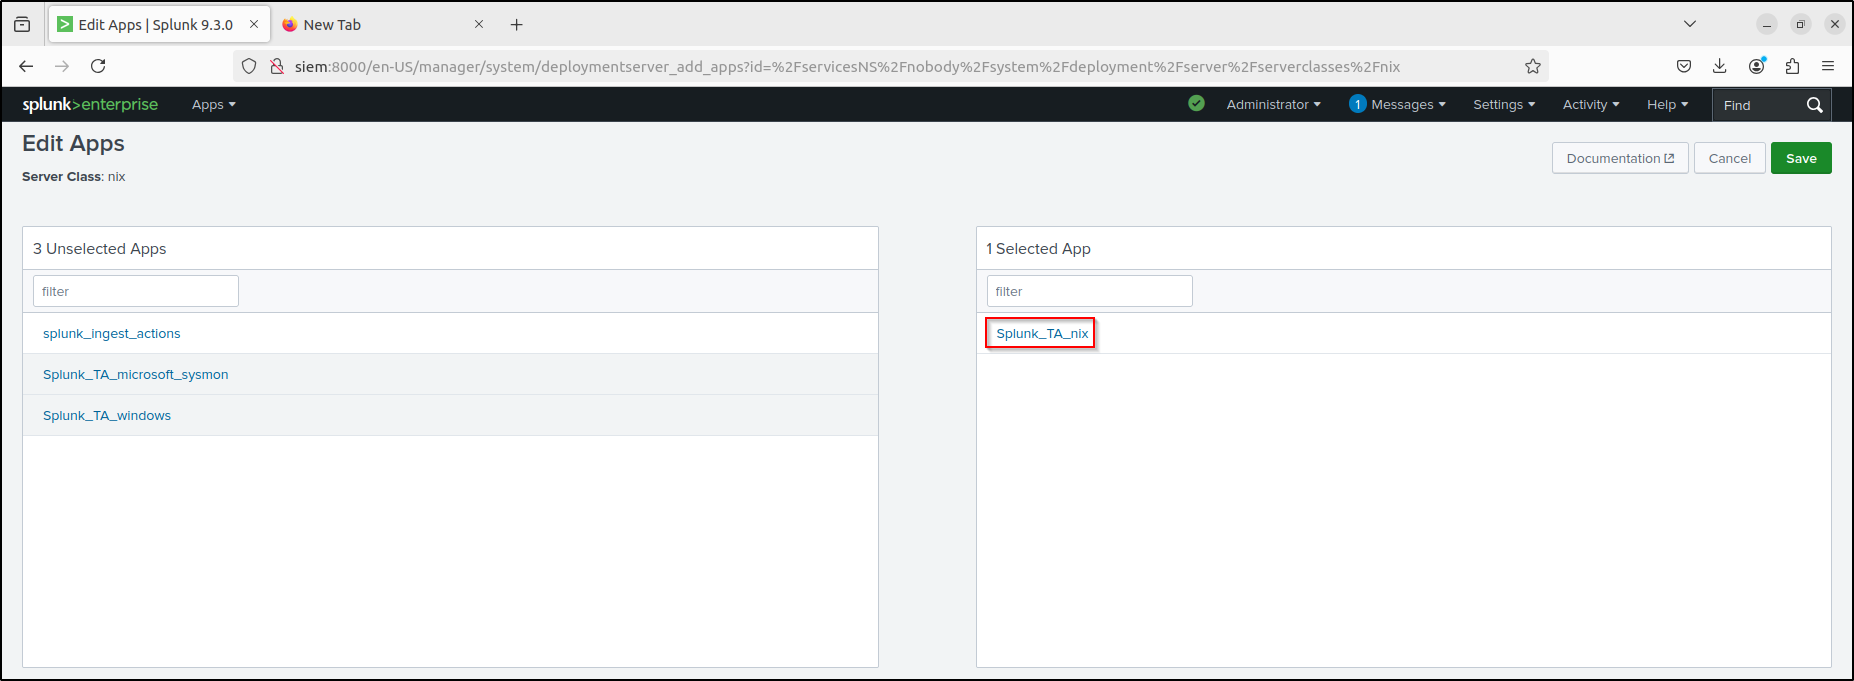
Select Splunk_TA_nix, add to Assigned Applications, then click Save.
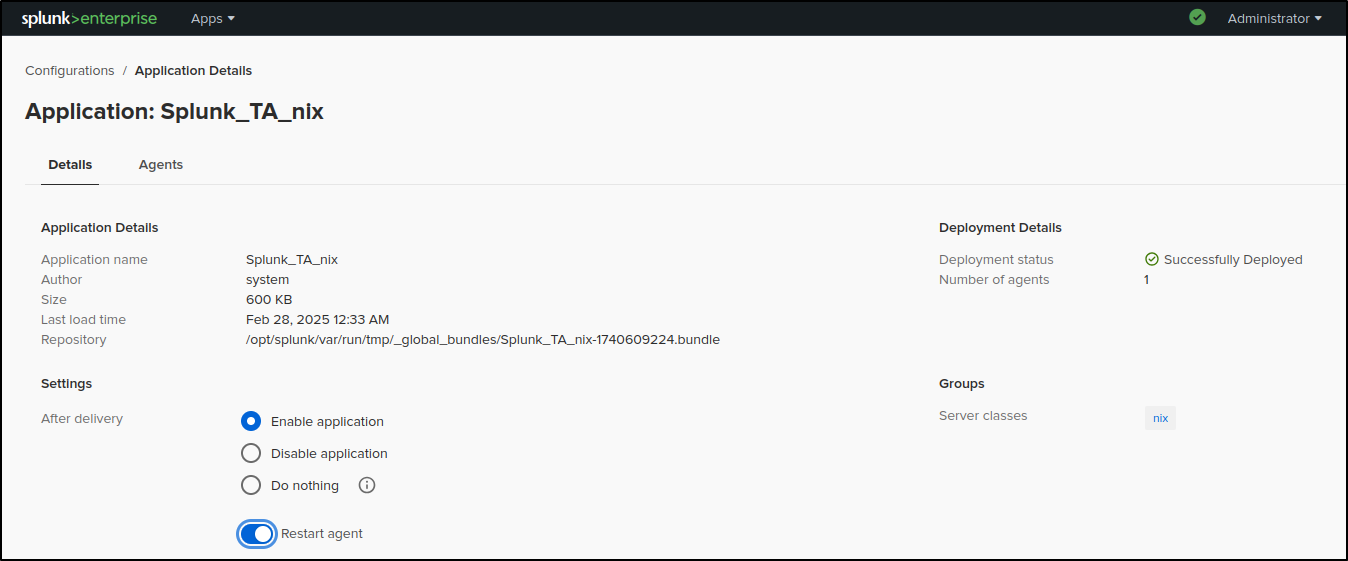
On the nix server class configurations page, click Splunk_TA_nix.

Click on the toggle switch for Restart Agent.
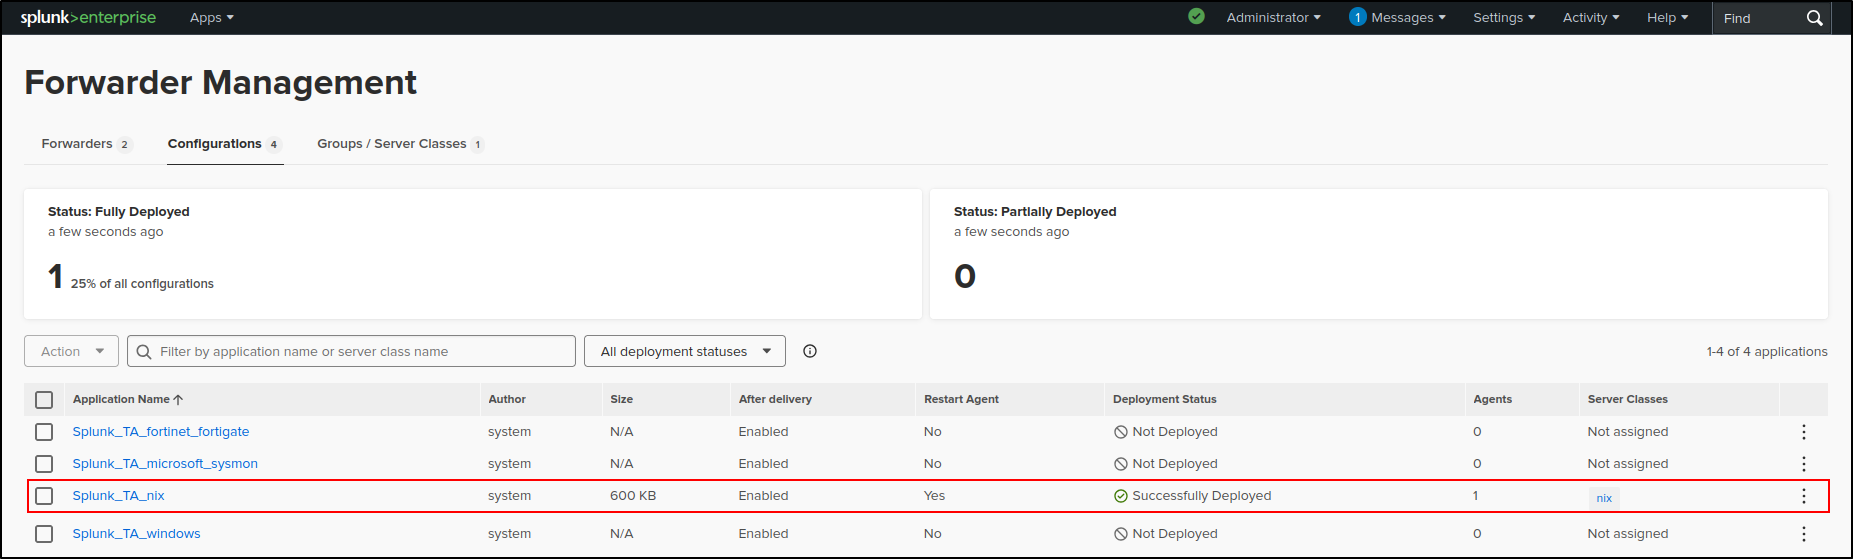
Navigate back to the nix server class configurations page. Verify that the Deployment Status for Linux app shows as successful. This process may take some time, so try refreshing the page periodically.
Older Splunk Universal Forwarder versions
On the Forwarder Management page of the web UI, click Edit under Actions for Splunk_TA_nix. Select Restart Splunkd After Installation, create a New Server Class called nix, and click Save


Click Add Apps and select Splunk_TA_nix. Click Save.
Click Add Clients. Put * in include, and filter by linux-x86_64. Click Preview and Save.
You should see Restart Splunkd in the After installation column. If only Enable App is shown, Edit each app and select Restart Splunkd. Verify the configuration in the Forwarder Management.
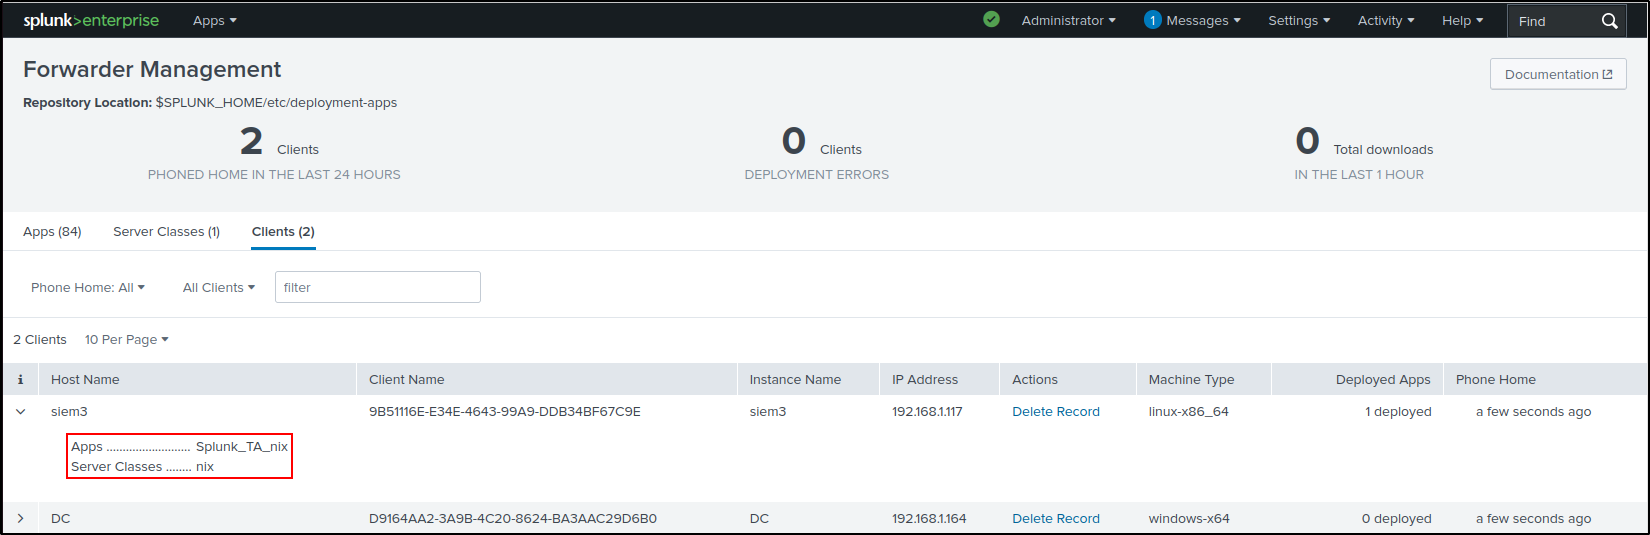
If the settings are not applied try reloading the deployment server.
Editing Config Files for Linux App
On the Splunk VM where Splunk Enterprise is installed, change into the /opt/splunk/etc/deployment-apps/Splunk_TA_nix/local directory. Copy app.conf, inputs.conf and props.conf from the /opt/splunk/etc/deployment-apps/Splunk_TA_nix/default directory.
cd /opt/splunk/etc/deployment-apps/Splunk_TA_nix/local
cp /opt/splunk/etc/deployment-apps/Splunk_TA_nix/default/app.conf .
cp /opt/splunk/etc/deployment-apps/Splunk_TA_nix/default/inputs.conf .
cp /opt/splunk/etc/deployment-apps/Splunk_TA_nix/default/props.conf .
Make the following changes to inputs.conf:
[default]
index = unixlog
...
[monitor:///var/log]
whitelist=(\.log|log$|messages|secure|auth|mesg$|cron$|acpid$|\.out)
blacklist=(lastlog|anaconda\.syslog)
disabled = 0
...
On the Ubuntu VM where Splunk UF is installed, navigate to /opt/splunkforwarder/etc/apps/Splunk_TA_nix/local directory. Copy app.conf, inputs.conf and props.conf from /opt/splunkforwarder/etc/apps/Splunk_TA_nix/default directory.
cd /opt/splunkforwarder/etc/apps/Splunk_TA_nix/local
cp /opt/splunkforwarder/etc/apps/Splunk_TA_nix/default/app.conf .
cp /opt/splunkforwarder/etc/apps/Splunk_TA_nix/default/inputs.conf .
cp /opt/splunkforwarder/etc/apps/Splunk_TA_nix/default/props.conf .
Edit inputs.conf (same as above). Make the following changes to inputs.conf:
[default]
index = unixlog
...
[monitor:///var/log]
whitelist=(\.log|log$|messages|secure|auth|mesg$|cron$|acpid$|\.out)
blacklist=(lastlog|anaconda\.syslog)
disabled = 0
...
Restart Splunk Universal Forwarder.
On the Ubuntu VM where Splunk UF is installed, recursively change the ownership of /var/log directory to splunk:splunk
This command changes system log ownership
Recursively changing /var/log can affect operating-system services and
log rotation. Use this only in the isolated lab described here. In a
production environment, grant the forwarder read access through appropriate
groups or ACLs instead.
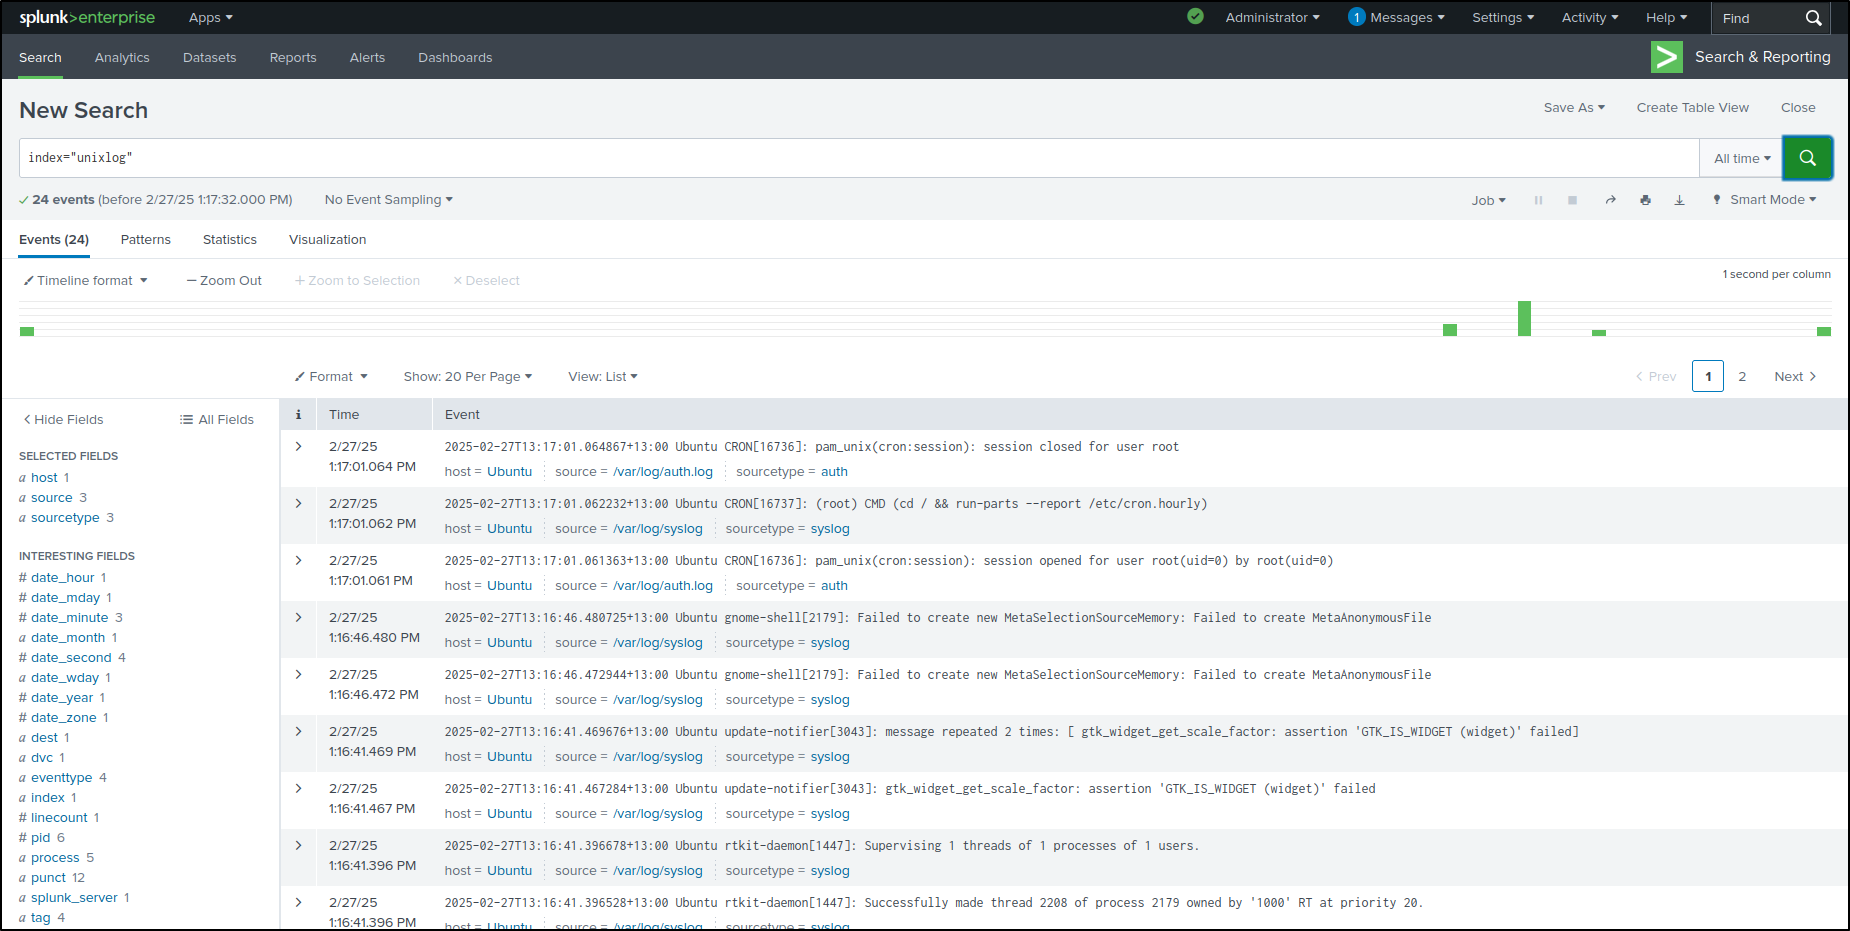
On the Splunk Enterprise web interface, verify that data is being indexed on unixlog.

Configuring Windows and Sysmon Apps
For Splunk v 9.4.0 and above:
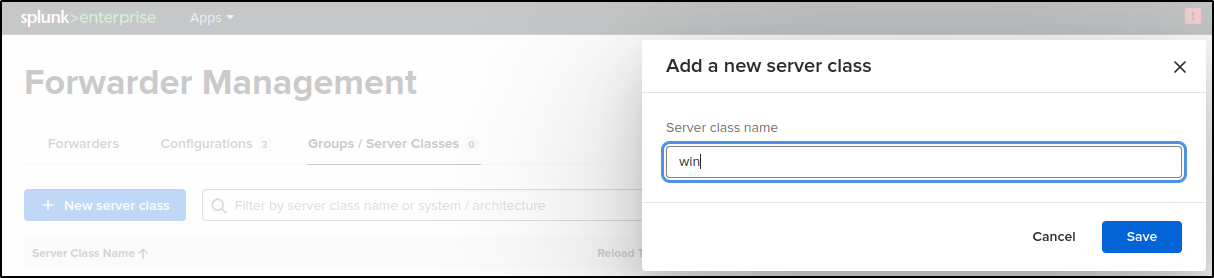
Navigate to Groups / Server Classes > New server class. Add a new server class called win and click Save.
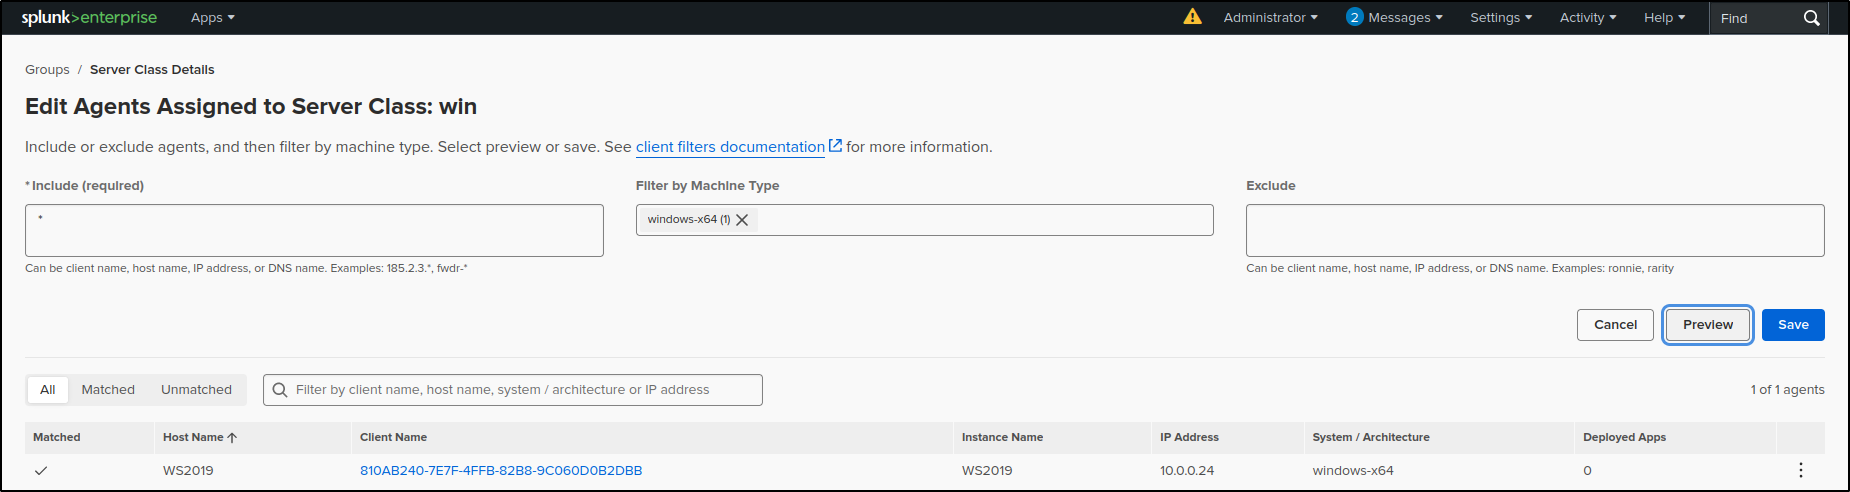
Click the win server class. Navigate to Agents > Edit agent assignment.

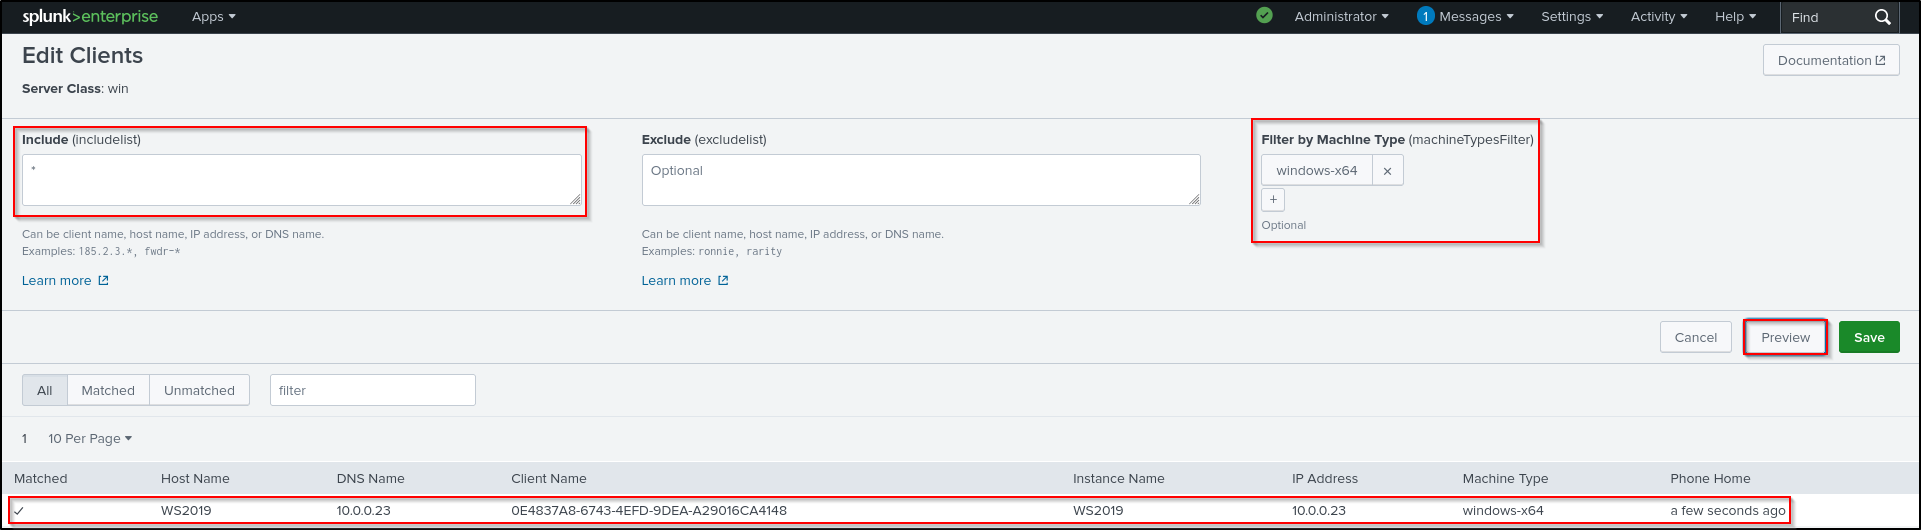
Put * in Include, and filter by windows-x64. Click Preview and make sure you can see a tick next to the hostname of the client. Click Save.
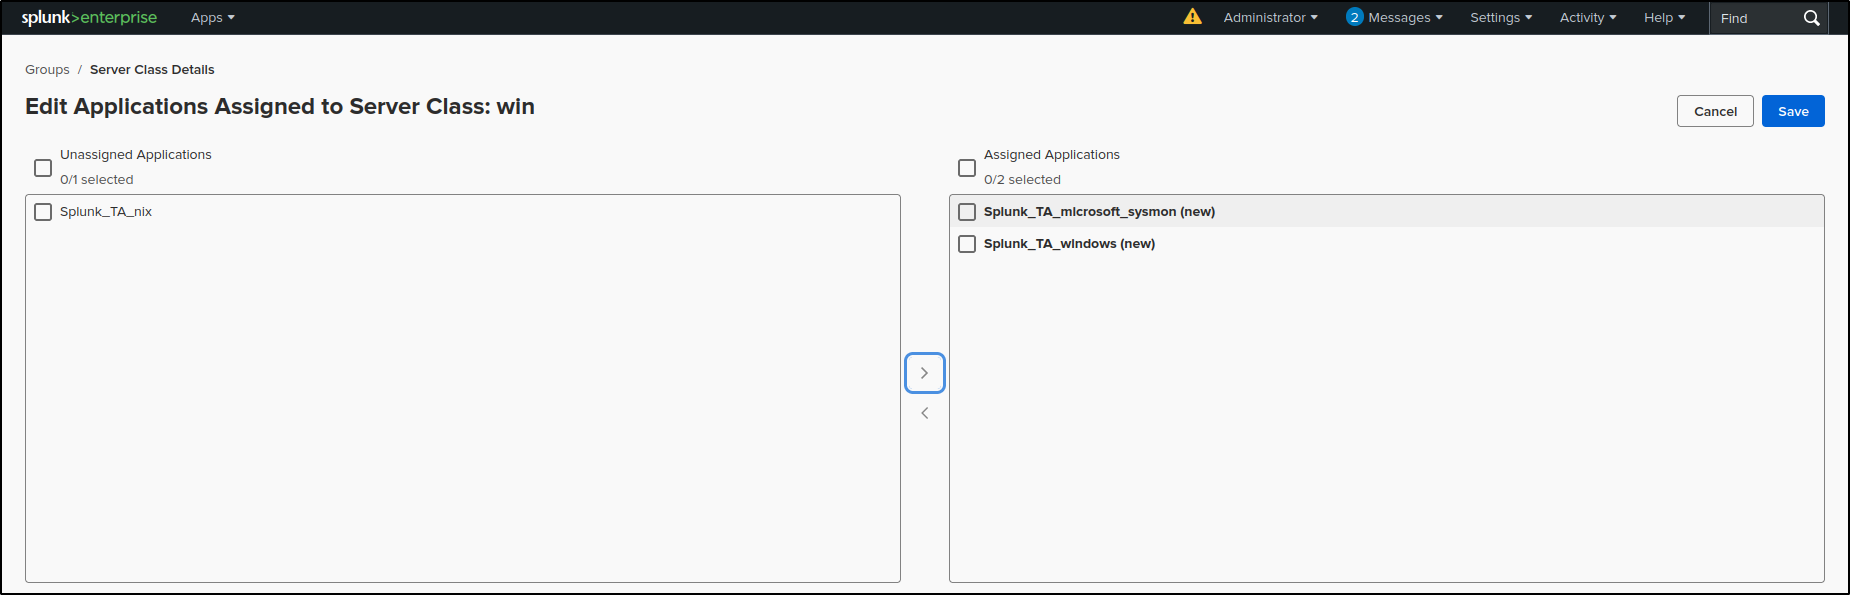
Navigate to win server class configurations > Edit configurations.

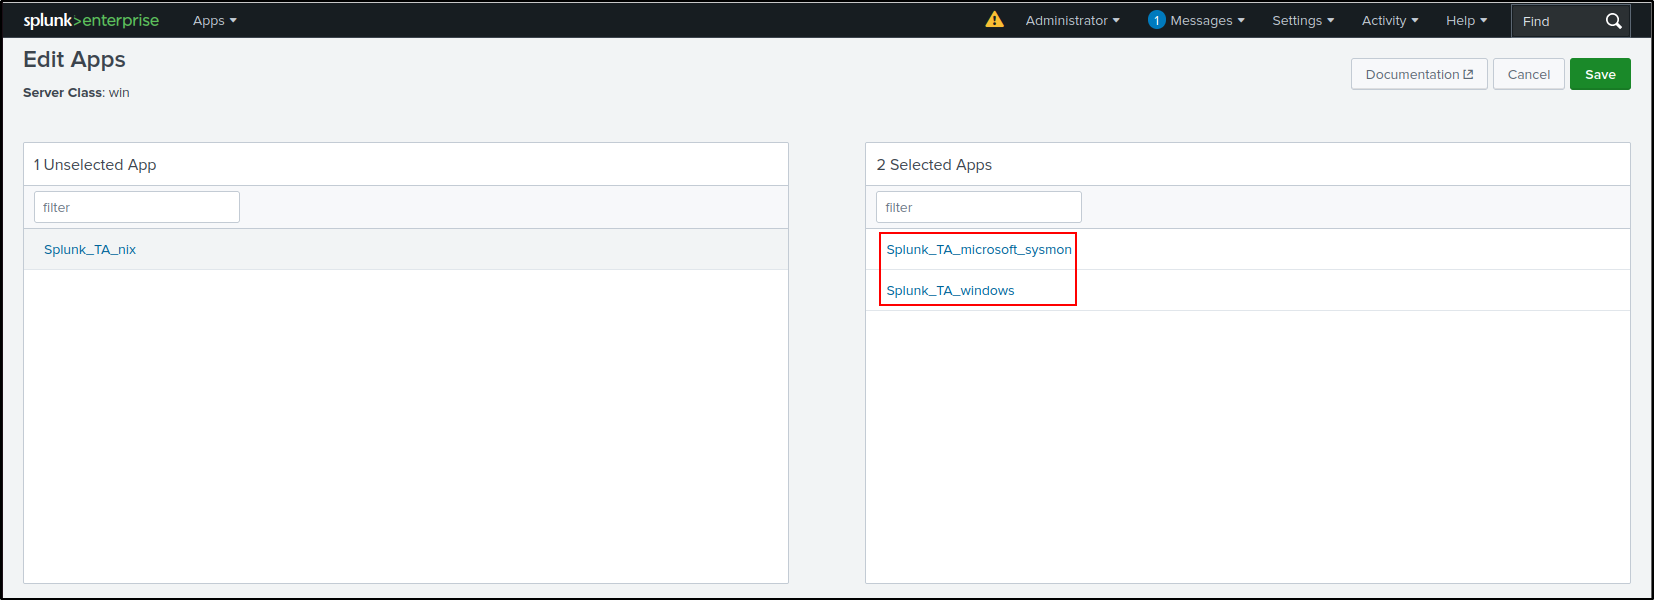
Add Apps and select Splunk_TA_windows and Splunk_TA_micorsoft_sysmon. Click Save.
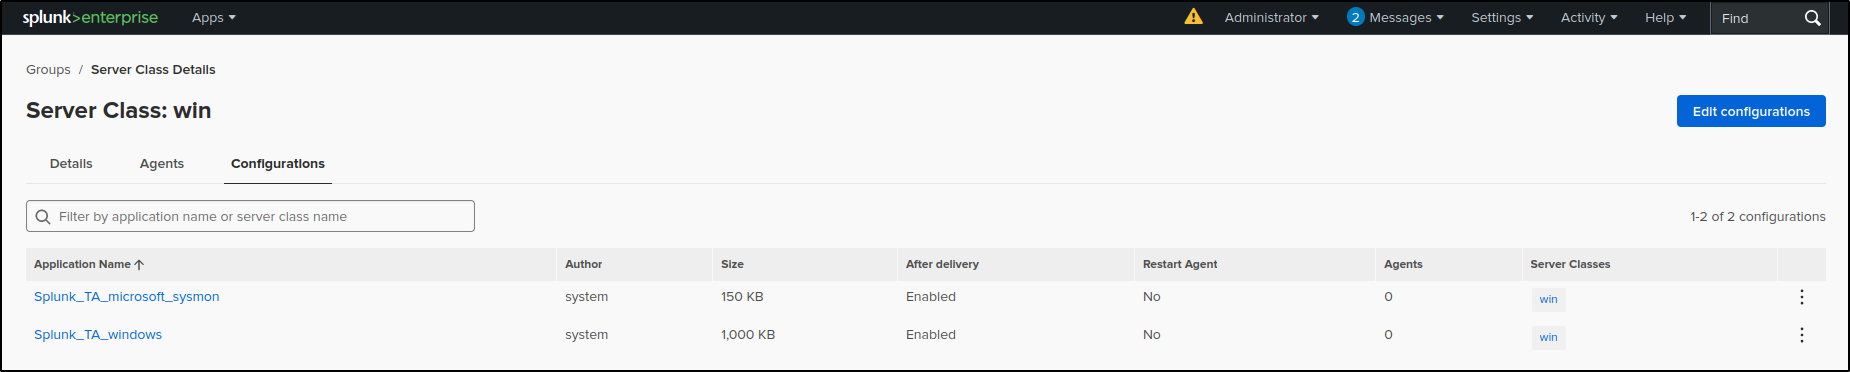
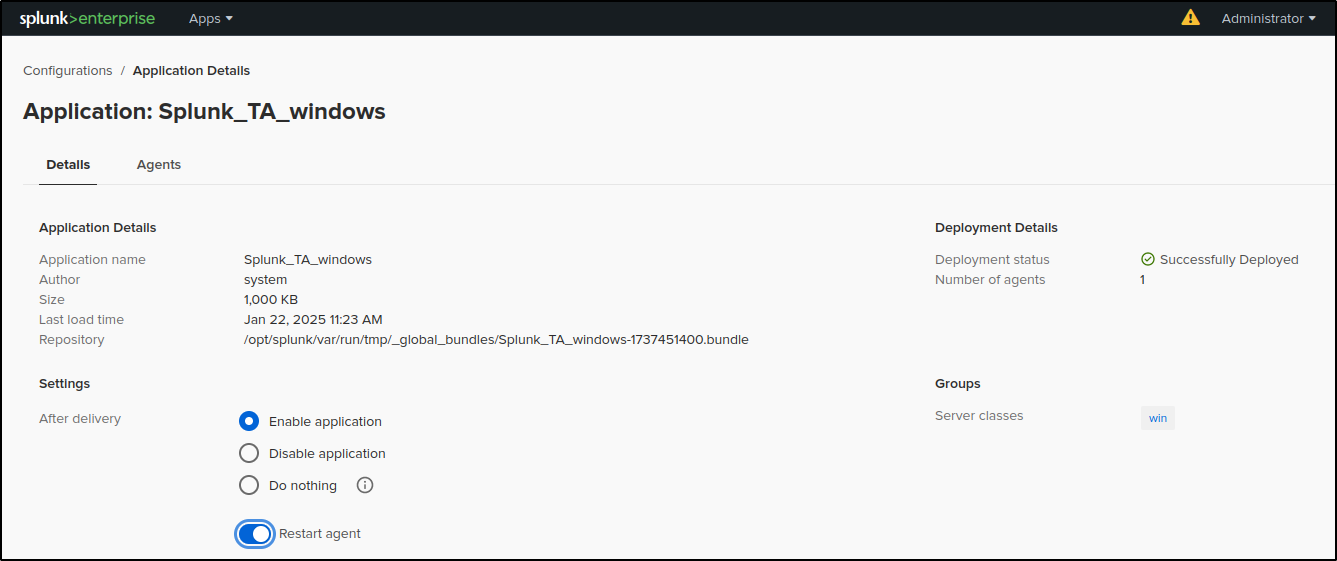
On the win server class configurations page, click Splunk_TA_windows.
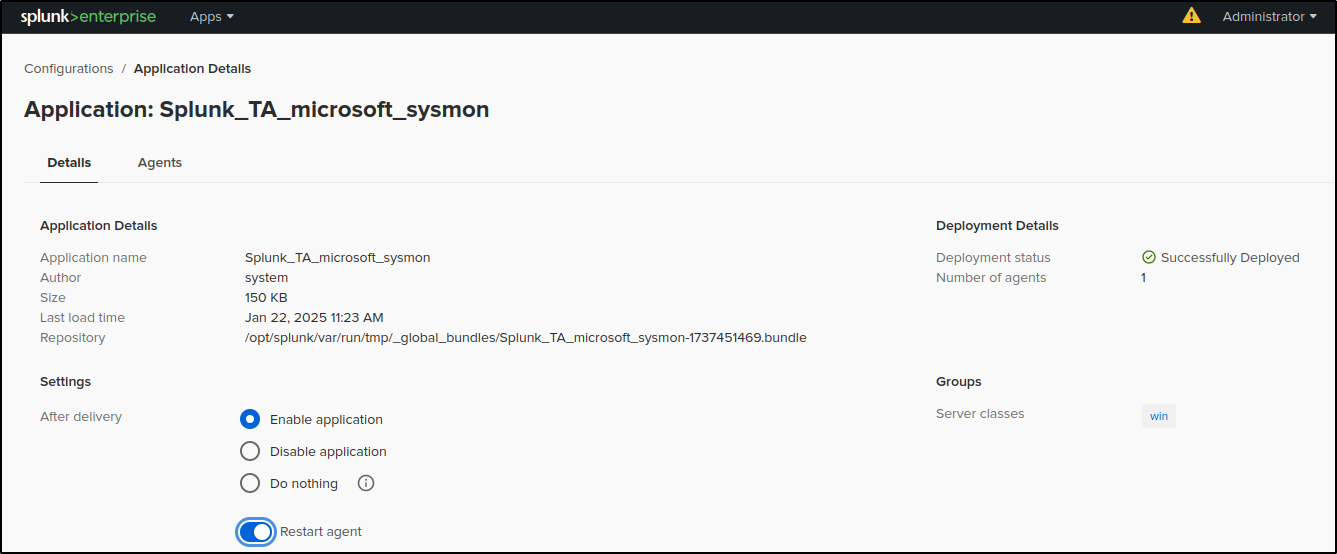
Click on the toggle switch for Restart Agent.
Navigate back to the win server class configurations page and repeat the same process for Splunk_TA_micorsoft_sysmon.
Navigate back to the win server class Configurations page. Verify that the Deployment Status for both the Windows and Sysmon apps shows as successful. This process may take some time, so try refreshing the page periodically.
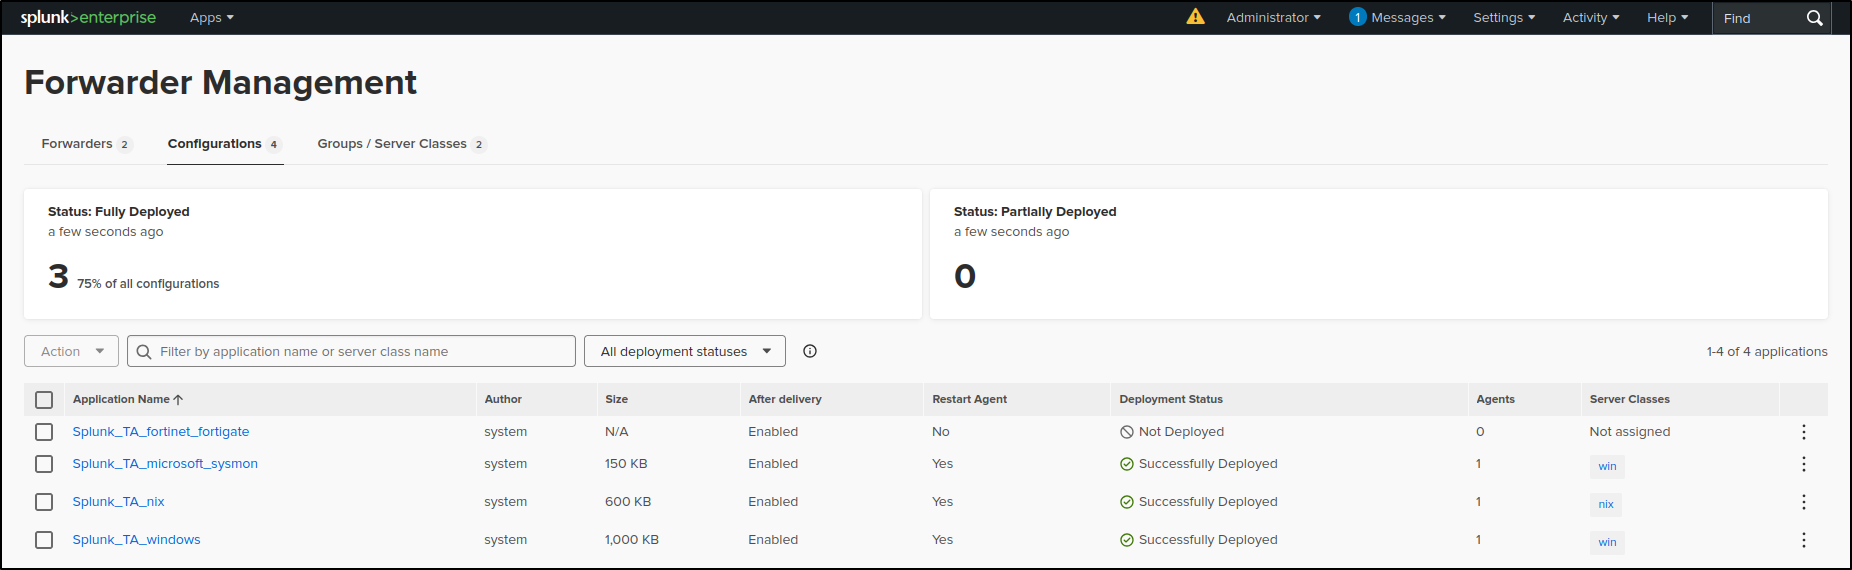
Older Splunk versions
On the Forwarder Management page of the web UI, click Edit under Actions for Splunk_TA_windows. Select Restart Splunkd After Installation, add New Server Class called win, and click Save
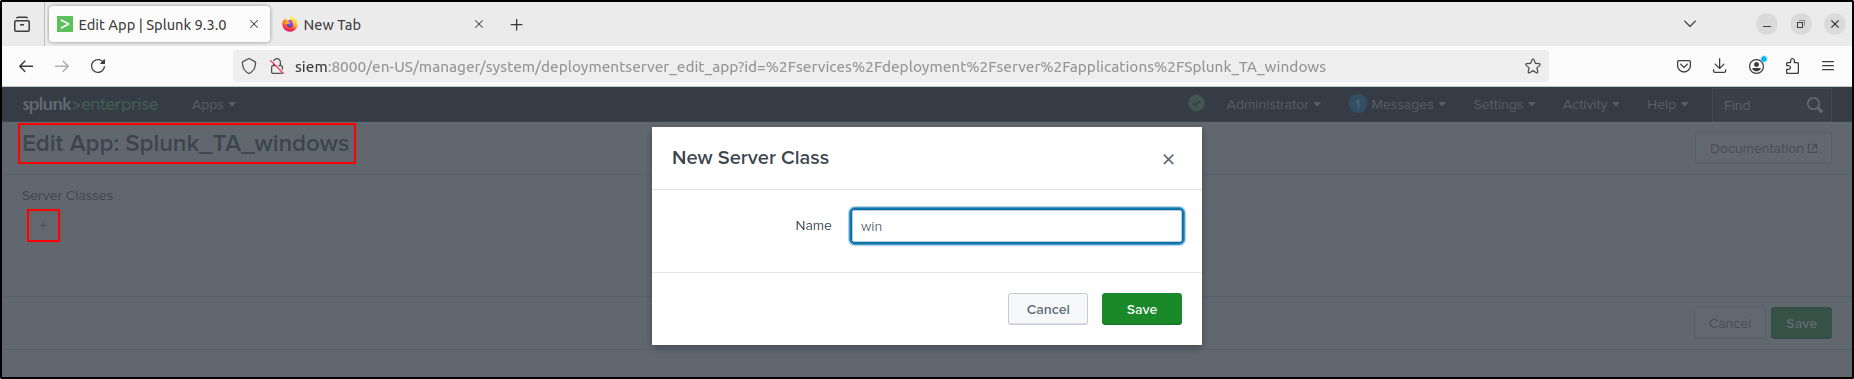
Click Add Apps and select Splunk_TA_windows and Splunk_TA_micorsoft_sysmon. Click Save.
Click Add Clients. Put * in Include, and filter by windows-x64. Click Preview and Save.
You should see Restart Splunkd in the After installation column. If only Enable App is shown, Edit each app and select Restart Splunkd.
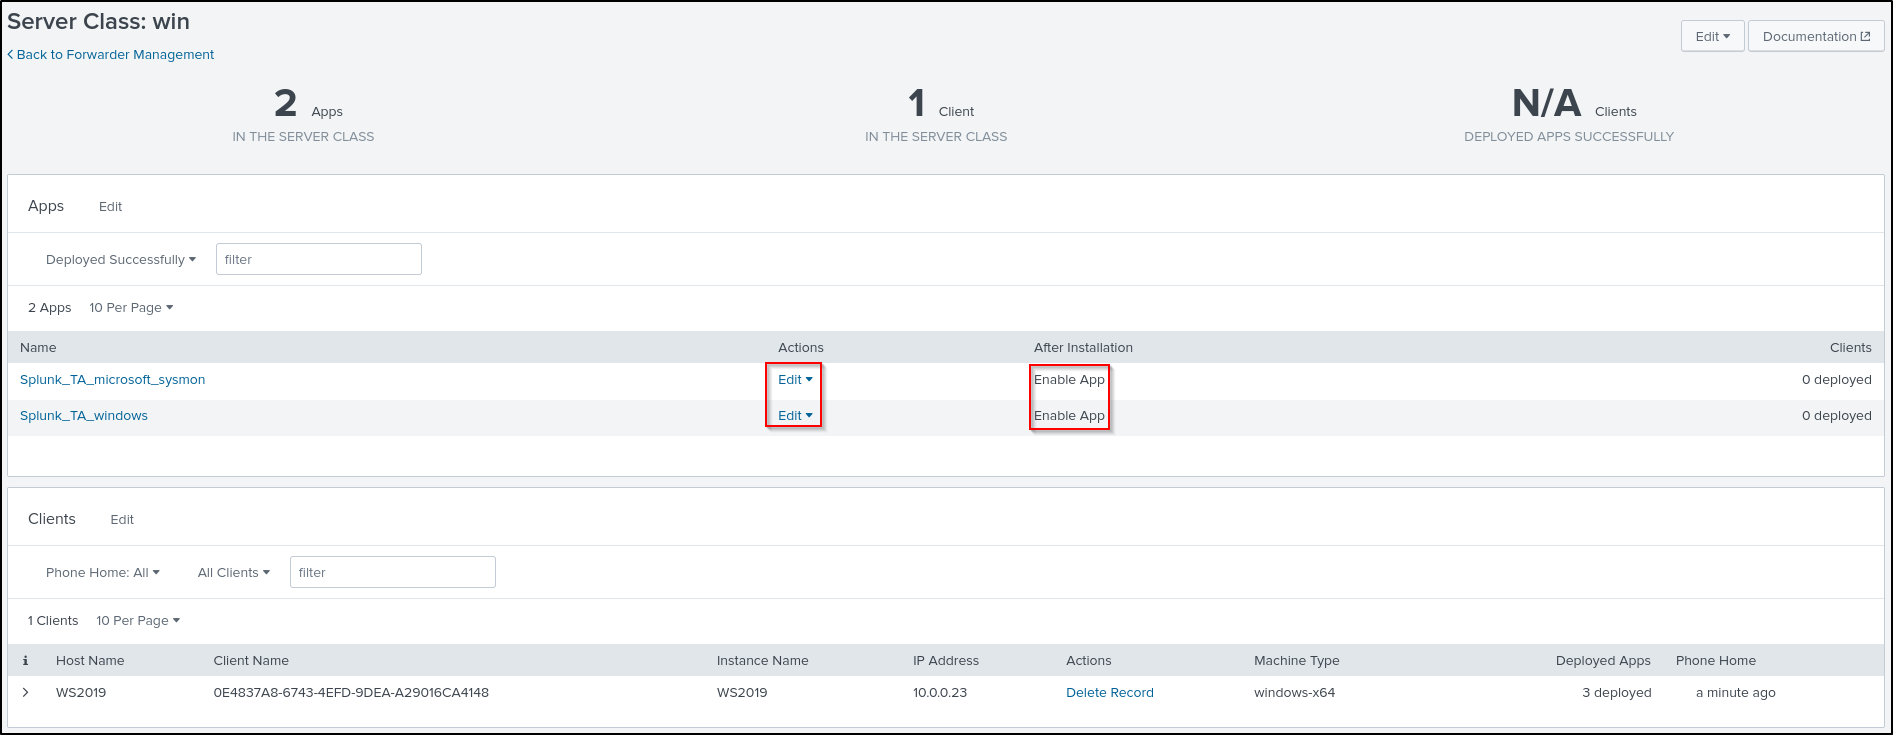

Verify the configuration in the Forwarder Management.
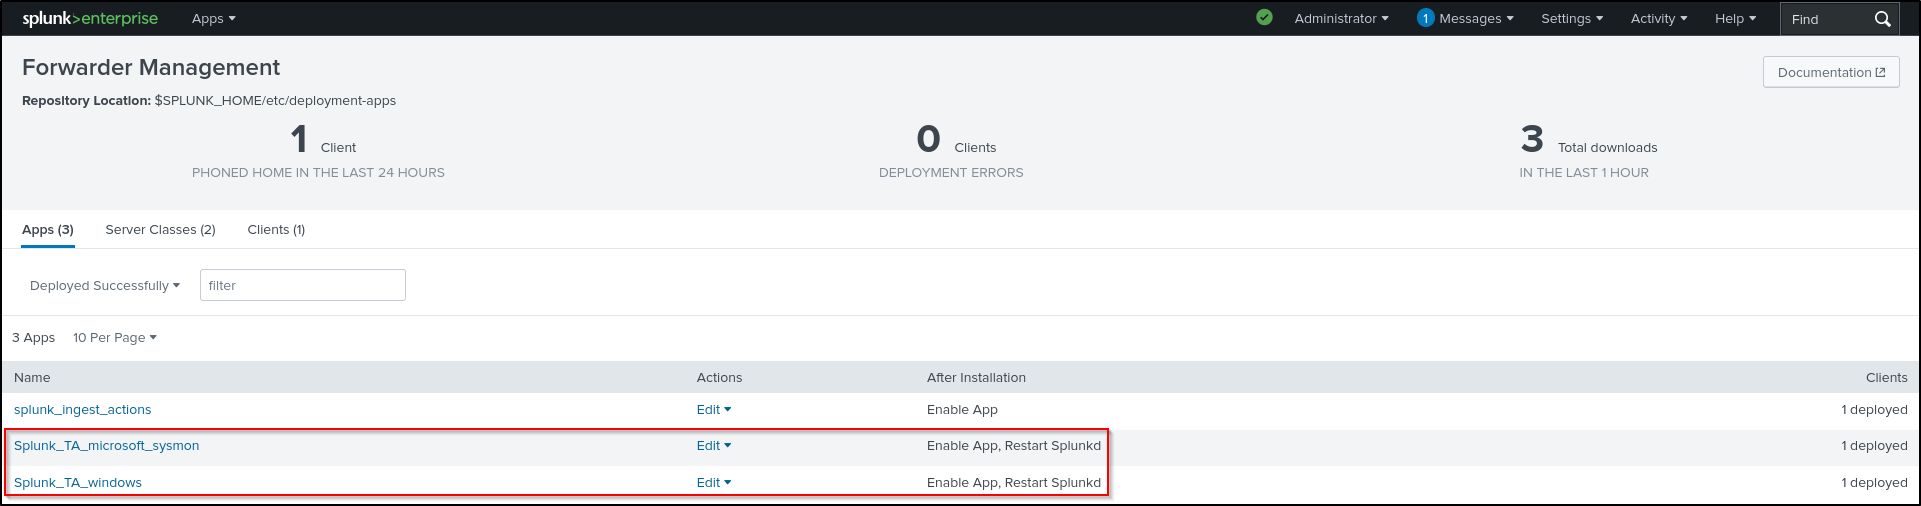
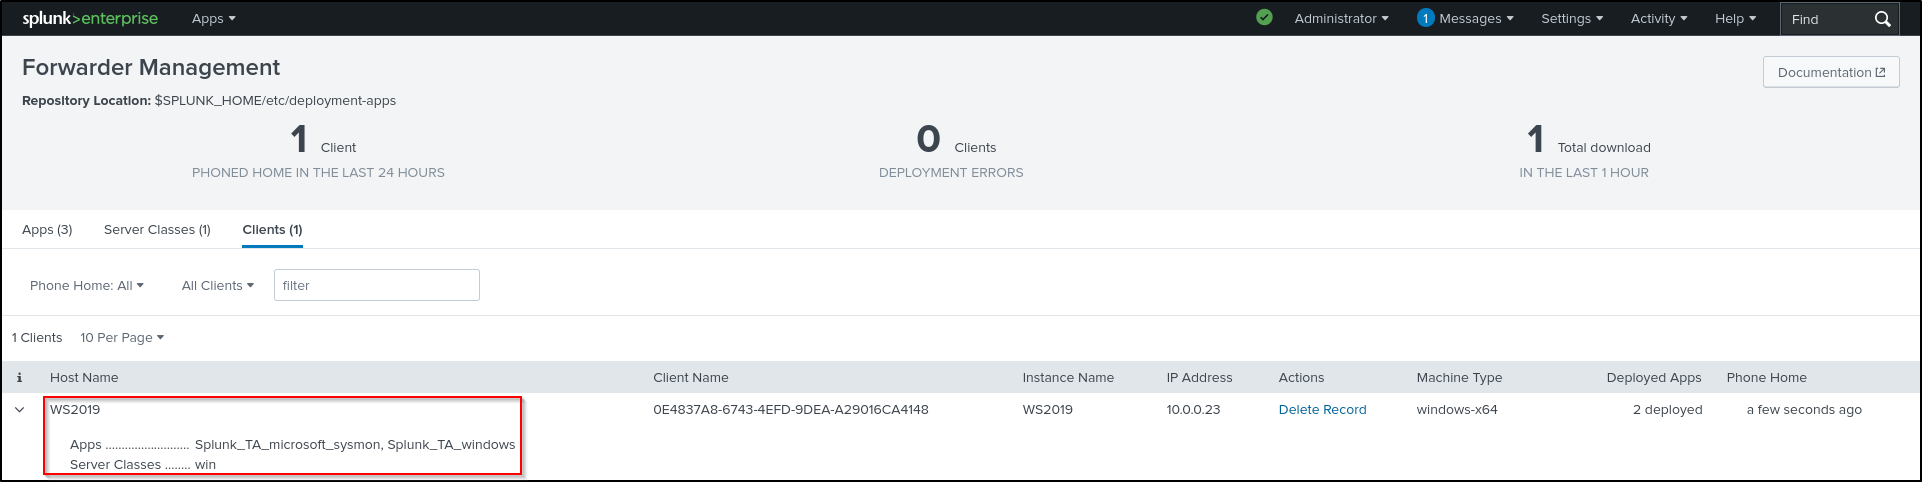
If the configuration is not applied, try reloading the deployment-server
Verify that /opt/splunk/etc/system/local/serverclass.conf aligns with our configuration so far
Editing Config Files for Windows App
On the Splunk VM where Splunk Enterprise is installed, change into opt/splunk/etc/deployment-apps/Splunk_TA_windows/local directory
Copy app.conf and inputs.conf from the /opt/splunk/etc/deployment-apps/Splunk_TA_windows/default directory.
cd /opt/splunk/etc/deployment-apps/Splunk_TA_windows/local
cp /opt/splunk/etc/deployment-apps/Splunk_TA_windows/default/app.conf .
cp /opt/splunk/etc/deployment-apps/Splunk_TA_windows/default/inputs.conf .
Make the following changes to inputs.conf
[default]
index = wineventlog

###### OS Logs ######
[WinEventLog://Application]
disabled = 0
start_from = oldest
current_only = 0
checkpointInterval = 5
renderXml=false

[WinEventLog://Security]
disabled = 0
start_from = oldest
current_only = 0
evt_resolve_ad_obj = 1
checkpointInterval = 5
blacklist1 = EventCode="4662" Message="Object Type:(?!\s*groupPolicyContainer)"
blacklist2 = EventCode="566" Message="Object Type:(?!\s*groupPolicyContainer)"
renderXml=false

[WinEventLog://System]
disabled = 0
start_from = oldest
current_only = 0
checkpointInterval = 5
renderXml=false
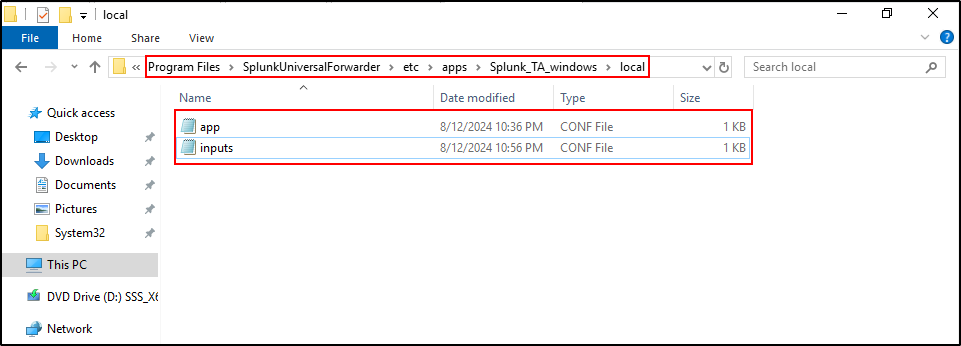
On WS2019 host where Splunk Universal Forwarder is configured, navigate to C:\Program Files\SplunkUniversalForwarder\etc\apps\Splunk_TA_windows\local . Copy app.conf and inputs.conf from C:\Program Files\SplunkUniversalForwarder\etc\apps\Splunk_TA_windows\default . Edit inputs.conf (same as above). Open the Notepad or Wordpad as administrator and edit the inputs.conf file.
Restart Splunk Universal Forwarder. On PowerShell, change directory into C:\program files\SplunkUniversalForwarder\bin . Run ./splunk restart
#Example output
PS C:\Users\Administrator> cd "C:\program files\SplunkUniversalForwarder\bin"
PS C:\program files\SplunkUniversalForwarder\bin> ./splunk restart
SplunkForwarder: Stopped

Splunk> Another one.

Checking prerequisites...
        Checking mgmt port [8089]: open
        Checking conf files for problems...
        Done
        Checking default conf files for edits...
        Validating installed files against hashes from 'C:\program files\SplunkUniversalForwarder\splunkforwarder-9.3.0-51ccf43db5bd-windows-64-manifest'
        All installed files intact.
        Done
All preliminary checks passed.

Starting splunk server daemon (splunkd)...

SplunkForwarder: Starting (pid 2328)
Done
Verify that data is being forwarded on wineventlog index. On web UI, navigate to Settings > Indexes and refresh the page. Go to Apps > Search & Reporting > Search for index=wineventlog .

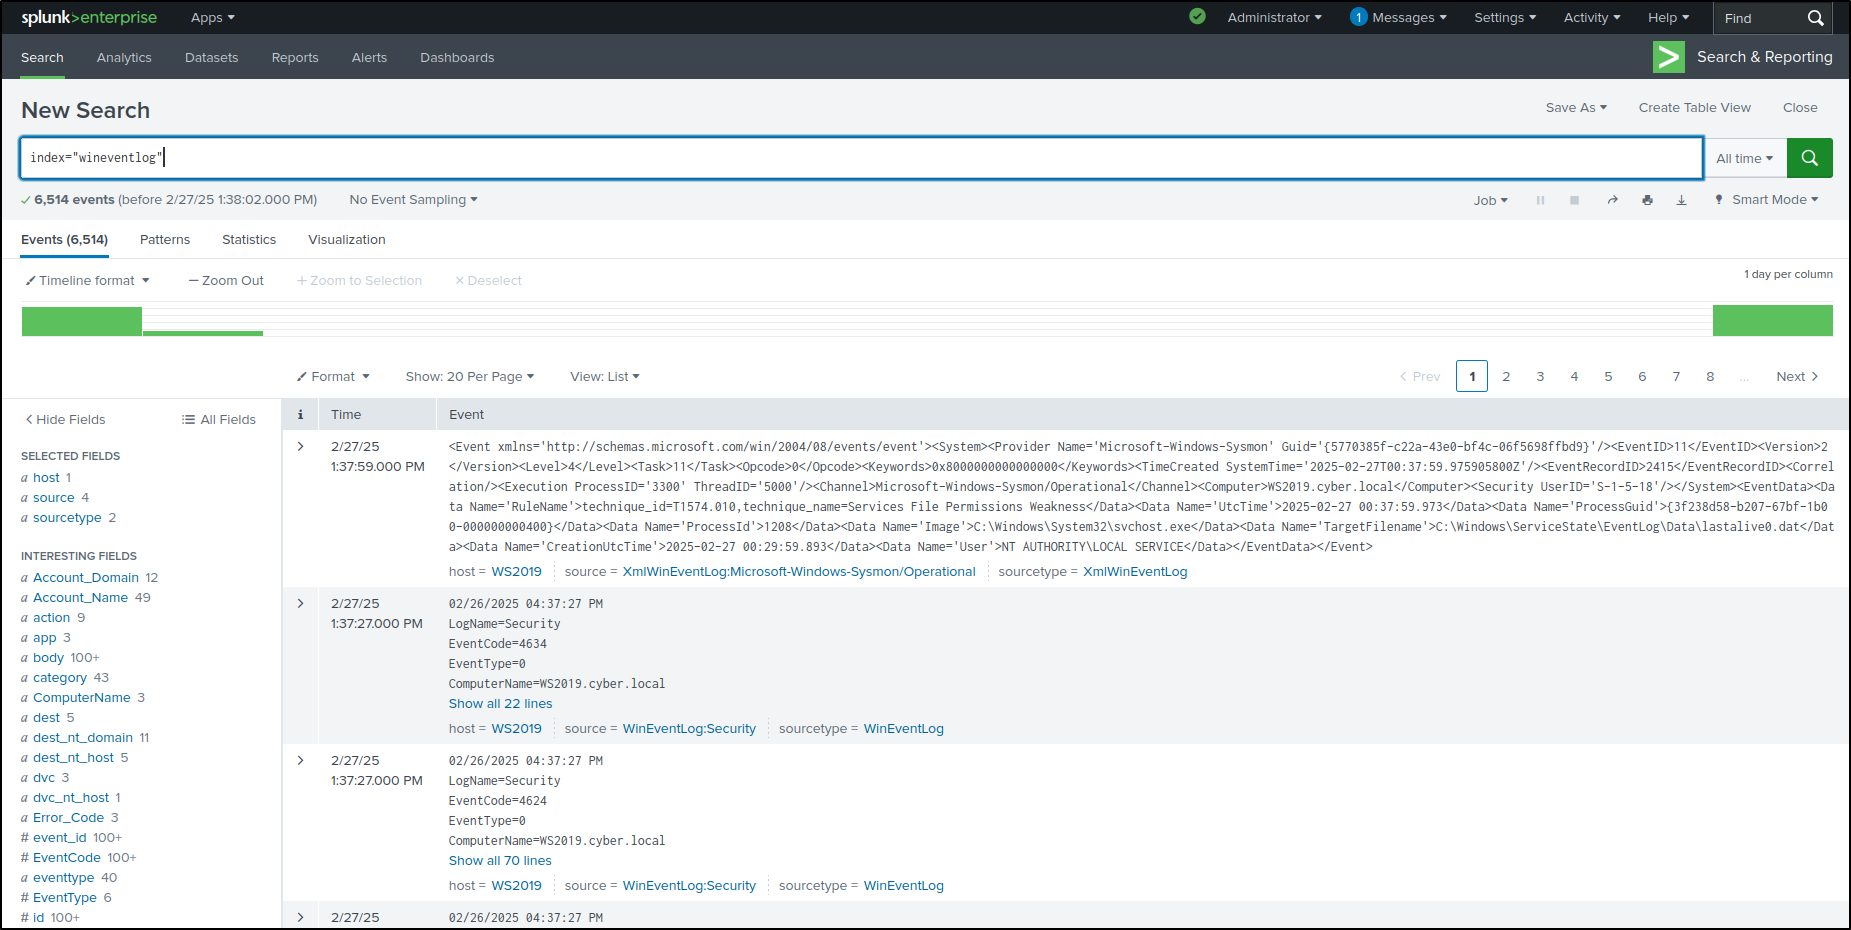
If the logs are not being indexed, try refreshing the web UI.
Editing Config Files for Sysmon App
On the Splunk VM where Splunk Enterprise is installed, change into the /opt/splunk/etc/deployment-apps/Splunk_TA_microsoft_sysmon/local directory. Copy app.conf and inputs.conf from the /opt/splunk/etc/deployment-apps/Splunk_TA_microsoft_sysmon/default directory.
cd /opt/splunk/etc/deployment-apps/Splunk_TA_microsoft_sysmon/local
cp /opt/splunk/etc/deployment-apps/Splunk_TA_microsoft_sysmon/default/app.conf .
cp /opt/splunk/etc/deployment-apps/Splunk_TA_microsoft_sysmon/default/inputs.conf .
Make the following changes to inputs.conf . Your index name must match with the index name you created earlier
[default]
index = sysmonlog

[WinEventLog://Microsoft-Windows-Sysmon/Operational]
disabled = false
renderXml = 1
source = XmlWinEventLog:Microsoft-Windows-Sysmon/Operational

[WinEventLog://WEC-Sysmon]
disabled = true
renderXml = 1
source = XmlWinEventLog:Microsoft-Windows-Sysmon/Operational
sourcetype = XmlWinEventLog:WEC-Sysmon
host = WinEventLogForwardHost
On WS2019 host where Splunk Universal Forwarder is configured, navigate to
C:\Program Files\SplunkUniversalForwarder\etc\apps\Splunk_TA_microsoft_sysmon\local . Copy app.conf and inputs.conf from C:\Program Files\SplunkUniversalForwarder\etc\apps\Splunk_TA_microsoft_sysmon\default . Edit inputs.conf (same as above)
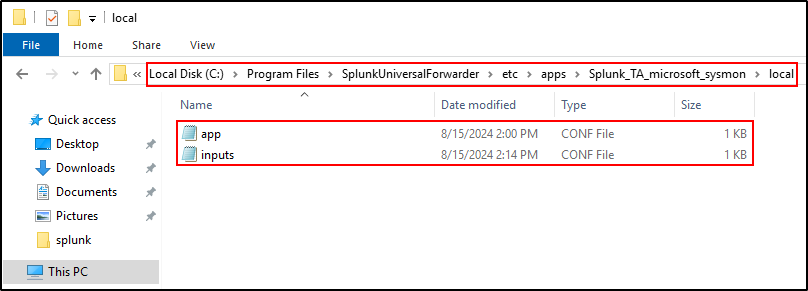
Restart Splunk Universal Forwarder. On PowerShell, change directory into C:\program files\SplunkUniversalForwarder\bin . Run ./splunk restart .
#Example output
PS C:\program files\SplunkUniversalForwarder\bin> ./splunk restart
SplunkForwarder: Stopped

Splunk> Another one.

Checking prerequisites...
        Checking mgmt port [8089]: open
        Checking conf files for problems...
        Done
        Checking default conf files for edits...
        Validating installed files against hashes from 'C:\program files\SplunkUniversalForwarder\splunkforwarder-9.3.0-51ccf43db5bd-windows-64-manifest'
        All installed files intact.
        Done
All preliminary checks passed.

Starting splunk server daemon (splunkd)...

SplunkForwarder: Starting (pid 4824)
Done

PS C:\program files\SplunkUniversalForwarder\bin>
Verify that Sysmon logs are being indexed.

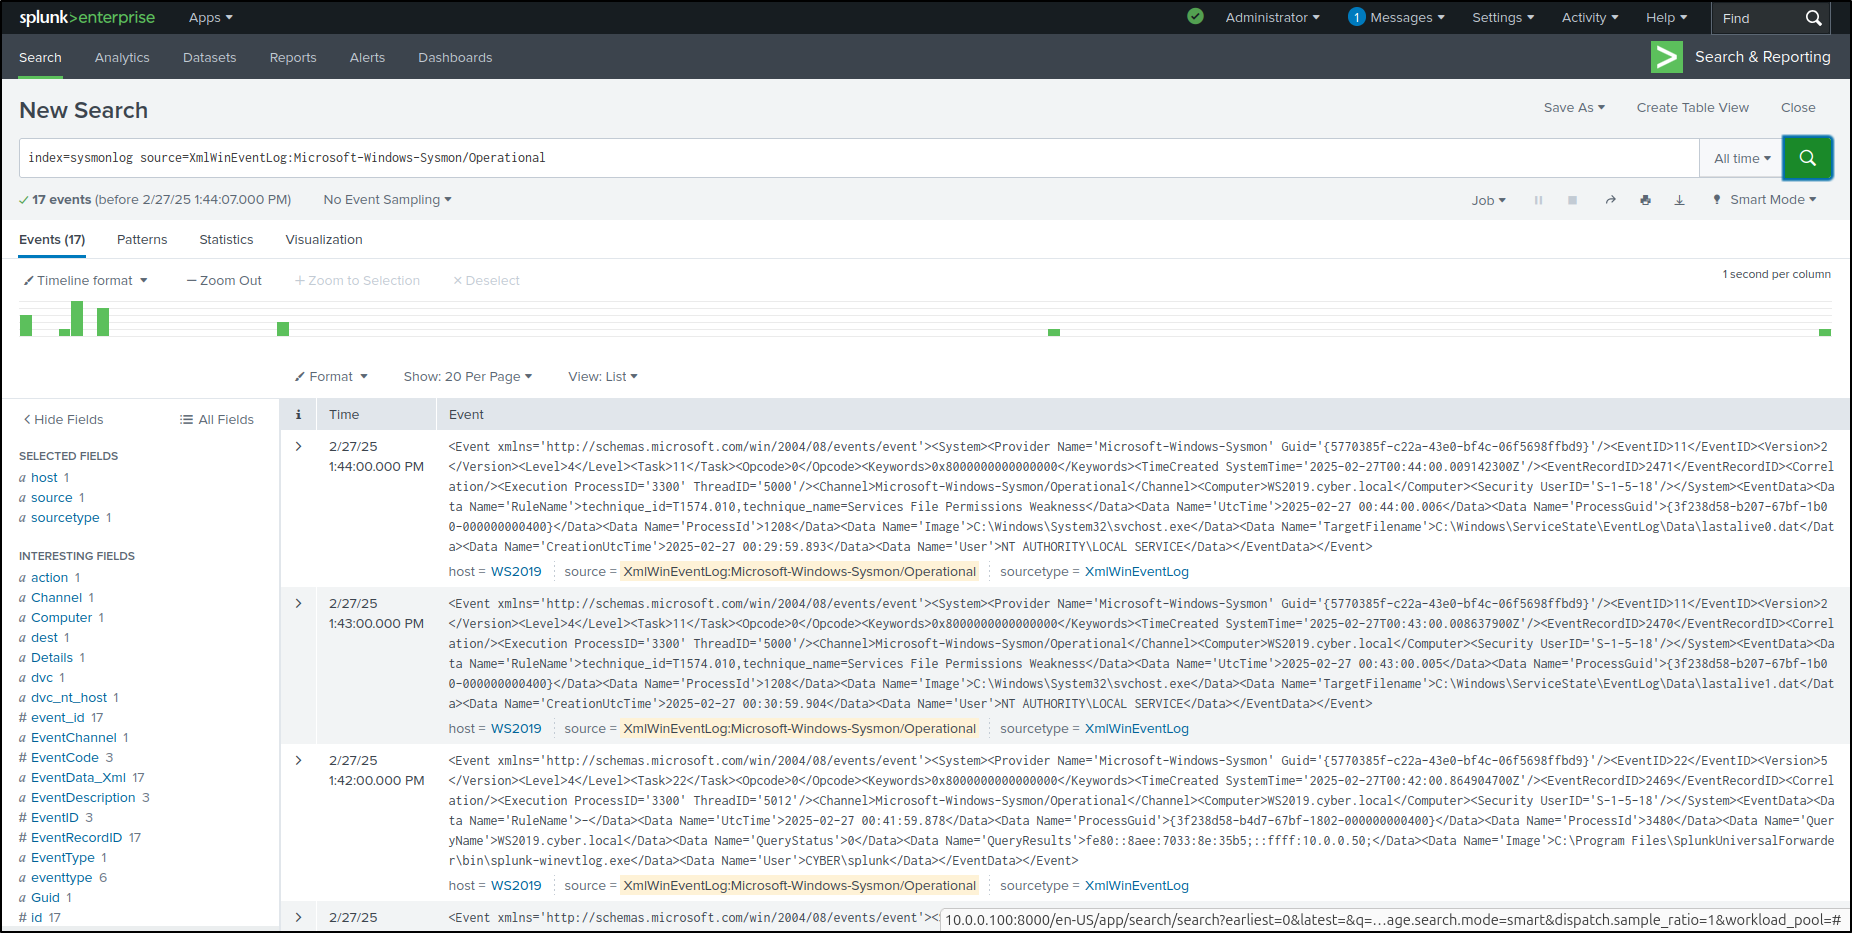
Search for index=sysmonlog source=XmlWinEventLog:Microsoft-Windows-Sysmon/Operational