Install and Configure TheHive
Prepare the offline Ubuntu package, configure each supporting service, and verify TheHive before creating cases. Complete the phases in order and stop whenever a checkpoint fails.
Version-sensitive installation
The commands below document the lab configuration used in this guide. Confirm current vendor requirements and package compatibility before adapting them to a new environment.
Check the component combination
This lab records TheHive 5.2.14 with Elasticsearch 8.15.1. Current StrangeBee compatibility guidance lists Elasticsearch 7.2.x–7.17.x for TheHive 5.0.0–5.2.16. Use the official software requirements to choose versions for a new build.
Protect the recovery point
The Cassandra configuration phase removes system keyspace data. Run it only against the intended disposable lab after confirming the VM identity and a working snapshot or backup.
1. Prepare the offline package
Download the dependencies
On an internet-connected Ubuntu machine, make a folder called the hive-package
Download openjdk 11
#wget http://archive.ubuntu.com/ubuntu/pool/main/o/openjdk-lts/openjdk-11-jdk_11.0.24+8-1ubuntu3~22.04_amd64.deb
Add the Cassandra, StrangeBee and Elasticsearch repositories and its GPG keys:
wget -qO - https://downloads.apache.org/cassandra/KEYS | sudo gpg --dearmor  -o /usr/share/keyrings/cassandra-archive.gpg
echo "deb [signed-by=/usr/share/keyrings/cassandra-archive.gpg] https://debian.cassandra.apache.org 40x main" | sudo tee -a /etc/apt/sources.list.d/cassandra.sources.list
wget -O- https://archives.strangebee.com/keys/strangebee.gpg | sudo gpg --dearmor -o /usr/share/keyrings/strangebee-archive-keyring.gpg
echo 'deb [signed-by=/usr/share/keyrings/strangebee-archive-keyring.gpg] https://deb.strangebee.com thehive-5.2 main' | sudo tee -a /etc/apt/sources.list.d/strangebee.list
wget -qO - https://artifacts.elastic.co/GPG-KEY-elasticsearch |  sudo gpg --dearmor -o /usr/share/keyrings/elasticsearch-keyring.gpg
sudo apt-get install apt-transport-https
echo "deb [signed-by=/usr/share/keyrings/elasticsearch-keyring.gpg] https://artifacts.elastic.co/packages/8.x/apt stable main" |  sudo tee /etc/apt/sources.list.d/elastic-8.x.list
Update and download the required packages without installing:
This will download all packages into the cache /var/cache/apt/archives/
sudo apt update
sudo apt-get install -y --download-only cassandra
sudo apt-get install -y --download-only thehive
sudo apt-get install -y --download-only elasticsearch
Run the following command to copy the required files and dependencies to the hive-package
cd /var/cache/apt/archives
cp openjdk-11-jre-headless_11.0.24+8-1ubuntu3~22.04_amd64.deb cassandra_4.0.13_all.deb java-common_0.72build2_all.deb ca-certificates-java_20190909ubuntu1.2_all.deb thehive_5.2.14-1_all.deb elasticsearch_8.15.1_amd64.deb ~/hive-package/
Compress the hive-package directory
hive-package.tar.gz exists and contains the downloaded .deb packages.2. Transfer and install the packages
Transfer and extract the hive-package on the air-gapped machine
Install the deb packages
3. Configure Cassandra
/etc/cassandra/cassandra.yamlEdit /etc/cassandra/cassandra.yaml
Leave cluster names as ‘Test Cluster’
Change the listen_address, rpc_address and the seeds to your IP address
cluster_name: 'Test Cluster'
...
listen_address: 10.0.0.40
...
rpc_address: 10.0.0.40
...
seed_provider:
    # Addresses of hosts that are deemed contact points.
    # Cassandra nodes use this list of hosts to find each other and learn
    # the topology of the ring.  You must change this if you are running
    # multiple nodes!
    - class_name: org.apache.cassandra.locator.SimpleSeedProvider
      parameters:
          # seeds is actually a comma-delimited list of addresses.
          # Ex: "<ip1>,<ip2>,<ip3>"
          - seeds: "10.0.0.40:7000"
Stop cassandra, remove the system keyspace data and then start cassandra. \
Verify that cassandra service is active and running.
systemctl stop cassandra
rm -rf /var/lib/cassandra/data/system/*
systemctl start cassandra.service
systemctl status cassandra.service
cassandra.service reports active and the configured listen, RPC, and seed addresses match the lab VM.
4. Configure Elasticsearch
/etc/elasticsearch/elasticsearch.ymlEdit /etc/elasticsearch/elasticsearch.yml
Uncomment the cluster name and change it to thehive
Uncomment the node name and leave it as node-1
Uncomment the network host and change it to your IP address
Uncomment the HTTP port and set it to 9200
Uncomment the cluster initial master nodes and remove node-2
Comment the cluster initial master nodes “hive”
cluster.name: thehive
...
node.name: node-1
...
network.host: 10.0.0.40
...
http.port: 9200
...
cluster.initial_master_nodes: ["node-1"]
...
# Enable security features
xpack.security.enabled: false
xpack.security.enrollment.enabled: false
...
#cluster.initial_master_nodes: ["hive"]
Start and enable elasticsearch. Verify elasticsearch service is active and running.
elasticsearch.service reports active and the node is listening on the configured address and TCP port 9200.
5. Configure TheHive
/etc/thehive/application.confChange the ownership of the /opt/thp directory to thehive user and group.
Verify the ownership
chown -R thehive:thehive /opt/thp

ls -la /opt/thp
total 12
drwxr-xr-x 3 thehive thehive 4096 Sep  7 17:12 .
drwxr-xr-x 4 root    root    4096 Sep  7 17:12 ..
drwxr-xr-x 5 thehive thehive 4096 Sep  7 17:12 thehive
Edit /etc/thehive/application.conf
Change the host name and application baseURL to your IP address
Make sure cluster-name matches with the cluster name defined in cassandra.yaml
To ensure TheHive is listening on the correct IP address and port, add the following lines under the service configuration:
db.janusgraph {
  storage {
    backend = cql
    hostname = ["10.0.0.40"]
    # Cassandra authentication (if configured)
    # username = "thehive"
    # password = "password"
    cql {
      cluster-name = "Test Cluster"
      keyspace = thehive
    }
  }
  index.search {
    backend = elasticsearch
    hostname = ["10.0.0.40"]
    index-name = thehive
  }
}
...
# Service configuration
application.baseUrl = "http://10.0.0.40:9000"
play.http.context = "/"
play {
  http {
    address = "0.0.0.0"  # Listen on all interfaces or set to "10.0.0.40" to bind to that IP
    port = 9000
  }
}
Start and enable thehive service. Verify it is active and running.
thehive.service reports active and its configuration points to the Cassandra and Elasticsearch services validated above.
6. Verify and secure access
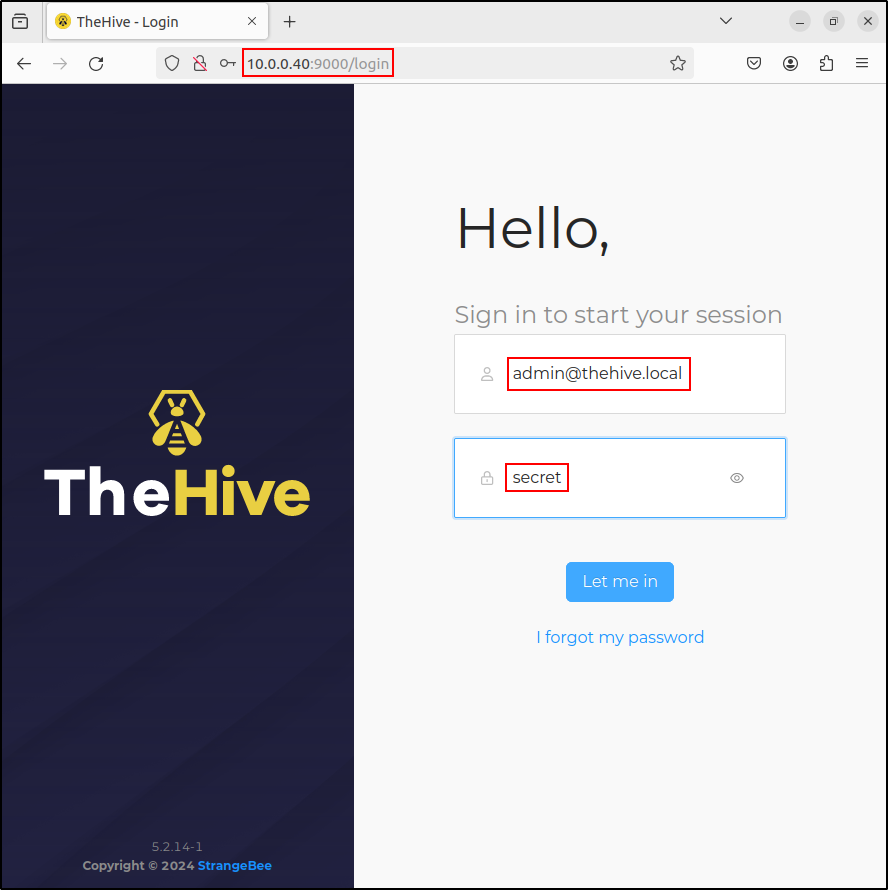
http://10.0.0.40:9000Navigate to the TheHive dashboard at http://10.0.0.40:9000.
Login using default credentials admin@hive.local (password: secret)
Replace default access immediately
The username can differ between package versions; the screenshot shows admin@thehive.local. After the first successful login, change the default password and create a named administrator account before continuing.
Confirm that you can sign in, open the cases view, and create a temporary training case. Remove the temporary case after verification.